Computers / KVM Switches
User Manual for SIIG 04-1366B KVM Switch
Quick guide for the SIIG 04-1366B KVM Switch. Learn how to connect your PCs, use the remote control, configure hotkeys, and troubleshoot common setup issues.
Table of contents
Manual images
Click an image to enlargeQuick guide from the manual
The SIIG 04-1366B is a 2x1 or 4x1 DisplayPort 4K KVM USB 3.0 Switch with remote control. This device allows you to control multiple computers using a single set of keyboard, mouse, and monitor. It supports DisplayPort 1.4/1.2, HDR, and EDID bypass. Switching between computers can be done via the front panel buttons, the included IR remote, or keyboard hotkeys.
Features
- Supports DisplayPort 1.4 & 1.2 video output.
- Supports HDR and Display EDID bypass.
- Includes two USB 2.0 ports for wired mouse and keyboard.
- Includes two USB 3.0 5Gbps ports (5V/900mA) for peripherals.
- Supports 3.5mm microphone and speaker extension.
- Plug-and-play functionality; no driver installation required.
- Compatible with Windows and Mac systems.
Device Layout
Front Panel: Features the Power button, Power indicator, Input Selection buttons (with Link/Select lights), IR Extender port, IR receiver, and console audio/USB ports.

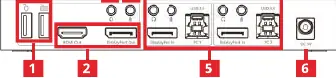
Rear Panel: Contains the console keyboard/mouse ports, video output (HDMI or DisplayPort), console audio ports, PC input ports (Mic, Speaker, USB-B, DisplayPort), and the DC 5V/3A power jack.
Operation and Control
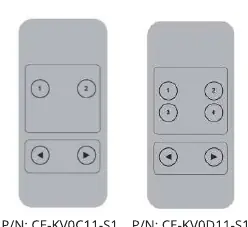
Remote Control: Use the numbered buttons (1-4) to switch to a specific PC. Use the arrow buttons to switch to the previous or next PC.
Mouse Traversal: To switch ports automatically, place the mouse on the far right side of the display and continue to slide to the right for 2 seconds. The unit will cycle through ports in order: PC1 to PC2 to PC3 to PC4 to PC1.
Hotkey Commands: Use the Scroll Lock key to trigger commands:
- Switch to next port: [Scroll Lock] + [Scroll Lock] + [Right Arrow or Down Arrow]
- Switch to previous port: [Scroll Lock] + [Scroll Lock] + [Left Arrow or Up Arrow]
- Switch to PC N: [Scroll Lock] + [Scroll Lock] + [N] (where N is 1 or 2)
- Auto-switch mode: [Scroll Lock] + [Scroll Lock] + [S] (Default: 15 seconds)
- Set auto-switch interval: [Scroll Lock] + [Scroll Lock] + [I] + [Number] + [Enter] (10-999 seconds)
- Buzzer on/off: [Scroll Lock] + [Scroll Lock] + [B] + [1/0]
- Reset to default: [Scroll Lock] + [Scroll Lock] + [F] + [L] + [A] + [S] + [H] + [Enter]
Application and Setup
Ensure all devices are powered off before connecting. Connect the power adapter to the DC jack. Connect your PCs to the KVM using the provided USB 3.0 Type-A to B cables. Connect your monitor to the HDMI or DisplayPort output. Connect your wired keyboard and mouse to the dedicated console ports on the rear panel. Note that hotkey functions only work when the keyboard is connected to the dedicated USB-A ports on the rear panel.

Support
For further technical support, visit http://www.siig.com/support.
Official resources from the manual
Manufacturer information
SIIG, Inc.
Practical help
Common problems
Hotkey commands are not working
Ensure the keyboard is connected to the dedicated USB-A ports on the rear panel, not the USB 3.0 hub ports.
Mouse traversal switching is not working
Ensure the mouse is moved to the far right edge of the display and held there for 2 seconds to trigger the switch.
Auto-switch mode is too fast or slow
Use the hotkey command [Scroll Lock] + [Scroll Lock] + [I] + [Number] + [Enter] to set the interval between 10 and 999 seconds.
Before use
- Connect the power adapter to the DC 5V/3A jack.
- Connect PCs to the KVM using the provided USB 3.0 Type-A to B cables.
- Connect the monitor to either the HDMI or DisplayPort output (not both simultaneously).
- Connect wired keyboard and mouse to the rear console ports.
- Ensure all devices are powered off before making connections.
Specs in practice
- USB 3.0 Ports
- Provides 5Gbps data transfer speed and 5V/900mA power for peripherals.
- Video Output
- Supports HDMI 2.0 & DP 1.2 up to 4K@60Hz, or DP 1.4 up to 8K@30Hz.
- Auto-switch Default
- The automatic switching interval is set to 15 seconds by default.
Images and diagrams
- Front Panel: Shows power button, input selection, and console ports.
- Rear Panel: Shows PC input ports, console output ports, and power jack.
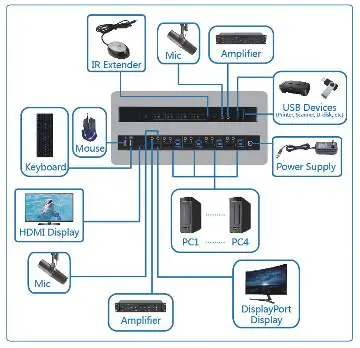
- Application Diagram: Illustrates the connection path between PCs, KVM, monitor, and peripherals.
Model compatibility
- Supports Windows and Mac systems.
- Console keyboard/mouse ports are for wired devices only.
- HDMI and DisplayPort outputs cannot be used simultaneously.

Manual page author
Emily Carter
User documentation editor
Prepares concise manual descriptions and highlights the most useful setup, operation, and maintenance information for readers.