Tools / Drills
User Manual for Ronix 2214 Electric Drill
Quick guide for the Ronix 2214 Electric Drill. Includes setup, operation, safety instructions, maintenance, and technical specifications.
Table of contents
Manual images
Click an image to enlargeQuick Guide
This manual provides essential instructions for the Ronix 2214 Electric Drill. Key operations include installing drill bits, adjusting the side handle and depth gauge, and selecting the action mode (hammer or drill). Always ensure the tool is unplugged before performing any maintenance or changing accessories.
Part List
The drill features the following components:
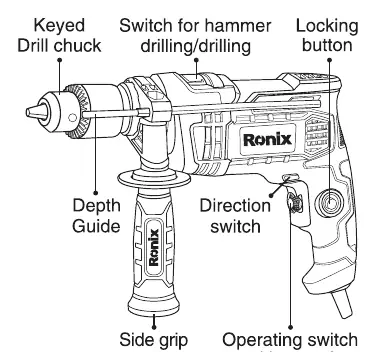
- Keyed drill chuck
- Depth guide
- Side grip
- Switch for hammer drilling/drilling
- Locking button
- Direction switch
- Operating switch with speed regulator wheel
Safety Warnings
General Power Tool Safety: Keep the work area clean and well-lit. Do not operate in explosive atmospheres. Keep children and bystanders away.
Electric Safety: Ensure the plug matches the outlet. Do not modify the plug. Avoid body contact with earthed surfaces. Do not expose the tool to rain or wet conditions. Use an RCD-protected supply if operating in damp locations.
Personal Safety: Stay alert and use common sense. Wear personal protective equipment, including eye protection. Prevent unintentional starting by ensuring the switch is off before connecting to power.
Installing and Removing the Bit
Always ensure the tool is switched off and unplugged before installing or removing the bit.
- To install: Place the bit in the chuck as far as it will go. Tighten the chuck by hand. Use the chuck key in each of the three holes and tighten clockwise. Ensure all three holes are tightened evenly.
- To remove: Turn the chuck key counterclockwise in one hole, then loosen the chuck by hand.
- After use, return the chuck key to its original position.
Side Handle
The tool is equipped with a side grip. To adjust, loosen the side grip by turning it counterclockwise, swing it to the desired position, and tighten it by turning clockwise.
Depth Gauge
The depth gauge is used for drilling holes of uniform depth. Insert the gauge into the hole in the grip base, adjust to the desired depth, and tighten the clamp screw to secure it.
Switch Action
To start the tool, pull the switch trigger. Increase pressure on the trigger to increase speed. Release the trigger to stop. For continuous operation, pull the switch trigger and push in the lock button. To stop from the locked position, pull the switch trigger fully and release.
Select the Action Mode
The tool has an action mode change lever:
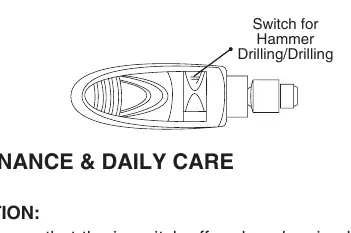
- Rotation with hammering: Slide the lever to the right (hammer symbol).
- Rotation only: Slide the lever to the left (drill symbol).
Maintenance & Daily Care
Always ensure the tool is switched off and unplugged before inspection or maintenance.
- Keep the tool and air vents clean.
- Periodically check all screws for looseness.
- Check the cord insulation for damage.
- After replacing carbon brushes, run the tool with no load for about 10 minutes.
- Repairs and carbon brush replacement should be performed by a Ronix Service after-sales center.
Specifications
- Model: 2214
- Rated power: 750W
- Rated voltage: 220-240V
- Frequency: 50-60Hz
- Action mode: Impact Drill
- Chuck size: 13mm (Keyed)
- Max Impact Rate: 48000 BPM
- No load speed: 0-2800rpm
- Drilling capacity: Wood 25mm, Steel 13mm, Concrete 13mm
- Net weight: 2Kg
Manufacturer information
Ronix Tools
Practical help
Common problems
Tool not starting
Check power supply, ensure the switch is functioning, and verify the cord is not damaged.
Bit slipping
Ensure the chuck is tightened evenly using all three holes with the chuck key.
Overheating
Ensure air vents are clean and not obstructed by dust or debris.
Before use
- Check that the switch is in the off position before plugging in.
- Ensure the drill bit is securely tightened in the chuck.
- Verify the side grip is securely attached and positioned.
- Check the action mode lever is set to the desired mode (drill or hammer).
- Wear appropriate personal protective equipment (eye protection, ear protection).
Specs in practice
- Rated power (750W)
- Indicates the motor power suitable for drilling tasks.
- Chuck size (13mm)
- The maximum diameter of the drill bit shank the chuck can hold.
- Max Impact Rate (48000 BPM)
- Beats per minute; higher values indicate faster drilling in concrete.
- No load speed (0-2800rpm)
- Variable speed range for different materials.
Images and diagrams
- Part List: Identifies the drill chuck, depth guide, side grip, switch trigger, lock button, and direction switch.
- Action Mode: Illustrates the lever position for switching between hammer drilling and standard drilling.
Model compatibility
- Drilling capacity: Wood 25mm, Steel 13mm, Concrete 13mm.

Manual page author
Michael Turner
Technical manual editor
Reviews PDF manuals for structure, safety notes, and practical product details so readers can find the right information quickly.