Tools / Drills
User Manual for Ronix 2220 Impact Drill
Quick guide for the Ronix 2220 Impact Drill. Learn how to operate the drill, adjust the bit stop, install the handle, and maintain the tool for optimal performance.
Table of contents
Manual images
Click an image to enlargeQuick guide from the manual
The Ronix 2220 is a 1050W impact drill designed for drilling into wood, steel, and masonry. Before using the tool, ensure the mains voltage matches the tool's specifications. Always wear appropriate personal protective equipment, including eye and ear protection. When working in damp locations, use a power supply protected by a residual current device (RCD).
Product Overview
The drill features several key controls:
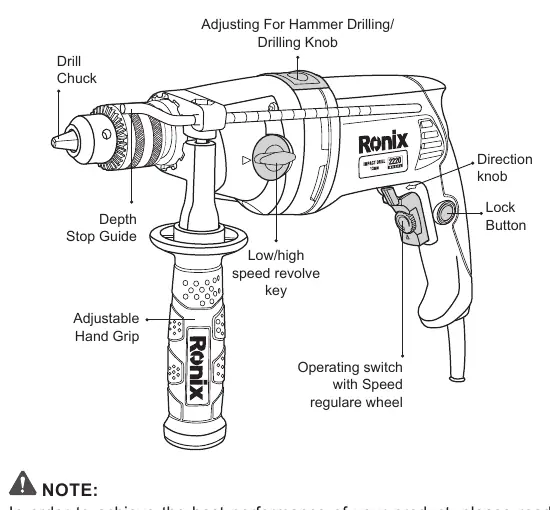
- Drill Chuck: Holds the drill bit.
- Adjusting For Hammer Drilling/Drilling Knob: Switches between rotary drilling and hammer drilling modes.
- Operating switch with Speed regulare wheel: Controls the drill speed and power.
- Direction switch: Changes the rotation direction.
- Lock Button: Enables continuous operation.
- Adjustable Hand Grip: Provides additional stability.
- Depth Stop Guide: Allows for accurate drilling depth.
Preparation
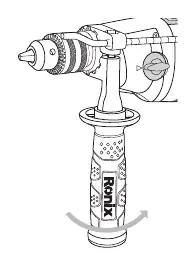
Inserting the Second Handle
To attach the auxiliary handle, rotate the lower part anti-clockwise to loosen it. Slide the handle over the drill chuck onto the flange behind it. Position the handle comfortably and tighten it by rotating the lower part clockwise.
Adjusting the Bit Stop
Insert the drill bit. Release the handle and push the bit stop forward until it aligns with the end of the drill bit. Then, pull the bit stop back to set the desired drilling depth.
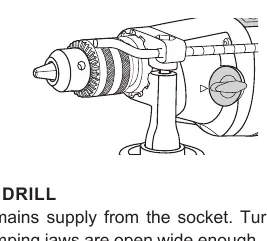
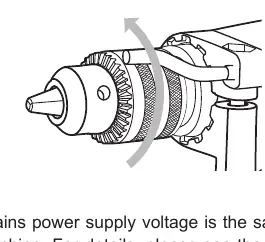
Inserting the Drill Bit
Ensure the tool is disconnected from the power supply. Turn the ring of the drill chuck until the clamping jaws are open wide enough to insert the drill bit. Tighten the chuck securely.
Operation
The machine features two mechanical gear positions:
- Low speed: For drilling larger holes requiring more force.
- High speed: For drilling holes with smaller diameters.
Use the hammer/drilling switch to select the appropriate mode: set to drilling for wood and metal, and hammer drilling for masonry. Use the speed regulator wheel on the operating switch to control the rotation speed. For continuous operation, press the operating switch and then the locking button.
Maintenance and Care
To prevent motor overload, never use excessive force. If the machine becomes too hot, run it without a load for two minutes to cool down. Regularly clean the ventilation slits with a brush or cloth to ensure proper airflow. Always keep the handles dry, clean, and free from oil and grease.
Manufacturer information
Ronix Tools
Practical help
Common problems
Drill bit jammed
Use the direction switch to reverse the rotation and carefully remove the bit.
Motor overheating
Allow the machine to run without a load for two minutes and ensure ventilation slits are not blocked.
Reduced drilling speed/power
Reduce the pressure applied to the tool; excessive force can overload the motor.
Before use
- Ensure the mains voltage matches the operating voltage of the machine.
- Check that the drill bit is the correct size and type for the material.
- Ensure the auxiliary handle is securely attached.
- Verify the hammer/drilling switch is set to the correct mode.
- Check that the direction switch is set to the desired direction.
Specs in practice
- Max Capacity (Masonry)
- Maximum hole diameter of 16mm in masonry.
- No-load Speed
- Variable speed ranges (0-1100RPM / 0-2800RPM) for different materials.
Images and diagrams
- The parts diagram identifies the drill chuck, depth stop, handle, and all control switches.
- The speed regulator wheel on the operating switch allows for precise speed control.
- The hammer/drilling switch is located on top of the tool housing.
Model compatibility
- Use only identical replacement parts for repairs.
- Use an RCD with a rated residual current of 30mA or less in damp locations.

Manual page author
Emily Carter
User documentation editor
Prepares concise manual descriptions and highlights the most useful setup, operation, and maintenance information for readers.