Toys / Toy Robots
Quick Start Guide for Ruko 1601PRO RC Car
Get started with your Ruko 1601PRO RC car. This guide covers battery installation, charging, transmitter setup, driving controls, and troubleshooting tips to ensure optimal performance.
Table of contents
Manual images
Click an image to enlargeQuick Start Guide
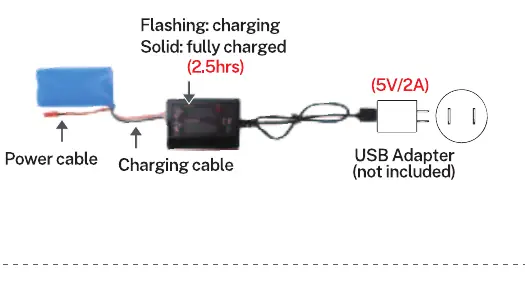
This guide provides essential steps to set up and operate your Ruko 1601PRO RC car. Ensure you have a 5V/2A USB adapter for charging and 4x 1.5V AA batteries for the transmitter, as these are not included.
Battery Setup
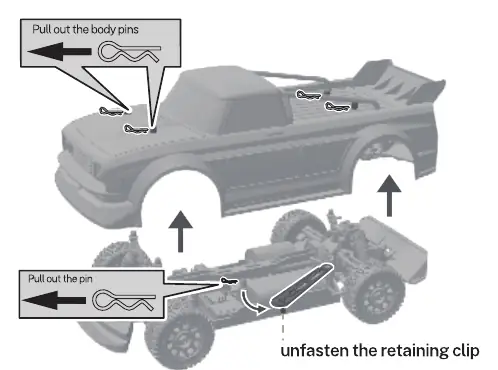
To access the car battery, remove the body pins and lift the car body. Unfasten the retaining clip to remove the battery. To charge, connect the battery to the charging cable and a 5V/2A USB adapter. The light will flash while charging and turn solid when fully charged (approx. 2.5 hours). When installing, ensure the wire connector is fully connected and the battery is secured with the retaining clip.
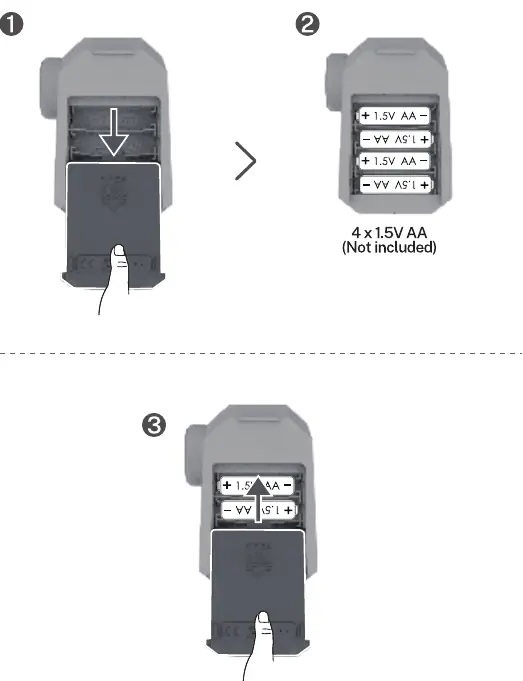
For the transmitter, open the battery compartment and insert 4x 1.5V AA batteries, ensuring correct polarity.
Powering On and Pairing
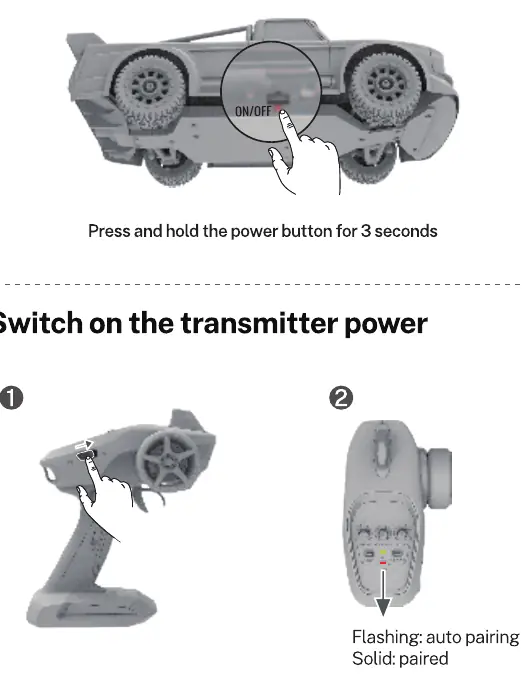
Press and hold the power button on the car for 3 seconds to turn it on. Switch on the transmitter power. The transmitter light will flash during auto-pairing and turn solid once paired successfully.
Driving Controls
Use the throttle trigger on the transmitter to control movement. Pull the trigger to go forward and push it to go backward. Note that when moving forward, the first push on the throttle will stop the car, and the second push will engage reverse. Use the steering wheel to turn left or right. You can switch the control direction using the TH.REV and ST.REV buttons if necessary.

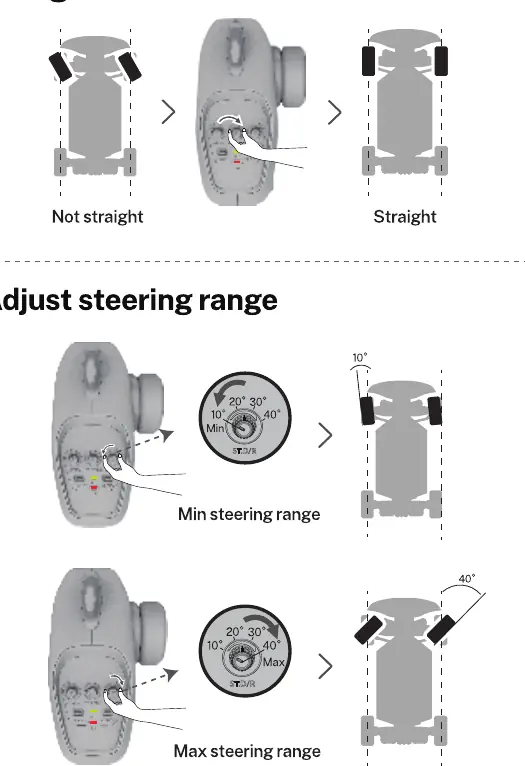
Steering Adjustments
Use the ST.TRIM knob to adjust the front wheels to the center position if the car does not drive straight. Use the ST.D/R knob to adjust the steering range (angle). Use the ESP knob to adjust the gyroscope frequency to help keep the car driving in a straight line based on road conditions.
Troubleshooting
If the car does not work, check if the car or transmitter batteries are low or if there is debris in the wheels. If the car will not pair, restart both the car and the transmitter. If there is an operation delay, ensure the battery clip is fastened securely and avoid obstacles or interference. For further assistance, search for '1601 Pro Quick Start' on YouTube.
Support
For technical support, you can contact Ruko via email at [email protected] or by phone at +1 (626)-215-4337 (available from 6 pm to 3 pm PDT).
Official resources from the manual
Manufacturer information
Ruko
Practical help
Common problems
Remote control car doesn't work
Check if the car battery or transmitter batteries are low. Remove any debris from the wheels or transmission shaft.
Car will not pair with the transmitter
Restart both the car and the transmitter to clear signal interference.
Car doesn't drive straight
Use the ST.TRIM knob to center the wheels or the ESP knob to adjust gyroscope frequency.
Steering range is too small
Adjust the steering range using the ST.D/R knob.
Operation delay
Ensure the battery clip is fastened securely and avoid obstacles or signal interference.
Before use
- Charge the car battery for approximately 2.5 hours.
- Install 4x 1.5V AA batteries in the transmitter.
- Ensure the battery connector is fully plugged in.
- Secure the battery with the retaining clip.
- Choose an open and smooth area for operation.
Specs in practice
- TH.REV / ST.REV
- Buttons to reverse the direction of the throttle or steering.
Images and diagrams
- Pull out body pins to remove the car body.
- Connect the wire connector carefully, minding the interface orientation.
- The transmitter light flashes during pairing and stays solid when paired.
Model compatibility
- Requires 4x 1.5V AA batteries for the transmitter (not included).
- Requires a 5V/2A USB adapter for charging (not included).

Manual page author
Emily Carter
User documentation editor
Prepares concise manual descriptions and highlights the most useful setup, operation, and maintenance information for readers.