Toys / RC Models & Drones
User Manual for Eachine Novice-II 1-2S Brushless Micro Drone
Quick guide for the Eachine Novice-II 1-2S Brushless Micro Drone. Learn how to bind the radio, configure flight modes, set up VTX channels, and update firmware.
Table of contents
Manual images
Click an image to enlargeQuick Start Guide
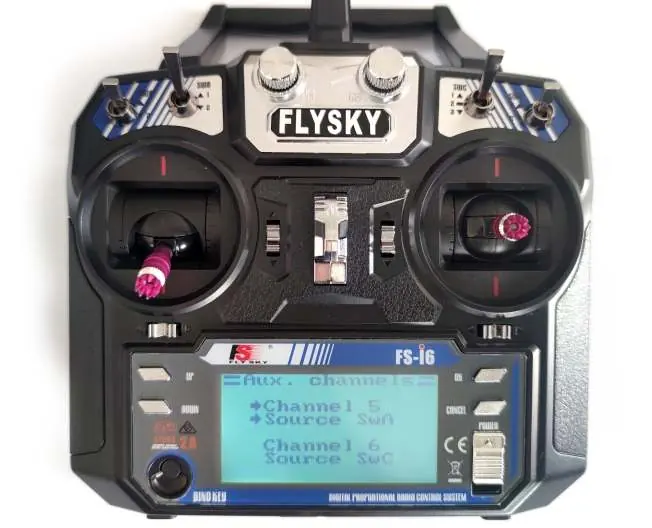
The Eachine Novice-II comes pre-bound to the included radio. To begin flying, power on your radio and goggles. Insert the battery into the drone's tray and plug it in. Place the drone on a stable surface to allow for calibration. Once calibrated, toggle the SWA(AUX1) switch to arm the drone. The goggles will display an "ARMED" notice. It is recommended to use the SWC(AUX2) switch to select Stable mode for beginners.
Specifications
- Wheelbase: 120mm
- Weight: 50g (without battery)
- Dimensions: 100mm x 100mm x 40mm
- Compatibility: 1s-2s Lipo/LIHV
- VTX Power: 25mw-200mw switchable
Flight and Radio Stick Controls
The left stick controls throttle and yaw direction. The right stick controls pitch and roll. Ensure the throttle stick is at the bottom position before powering on the radio to avoid alarms.
Battery Charging
The drone includes a 6-way charger. Connect the battery to the charger. The charger supports 2-6S Lipo input and provides 5V USB output. Do not connect more than one battery to a single port (e.g., do not mix Picoblade 1.25 and PH 2.0 plugs on the same port).

Binding Procedure
If re-binding is required:
- Connect the drone to a computer via USB and open the Betaflight configurator.
- Go to the CLI tab and type "bind_rx_spi".
- Set your transmitter to binding mode (turn on while holding the bind button).
- The LEDs on the flight controller will blink fast, then slowly, indicating a successful bind.
- Exit binding mode on the transmitter and reconnect the drone to the computer. The LEDs should turn solid.
Receiver and VTX Configuration
To configure the receiver, ensure the mode is set to SPI RX Support in the Betaflight Configuration tab and select the appropriate provider (A7105_Flysky_2A for AFHDS-2A or A7105_Flysky for AFHDS). Do not enable Serial RX.
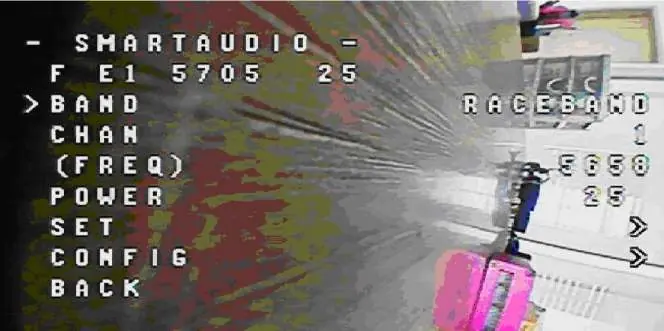
To switch VTX channels:
- Button: Short press to change channel, hold to change band.
- CLI: Use commands set vtx_band, set vtx_channel, and set vtx_freq, then save.
- OSD: Enable Smartaudio for UART2, then use transmitter sticks (THR MID + YAW LEFT + PITCH UP) to enter the OSD menu.
Firmware Updates
To update ESC firmware, use BLHeliSuite. Connect the flight controller to the computer, ensure the COM port number is under 255, and select the SILABS BLHeli Bootloader. The firmware target is "S-H-50". For flight controller firmware, use the Betaflight configurator and the "CrazybeeF4FS" target. Use Zadig tools to replace drivers with WinUSB if necessary.
Manufacturer information
Eachine
Practical help
Common problems
Radio alarm on startup
Ensure the throttle stick is in the bottom position before turning on the radio.
Binding failure
Ensure the transmitter is set to AFHDS 2A Mode and the flight controller is in bind mode via the Betaflight CLI.
VTX channel not saving
Using the physical button to change channels does not save settings after power off. Use the OSD menu or CLI commands to save settings permanently.
Before use
- Charge batteries using the provided 6-way charger.
- Power on the radio and goggles.
- Ensure the throttle stick is at the bottom position.
- Place the drone on a stable surface for calibration.
- Toggle SWA(AUX1) to arm the drone.
Images and diagrams
- Flight controller connection diagram shows wiring for motors, buzzer, and receiver.
- Stick diagrams illustrate throttle, yaw, pitch, and roll controls.
Model compatibility
- Compatible with 1s-2s Lipo/LIHV batteries.
- Default VTX setting is 200mw.

Manual page author
David Miller
Documentation analyst
Organizes user manual content into clear summaries, with attention to model details, product context, and everyday usability.