Tools / Power Tools
User Manual for Ryobi 18V Brushless Impact Driver R18IDBL
Quick guide for the Ryobi 18V Brushless Impact Driver R18IDBL. Learn about mode selection, battery compatibility, maintenance, and safety instructions.
Table of contents
Manual images
Click an image to enlargeQuick guide from the manual
The Ryobi 18V Brushless Impact Driver (R18IDBL) is designed for fastening and removing screws and bolts. It features electronic speed control and a specialized DeckDrive mode for decking applications. Always read the safety warnings before use, wear eye protection, and ensure the tool is disconnected from the power source when not in use or during maintenance.
Know your product
The tool consists of the following key components:
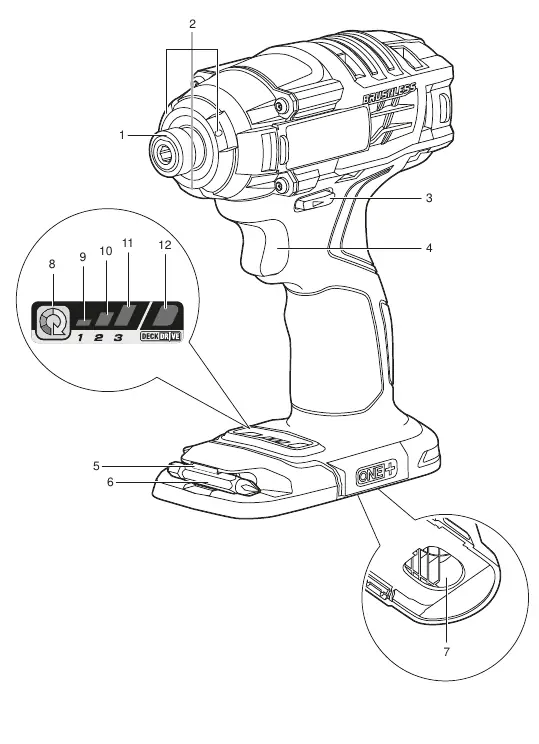
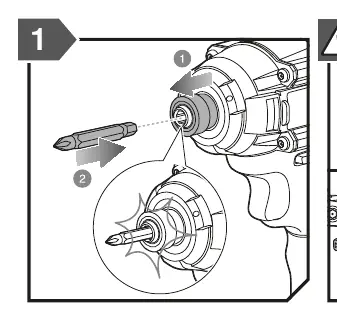
- Coupler: For bit attachment.
- Tri-beam LED: Illuminates the work area.
- Direction of rotation selector: Sets forward or reverse.
- Variable-speed switch trigger: Controls the speed.
- Bit storage: Convenient storage for bits.
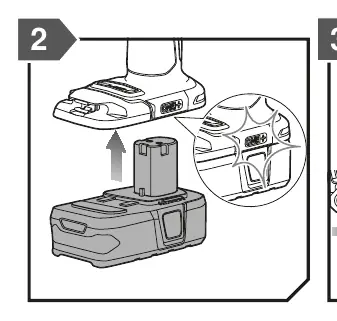
- Battery port: Connection point for the 18V battery pack.
- Mode selection button: Cycles through speed settings.
Mode selection
The product features electronic speed control to suit different applications:
- Speed 1: Best for small screws.
- Speed 2: Provides better control for mid-sized screws.
- Speed 3: Maximum speed and power for large screws.
- DeckDrive mode: Optimized for driving decking screws. It features a soft start-up to catch the thread, accelerates to full speed, and slows down when the screw is almost flush.
Maintenance
To ensure the longevity and safety of your tool:
- Cleaning: Use clean cloths to remove dirt and carbon dust. Avoid using solvents on plastic parts, as they can damage the material.
- Lubrication: All bearings are lubricated for the life of the product under normal conditions; no further lubrication is required.
- Repairs: All repairs should be performed by an authorised service centre using identical replacement parts.
Safety and handling
Always hold the tool by insulated gripping surfaces when working near hidden wiring. Keep the work area clean and well-lit. When transporting lithium batteries, follow local and national regulations, and protect exposed connectors with non-conductive caps or tape.
Manufacturer information
Ryobi
Practical help
Common problems
Tool does not start
Ensure the battery pack is fully charged and correctly inserted into the battery port.
Reduced performance or torque
Check if the battery is low. Ensure the correct speed mode (1, 2, or 3) is selected for the screw size.
Fastener damage
Use a lower speed setting for smaller screws or ensure the correct bit is used.
Before use
- Ensure the battery pack is fully charged.
- Check that the bit is securely inserted into the coupler.
- Verify the direction of rotation selector is set to the desired direction.
- Wear appropriate eye protection and hearing protection.
- Ensure the work area is clear of bystanders.
Specs in practice
- Impacts per minute
- 0 - 3900 IPM, indicating the hammering frequency.
Images and diagrams
- Page 7 provides a detailed diagram of the tool, identifying the coupler, LED, rotation selector, trigger, and mode selection buttons.
- Page 8 illustrates the bit insertion process and how to interpret the mode selection indicators.
Model compatibility
- Compatible with Ryobi 18V Lithium-Ion battery packs (e.g., RB18L13, RB18L15, RB18L20, RB18L25, RB18L26, RB18L40, RB18L50).
- Compatible with Ryobi chargers (e.g., BCS618G, BCL14181H, BCL14183H, BCL1418IV, RC18150U).

Manual page author
Michael Turner
Technical manual editor
Reviews PDF manuals for structure, safety notes, and practical product details so readers can find the right information quickly.