Electronics / Microphones
User Manual for Saramonic Blink ME B2 Wireless Microphone System
Comprehensive user guide for the Saramonic Blink ME B2 wireless microphone system. Learn how to operate the touchscreen, pair devices, manage onboard recording, adjust gain, and troubleshoot common issues.
Quick answers from the manual
Quick answer
- The Saramonic Blink ME B2 is a 2-person wireless microphone system. Power on/off by holding the power button for 3 seconds. Lock/unlock the screen by pressing the power button twice. p. 2, 3, 4
Key actions
- Pairing the devices p. 11
- Charging the transmitter p. 11
First start
- Power on the devices by holding the power button for 3 seconds. p. 2, 3
Problems and fixes
Device freezes
Press and hold the power button for 18 seconds to force the shutdown.
p. 11, 15Maintenance and reset
- To restore factory settings, go to Settings -> Reset. p. 5, 8
Technical specifications
| Parameter | Value | Meaning | Pages |
|---|---|---|---|
| Transmission Type | 2.4GHz digital frequency | Wireless communication band | p. 14 |
| Operating Range | 328' (100m) | Maximum distance without obstacles | p. 14 |
| Memory | 8G | Onboard storage capacity for transmitter | p. 14 |
Where to find it in the PDF
- Transmitter Overview p. 2
- Receiver Overview p. 3
- Specifications p. 14
Table of contents
Manual images
Click an image to enlargeQuick guide from the manual
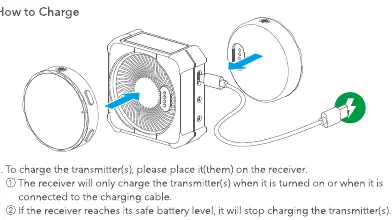
The Saramonic Blink ME B2 is a 2-person wireless microphone system with a touchscreen interface. To power the devices on or off, press and hold the power button for 3 seconds. To lock or unlock the screen, press the power button twice. The system is paired by default; if connection is lost, use the 'Pair' option in the settings menu of both the transmitter and receiver. To charge the transmitters, place them onto the receiver while it is powered on or connected to a power source.
Device Overview
Transmitter: Features a microphone capsule, touchscreen, power button, LED indicator, NR (Noise Reduction) button, contacts, and a magnet for mounting.
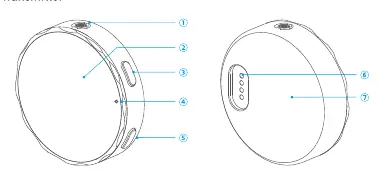
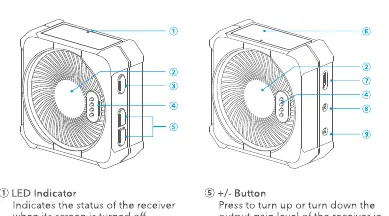
Receiver: Features an LED indicator, magnet, power button, contacts, +/- gain buttons, touchscreen, USB-C port, 3.5mm monitor port, and 3.5mm auto-sensing output.
Touchscreen Operations
The touchscreen allows for intuitive control. Swipe up from the bottom of the home screen to access device settings such as Onboard Recording, Noise Reduction, TX Gain, Brightness, and System Settings (Pairing, Language, Date & Time, Reset, Version, Cert info). Swipe down from the top of the home screen to access quick settings like Power saving, Always on, Auto screen off, Microphone mute/unmute, Onboard recording toggle, and Settings access.
Setup and Usage
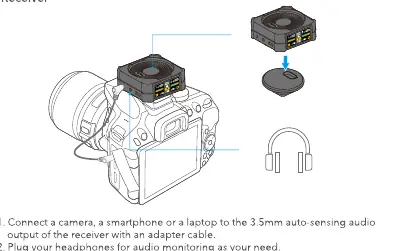
Use the provided magnetic clips or magnets to attach the transmitter to clothing. Connect the receiver to a camera, smartphone, or laptop using the 3.5mm auto-sensing output or USB-C port. You can plug headphones into the 3.5mm monitor port for real-time audio monitoring.
Onboard Recording
The transmitter supports onboard recording. The memory can store up to 22 hours at 48kHz/16bit or 15 hours at 48kHz/24bit. Files are automatically split every 30 minutes. To load files, place the transmitters on the receiver and connect the receiver to a laptop via the USB-C port.
Charging
Place the transmitter(s) on the receiver to charge. The receiver must be turned on or connected to a charging cable for this to work. Use the included USB-A to USB-C cable to charge the receiver when its battery is low.
Troubleshooting
If you encounter issues, check the following: ensure cables are secure, gain/volume are not at minimum, and the transmitter is not muted. If the device freezes, press and hold the power button for 18 seconds to force a shutdown.
Practical help
Common problems
No sound from the unit or when connected to an external device
Check that the connecting cable is not loose, ensure gain and volume are not set to minimum, and verify the transmitter is not muted.
Sound is too low, too loud, or distorted
Adjust the mic gain and volume to a suitable level for the current recording environment.
Device freezes
Press and hold the power button for 18 seconds to force the device to shut down.
Intermittent sound or limited range
Ensure there is no interference between the transmitter and receiver (e.g., obstacles, Wi-Fi antennas).
Before use
- Charge the receiver and transmitters fully.
- Ensure the transmitter is not muted.
- Check that the connecting cable between the receiver and your recording device is secure.
- Verify gain levels are appropriate for your environment.
- Ensure the transmitter and receiver are paired.
Specs in practice
- 2.4GHz Digital Frequency
- The wireless transmission band used for communication between transmitter and receiver.
- 48kHz Sampling Rate
- The audio quality standard for the onboard recording.
- 100m Operating Range
- Maximum distance between transmitter and receiver without obstacles.
- 3.5mm Auto-Sensing Output
- The port automatically detects the device type (camera/smartphone) to provide the correct audio signal.
Images and diagrams
- Transmitter: Shows microphone capsule, touchscreen, power button, and NR button.
- Receiver: Shows gain buttons, touchscreen, USB-C port, and audio output ports.
- Charging: Shows transmitters magnetically attached to the receiver for charging.
- Mounting: Shows magnetic clip usage for attaching the transmitter to clothing.
Model compatibility
- Compatible with cameras, smartphones, and laptops.
- Requires appropriate adapter cables for specific device connections.
- Onboard recording files are saved in WAV format.

Manual page author
Michael Turner
Technical manual editor
Reviews PDF manuals for structure, safety notes, and practical product details so readers can find the right information quickly.