Lighting / Fixtures
User Manual for Saxby 13A Weatherproof Switched Fused Spur Unit
Quick guide for the Saxby 13A Weatherproof Switched Fused Spur Unit. Includes installation steps, wiring diagrams, safety warnings, and technical specifications.
Table of contents
Quick Guide
This document provides essential installation and safety information for the Saxby 13A Weatherproof Switched Fused Spur Unit. Always ensure the mains isolator is switched off before starting any work. The unit is rated IP66, provided the cover is securely closed.
Safety Warnings
- Ensure the mains isolator is switched off at the consumer unit before commencing work. If in doubt, consult a qualified electrician.
- Wiring must be installed in accordance with the latest edition of the IET regulations BS7671.
- The total load on the circuit must not exceed the rating of the circuit cable, fuse, or MCB.
- The product must be earthed.
- Wiring colors: Earth (Green/Yellow), Neutral (Blue), Live (Brown).
Installation Instructions
Preparation: Choose an outdoor location with access to a mains supply. The unit must be mounted on a clean, rigid, vertical flat surface.
Mounting: Remove the front assembly from the back box. Use the back box as a template to mark and drill fixing holes. Note that drilling a drain hole will reduce the IP rating; only drill if necessary at the lowest point of the conduit run.
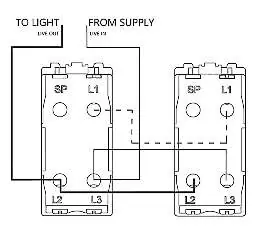
Wiring: Ensure adequate excess cable length. Remove pre-fitted blanking plugs only for positions used and install a suitable IP gland or grommet. Wire the switch/socket according to the provided diagrams, ensuring correct polarity. Ensure all connections are secure with no loose strands and that all bare wires are sheathed.
Final Assembly: Fit the front assembly, ensuring the gasket is not pinched or damaged. Secure with the provided screws, taking care not to over-tighten. Ensure the cover is closed and secured when not in use.
Technical Specifications
- Voltage: 220-250V ac
- Frequency: 50/60Hz
- IP Rating: IP66 (when cover is securely closed)
- Socket Terminal Capacity: 3 x 2.5mm², 3 x 4mm², 2 x 6mm²
- Switch Terminal Capacity: 3 x 2.5mm², 3 x 4mm², 1 x 6mm²
- Fuse Terminal Capacity: 4 x 2.5mm², 3 x 4mm², 2 x 6mm²
Care and Maintenance
- Clean the unit using a soft, dry cloth only.
- Do not use solvents, cleaning products, or white spirits.
Warranty
This accessory is guaranteed for 25 years, provided it is returned to the point of purchase, the correct installation procedure was followed, the unit was not overloaded or taken apart, and it was not exposed to decorative or cleaning materials. A dated receipt is required.
Practical help
Common problems
Water ingress
Ensure the gasket is not pinched or damaged during assembly and that the cover is securely closed.
Reduced IP rating
Avoid drilling a drain hole unless absolutely necessary. If drilled, it must be at the lowest point of the conduit run.
Wiring errors
Verify polarity: Live (Brown), Neutral (Blue), Earth (Green/Yellow). Ensure all connections are secure with no loose strands.
Before use
- Switch off the mains isolator at the consumer unit.
- Ensure the mounting surface is clean, rigid, and flat.
- Verify the circuit load does not exceed cable or fuse ratings.
- Use appropriate IP-rated glands or grommets for cable entry.
- Check that the gasket is properly seated before securing the front assembly.
Specs in practice
- Terminal Capacity
- The maximum size and number of cables that can be safely connected to the terminals.
Images and diagrams
- Wiring diagrams illustrate the correct connection of Live, Neutral, and Earth wires to the terminals.
- Diagrams show the path from the supply to the switch/socket and to the light.
Model compatibility
- Suitable for outdoor use when installed correctly.
- Requires a rigid vertical flat surface for mounting.

Manual page author
David Miller
Documentation analyst
Organizes user manual content into clear summaries, with attention to model details, product context, and everyday usability.