Lighting / Fixtures
Instruction Manual for Saxby 2-IN-1 PIR Detector
Quick guide for the Saxby 2-IN-1 PIR Detector (90977). Learn how to install, wire, and adjust the motion sensor settings for optimal performance.
Quick answers from the manual
Quick answer
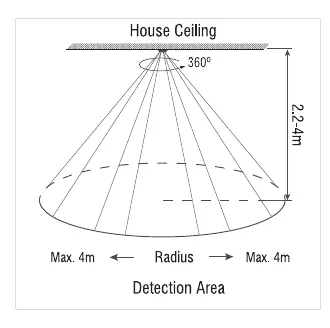
- The Saxby 2-IN-1 PIR Detector is an indoor motion sensor with a 360-degree detection range. It requires a mounting height of 2.2-4m and supports a maximum load of 2000W (incandescent) or 1000W (LED). p. 1, 2
Key actions
- Adjusting sensor settings p. 1
- Installing the sensor p. 2
First start
- Set the LUX knob to the SUN position if testing during the day. p. 1
Problems and fixes
Sensor not working
Check if ambient light is too high (if set to moon) or if there are heat sources causing interference.
p. 1, 2Maintenance and reset
- Clean with a soft dry cloth; do not use solvents. p. 1
Technical specifications
| Parameter | Value | Meaning | Pages |
|---|---|---|---|
| Supply Voltage | 220-240V~ | Standard mains voltage. | p. 1 |
| Max Load | 2000W / 1000W | Max 2000W incandescent, 1000W LED. | p. 1 |
Where to find it in the PDF
- PIR Adjustment and Technical Data p. 1
- Installation and Wiring p. 2
Table of contents
Manual images
Click an image to enlargeQuick guide from the manual
The Saxby 2-IN-1 PIR Detector (90977) is an indoor motion sensor designed for ceiling mounting at a height of 2.2 to 4 meters. It features adjustable time delay and ambient light sensitivity. Ensure the power is switched off at the mains before starting any installation or maintenance work.
Installation
Before installing, ensure the existing fitting is removed and the power is switched off. The unit must be installed by a competent and qualified electrician.
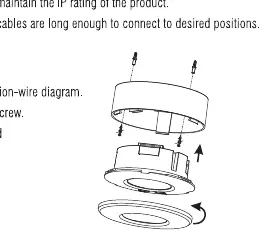
- Remove the metal spring of the sensor.
- Connect the power and the load according to the wiring diagram.
- Fix the bottom of the sensor on the selected position with the provided screw.
- Install the upper cover on the sensor.
- For installation two: Unload the vinyl cover, connect wires to the terminal, fold the metal springs upwards, and insert the sensor into the ceiling hole.
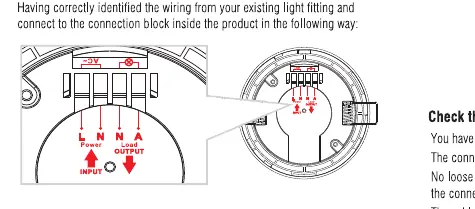
Wiring
The product is double insulated and does not require an earth connection. If incoming earth cables are present, they must be joined together and insulated with good quality insulation tape. Ensure connections are tight and the cable clamp is fitted over the wires.
PIR Adjustment
The sensor has two adjustment knobs located on the unit:
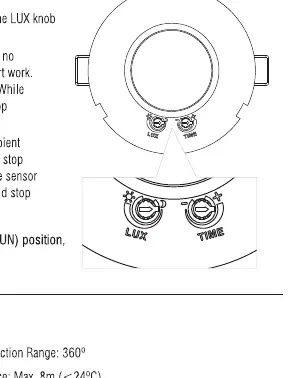
- TIME: Turn anti-clockwise to decrease the time (min 10s) or clockwise to increase (max 7min).
- LUX: Turn anti-clockwise to the minimum (moon) to set the sensor to work only in darkness. Turn clockwise to the maximum (sun) to allow operation in daylight.
Note: When testing in daylight, turn the LUX knob to the SUN position, otherwise the sensor may not trigger.
Technical Data
- Supply Voltage: 220-240V~, 50Hz
- Detection Range: 360 degrees, max 8m radius
- Rated Load: Max 2000W (incandescent) / 1000W (LED)
- Time Delay: 10s ±3s to 7min ±2min
- Ambient Light:<10-2000 LUX (adjustable)
- Installation Height: 2.2-4m
Care and Safety
Clean only with a soft dry cloth. Do not use solvents or abrasive cleaners. Always switch off the power supply before changing lightbulbs or cleaning.
Practical help
Common problems
Sensor does not work in daylight
Turn the LUX knob clockwise to the SUN position. If set to the moon position, the sensor will not work in ambient light.
False triggering
Avoid positioning the sensor near heat sources (flues, heat extraction units) or electromagnetic fields.
Before use
- Ensure power is switched off at the mains.
- Verify installation height is between 2.2m and 4m.
- Check that the load does not exceed 2000W (incandescent) or 1000W (LED).
- Ensure the switch is turned off before installation.
- Confirm all parts are present.
Specs in practice
- Detection Range
- 360-degree coverage with a maximum radius of 8 meters.
- Ambient Light (LUX)
- Determines the light level at which the sensor activates (<10 LUX for darkness, 2000 LUX for daylight).
Images and diagrams
- The wiring diagram illustrates the connection of Live (L), Neutral (N), and Load Output terminals.
- The detection area diagram shows the 360-degree coverage pattern and the required mounting height of 2.2-4m.
Model compatibility
- Suitable for indoor use only.
- Double insulated; does not require an earth connection.
- Compatible with loads up to 2000W (incandescent) or 1000W (LED).

Manual page author
Michael Turner
Technical manual editor
Reviews PDF manuals for structure, safety notes, and practical product details so readers can find the right information quickly.