Home / Security
User Guide for Schneider Electric SysM/SysD Connected Push-button Module
Comprehensive user guide for the Schneider Electric SysM/SysD Connected Push-button Module. Learn how to install, pair, configure, and operate your 1-gang or 2-gang switch, dimmer, or shutter module using the Wiser Home app.
Table of contents
Manual images
Click an image to enlargeQuick guide from the manual
The SysM/SysD Connected Push-button Module allows for smart control of switches, dimmers, and shutters. To get started, ensure you have the Wiser Home app installed and a Wiser Hub 2nd Generation. The device is controlled via the app or manually using short and long presses on the physical button.
About the device
The module is available in 1-gang and 2-gang versions and requires a compatible insert (switch, dimmer, or shutter) and rocker. It supports switching, dimming, and shutter control functionality.
Pairing the device
- Open the Wiser Home app and tap the Home page.
- Tap Devices, then the + icon, select Lights, and choose 1-gang (or 2-gang).
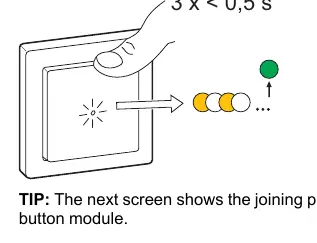
- Short press the top-center (or top-right for 2-gang) button three times.
- Ensure the LED blinks amber.
- Wait for the LED to turn green, indicating the device has joined.
- Assign the device to a room in the app.
Manual operation
You can control the connected load directly from the wall module:
- Switch: Short press (< 0.5s) to toggle the load on/off.
- Dimmer: Short press (< 0.5s) to toggle on/off; long press (> 0.5s) to dim up/down.
- Shutter: Short press (< 0.5s) to move; long press (> 0.5s) to move up/down.
App configuration
Using the Wiser Home app, you can:
- Rename the device: Go to Device Details > Device Name.
- Set location: Assign the device to a specific room.
- Identify: Flash the device LED to locate it physically.
- Set brightness (Dimmer only): Adjust minimum/maximum brightness and enable RL-LED mode if flickering occurs.
- Set duration (Shutter only): Configure open/close duration.
Schedules, Moments, and Automations
The Wiser app allows for advanced automation:
- Schedules: Set devices to operate at specific times (e.g., sunrise/sunset).
- Moments: Group multiple actions to be performed together (e.g., "Movie Night").
- Automations: Trigger actions based on conditions like device status changes or time periods.
Resetting the device
To reset to factory defaults:
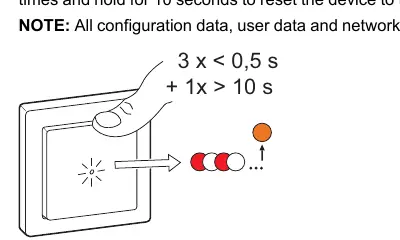
- Short press the top-center (or top-right for 2-gang) button three times.
- Hold the button down for 10 seconds.
- The LED will blink red, then the device will restart and glow solid orange.
Troubleshooting
If you encounter issues:
- Dimming issues: Reduce/increase load, allow the module to cool, or check load compatibility.
- Flickering: Change the load, set RL LED mode, or increase minimum brightness.
- No shutter movement: Check power supply and wiring.
- Pairing failure: Reset the device to factory defaults.
Manufacturer information
Schneider Electric
Practical help
Common problems
Dimming up not possible
Reduce or increase load, allow the pushbutton to cool, or change the load if incompatible.
Flickering at minimum brightness
Increase minimum brightness, install a 31LCDA load correction device, or set RL LED mode.
No shutter movement
Check power supply, change the load, or check wiring.
Device not ready to pair
Reset the device to factory default settings.
Before use
- Ensure the module is mounted on the correct insert (switch, dimmer, or shutter).
- Install the corresponding rocker and frame.
- Download and install the Wiser Home app.
- Ensure the Wiser Hub 2nd Generation is installed and operational.
Specs in practice
- Operating frequency
- 2405-2480 MHz (Zigbee 3.0)
- Operating elements
- 2 or 4 push-buttons depending on the gang configuration.
- Display elements
- 1 or 2 LEDs for status and orientation.
Images and diagrams
- Manual operation diagrams indicate short press (0.5s) actions.
- LED blink patterns: Amber blinking indicates pairing mode; Red blinking indicates reset mode.
Model compatibility
- Compatible with Wiser Hub 2nd Generation.
- RL-LED mode is recommended for LED lamps to avoid flickering and overheating.

Manual page author
Emily Carter
User documentation editor
Prepares concise manual descriptions and highlights the most useful setup, operation, and maintenance information for readers.