HVAC / Thermostats & Controls
Installation and User Guide for Schneider Electric Drayton 2290M Digistat
Comprehensive installation and user guide for the Schneider Electric Drayton 2290M Digistat programmable room thermostat. Includes wiring instructions, installer settings, programming steps, and technical specifications.
Quick answers from the manual
Quick answer
- The Drayton 2290M Digistat is a programmable room thermostat. Installation requires mounting the back plate, wiring according to the provided diagram (Fig 3), and securing the front cover. It supports various scheduling modes and OpenTherm boiler control. p. 1, 3
Key actions
- Access Installer Options p. 2
- Adjust Schedule p. 4
First start
- Automatic Operation p. 1
Show 4 more answers Show less
Problems and fixes
Sensor Fault
Heating output is reduced to 30% (3 mins ON, 7 mins OFF).
p. 2Maintenance and reset
- Factory Reset p. 2
Technical specifications
| Parameter | Value | Meaning | Pages |
|---|---|---|---|
| Power supply | 230VAC +/-10%, 50Hz | Operating voltage | p. 3 |
| Temperature range | 5°C to 30°C | Control range | p. 3 |
| Protection level | IP30 | Ingress protection | p. 3 |
Where to find it in the PDF
- Installation Guide p. 1
- Installer Options p. 2, 3
- User Guide p. 3, 4
Table of contents
Manual images
Click an image to enlargeImportant information from the manual
The Drayton 2290M Digistat is a programmable room thermostat designed for 24-hour, 5-2 day, or 7-day scheduling. It features a real-time clock that automatically adjusts for summer/winter time changes. The device is intended for fixed wiring only and must be installed by a competent electrician in accordance with IEE regulations.
Installation
Before starting, ensure the mains supply is switched off. If you are not confident in performing the installation, contact a professional.
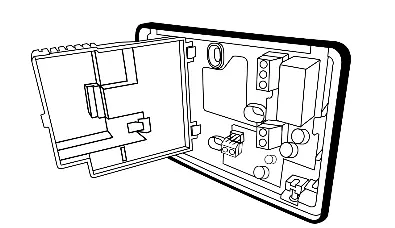
- Remove the front cover: Release the 2 screws at the bottom of the unit. The mounting holes and electrical connections are located under the hinged black cover.
- Mounting: Fix the back plate directly to the wall using suitable wall plugs and screws, or mount it over an existing wall box.
- Wiring: Connect the wiring according to the diagram provided in the manual (Fig 3). If using an OpenTherm boiler, connect the cables to the OT1 and OT2 terminals on the Digistat. Polarity for OpenTherm is not important.
- Finishing: Close the hinged terminal cover and replace the front cover by locating the two latches at the top, then fasten the 2 screws at the bottom.
Installer Options
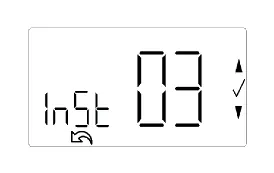
To access the Installer Options menu, press the settings button for 3 seconds. Use the + and - buttons to navigate and the O button to select.
- Partial Sight Assistant: Provides audible tones when adjusting the setpoint.
- Frost Protection: Switches on heating if the temperature falls to 5°C, maintaining 7°C.
- Minimum/Maximum Setpoint Limits: Allows you to restrict the temperature range.
- Optimum Start: Adjusts the thermostat setpoint early so the room is at the required temperature when the event starts.
- Valve Protection: Operates the relay output for at least one minute each week to protect the valve.
- Sensor Fault Function: Reduces heating output to 30% (3 minutes ON, 7 minutes OFF) in case of a sensor fault.
- Installer Settings Lock: Allows locking of installer settings with a 3-digit code.
User Guide and Operation
The thermostat comes pre-programmed for a typical 9-5 schedule. You can adjust the temperature temporarily in Auto Mode using the + and - buttons; the change will hold until the next pre-programmed event.
Programming
To adjust times and temperatures:
- In Auto Mode, press the settings button once.
- Use + and - to select the day or set of days. Press O to confirm.
- Adjust the start time and temperature for each period using + and - buttons, confirming each step with O.
- To add more time periods (up to 8 per day), select the 'Add' option when prompted.
- Press the settings button to exit and return to the home screen.
Technical Data
- Power supply: 230VAC +/-10%, 50Hz
- Switch type & rating: 16(2)A at 230V / 50Hz
- Temperature range: 5°C to 30°C
- Protection level: IP30
- Operating Frequency: 2402-2480 MHz
Manufacturer information
Schneider Electric
Practical help
Common problems
Thermostat not heating
Ensure the unit is not in 'OFF' mode and the setpoint is higher than the current room temperature. Check if the 'calling for heat' indicator is visible on the screen.
Forgot installer code
If the device is locked and the code is forgotten, please call the Technical Helpline.
Sensor fault
The device will automatically reduce heating output to 30% (3 mins ON, 7 mins OFF) to protect the system.
Before use
- Ensure mains supply is switched off before installation.
- Verify wiring conforms to current IEE regulations.
- Ensure the thermostat is not covered by curtains or furniture.
- Check if your boiler supports OpenTherm for advanced control.
- Ensure the time on the programmer is correct.
Show more Show less
Specs in practice
- Power supply
- 230VAC +/-10%, 50Hz
- Temperature range
- 5°C to 30°C
- Protection level
- IP30 (Protected against solid objects over 2.5mm)
- Max RF Power
- +10dBm
Images and diagrams
- Fig 1: Removing the front cover to access mounting holes.
- Fig 2: Mounting the back plate to the wall.
- Fig 3: Wiring diagram for mains and OpenTherm connections.
- Fig 4: Closing the terminal cover and securing the front cover.
Model compatibility
- Compatible with OpenTherm boilers.
- Designed for fixed wiring only.
- Supports 24h, 5-2day, or 7day program types.

Manual page author
Emily Carter
User documentation editor