Power / Batteries & Chargers
User Manual for Schumacher 15W COB LED Under-the-Hood Work Light
Comprehensive user guide for the Schumacher 15W COB LED Under-the-Hood Work Light. Includes setup instructions, charging procedures, operating modes, maintenance tips, and troubleshooting.
Table of contents
Manual images
Click an image to enlargeQuick Guide
To ensure optimal performance and battery longevity, charge the work light immediately after purchase, after every use, and at least every 3-6 months. Failure to maintain the battery charge may result in permanent damage and void the warranty.
Safety Instructions
Important: Read and follow all instructions to prevent personal injury or property damage.
- Do not look directly into the light or shine it into the eyes of people or animals.
- Do not use the work light if it has been dropped, received a sharp blow, or is damaged.
- Do not immerse the work light in water.
- Use only the provided charger. Using an unauthorized charger may cause fire or injury.
- Ensure the work light is unplugged and cooled down before cleaning.
- Do not expose the battery to temperatures above 140°F (60°C).
Setup
Remove any cord wraps and uncoil the cable between the charger and the work light. Use the integrated hooks to attach the work light to the underside of a car hood.
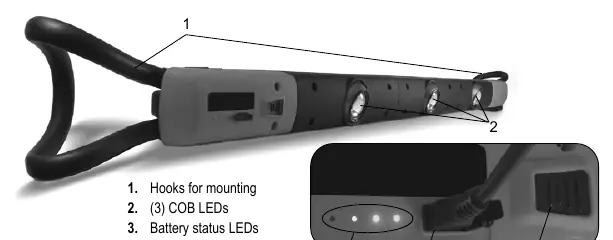
Features
The unit features three COB LEDs, battery status LEDs, a charging port, and a power level button. It comes with an AC wall charger with a USB port and a micro USB to USB charging cable.
Charging
1. Ensure the work light is turned off before charging.2. Connect the micro USB end of the cable to the work light and the USB end to the wall charger.3. Plug the charger into a live AC outlet. The green LEDs will indicate the battery status.4. Charging takes approximately 7-8 hours. When fully charged, all four LEDs will be lit.5. Unplug the charger from the outlet and the work light once charging is complete.
Operation
Press the Power Level button on the front of the unit to cycle through the lighting modes:1x: Turns on one (center) light.2x: Turns on two lights.3x: Turns on all three lights.4x: Turns all lights off.The position of each individual light can be rotated for precise positioning.
Maintenance and Storage
Store the unit in a cool, dry place. Always unplug and disconnect the work light before performing any maintenance. Any servicing should be performed by a qualified service technician.
Troubleshooting
If the work light does not operate, ensure the battery is charged. If the issue persists, the battery may be defective and require replacement by a qualified technician.
Specifications
- Battery: 3.7V, 2600 mAh Lithium Ion
- Lumen Output: 400 lm (single light) to 1000 lm (three lights)
- Charging Time: 7-8 hours
- Operating Time: 14 hours (single light) to 6 hours (three lights)
- Charger Input: 100-240V AC, 50-60Hz, 0.6A
- Charger Output: 5V DC, 2A
Official resources from the manual
Practical help
Common problems
Work light does not operate
Recharge the battery to full capacity. If it still does not work, the battery may be bad and needs to be replaced by a qualified technician.
Before use
- Charge the battery immediately after purchase.
- Ensure the work light is turned off before connecting to the charger.
- Verify the charger voltage matches the work light requirements.
- Uncoil the charging cable completely.
- Ensure the work light is cool before cleaning or maintenance.
Specs in practice
- Lumen Output
- Brightness level: 400 lm for one light, 1000 lm for all three lights.
- Operating Time
- Battery life: 14 hours for single light, 6 hours for three lights.
- Charging Time
- Time required to fully charge the battery is 7-8 hours.
Images and diagrams
- Hooks: Used for mounting the light under the car hood.
- COB LEDs: Three light sources that can be rotated.
- Battery status LEDs: Indicate the current charge level.
- Charging port: Micro USB port for charging.
- Power level button: Controls the light intensity and on/off function.
Model compatibility
- Use only the provided charger to avoid fire or injury.
- AC charger is for indoor use only; do not expose to damp conditions.

Manual page author
Michael Turner
Technical manual editor
Reviews PDF manuals for structure, safety notes, and practical product details so readers can find the right information quickly.