Computers / Industrial Tablets
User Manual for Scorpion 10X V2 Android Tablet
Quick start guide and user manual for the Scorpion 10X V2 Android industrial tablet. Learn how to install the battery, SIM/TF cards, charge the device, and configure basic system settings.
Table of contents
Manual images
Click an image to enlargeQuick Start Guide
This guide provides essential instructions for setting up and operating the Scorpion 10X V2 Android industrial tablet. Always ensure the device is handled according to safety guidelines to prevent damage or injury.
Package Contents
- 1x Scorpion 10X V2 Android Tablet
- 1x Hand-Strap
- 1x AC power adapter
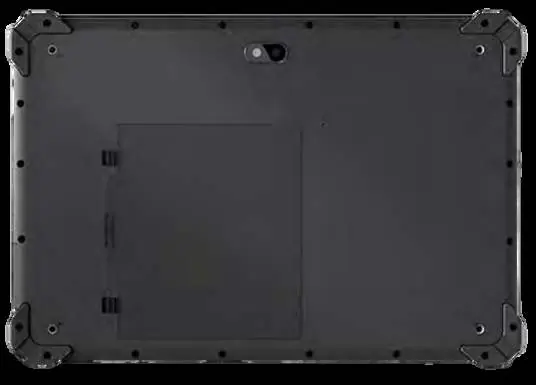
Device Overview
The tablet features various ports and controls for industrial use:

- Front: Camera, Indicator, F Key, HOME button, Volume buttons, Power button, Stereo speakers, Microphone.
- Rear: Camera, Flash lamp, Battery switches, Battery latch, Battery cover.
- Right Side: Interface options (Standard RJ45 network port, optional DB9 serial port, USB 2.0).
- Left Side: USB 3.0 port, 3.5mm earphone jack, HDMI connector, Type-C port.
- Top/Bottom: Module port, Pogo pin, Locating hole.
Replacing battery
- Place the tablet upside down on a flat surface.
- Open the two battery switches.
- Carefully pry the battery cover out of the side grooves.
- Remove the old battery and insert the new one, ensuring the connector side is inserted first.
- Close the battery cover and secure both battery switches.
Warning: Ensure all components are dry before installation. Using wet components may cause damage not covered by the warranty.
Installation of TF card and SIM card


- Remove the battery as described in the battery replacement section.
- Remove the card holder.
- Insert the TF card and Nano SIM card into the specified positions.
- Reinsert the card holder and the battery.
Charging
The battery is delivered in power-saving mode. This mode is deactivated once the battery is inserted and the device is connected to a power source.
- Open the cover on the left side to expose the Type-C port.
- Insert the Type-C USB cable into the port.
- Plug the power adapter into a wall outlet.
Turning On/Off
- Turn on: Press the power button.
- Turn off: Click [Power] -> [Shut down].
- Sleep: Press the power button or click [Power] -> [Sleep].
- Restart: If the system crashes, use Ctrl + Alt + Del and click [Restart], or hold the power button for 5+ seconds to force a shutdown.
System Basics
Touchscreen: Do not use sharp objects like pens or pencils. Use your finger or a stylus to avoid damaging the screen.
WLAN: Go to [Settings] -> [Network & Internet] -> [WLAN] to toggle the switch.
Bluetooth: Go to [Settings] -> [Devices] -> [Bluetooth] to toggle the switch and connect to devices.
Safety Instructions
- Protect the device from extreme temperatures and do not submerge in water.
- Never clean with solvents or chemical products; use a soft, dry cloth.
- Use only the original charger or one with compatible voltage/current ratings.
- Dispose of the device and battery at appropriate electronic waste collection points.
Practical help
Common problems
Tablet has crashed and is unresponsive
Use Ctrl + Alt + Del and select [Restart], or hold the power button for 5+ seconds to force a shutdown.
Battery not charging
Ensure you are using the original charger and that the battery is correctly inserted. The battery may be in power-saving mode; connect to a power source to activate.
Touchscreen not working correctly
Ensure you are not using sharp objects. Use only your finger or a stylus.
Before use
- Ensure all components are dry before installing the battery.
- Use only the provided battery and charger.
- Verify the battery connector side is inserted first.
- Check that the battery switches are fully closed after installation.
Images and diagrams
- Battery switches: Located on the rear panel; must be opened to access the battery compartment.
- Card slots: Located underneath the battery; requires battery removal to access.
Model compatibility
- Use only the battery provided with the device to avoid explosion risks.
- Do not use sharp objects on the touchscreen.

Manual page author
Emily Carter
User documentation editor
Prepares concise manual descriptions and highlights the most useful setup, operation, and maintenance information for readers.