Computers / Industrial Tablets
User Manual for Scorpion 10X PRO Rugged Tablet
Quick-start guide for the Scorpion 10X PRO rugged tablet. Learn how to charge the battery, perform hot-swapping, install SIM cards, attach peripheral kits, and understand LED status indicators.
Table of contents
Manual images
Click an image to enlargeQuick Start Guide
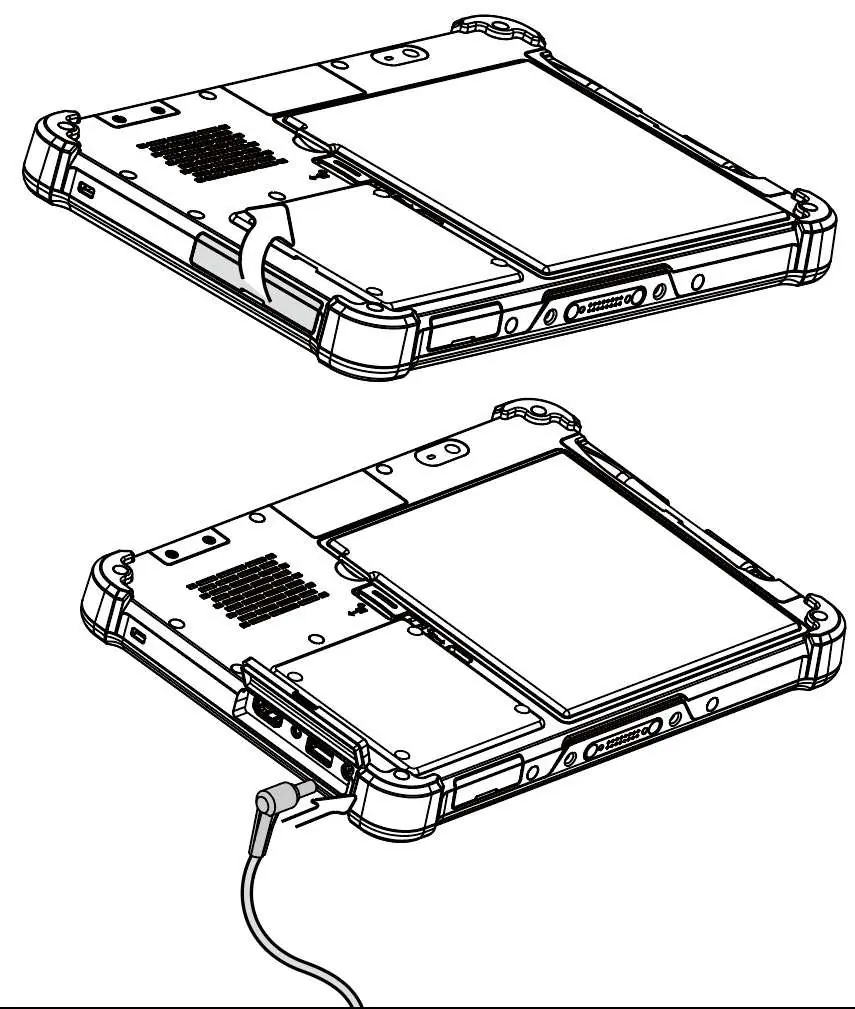
When the tablet is shipped from the factory, the battery is in shipping mode to reduce consumption. You must release the battery from shipping mode before use. To do this, pry open the rubber cover protecting the charging port and plug in the supplied power adapter. Fully charge the battery before the first use. To turn on the system, press the power button for 1 second. To power off, long-press the power button for 4 seconds.
Device Overview
The tablet features various controls and ports:
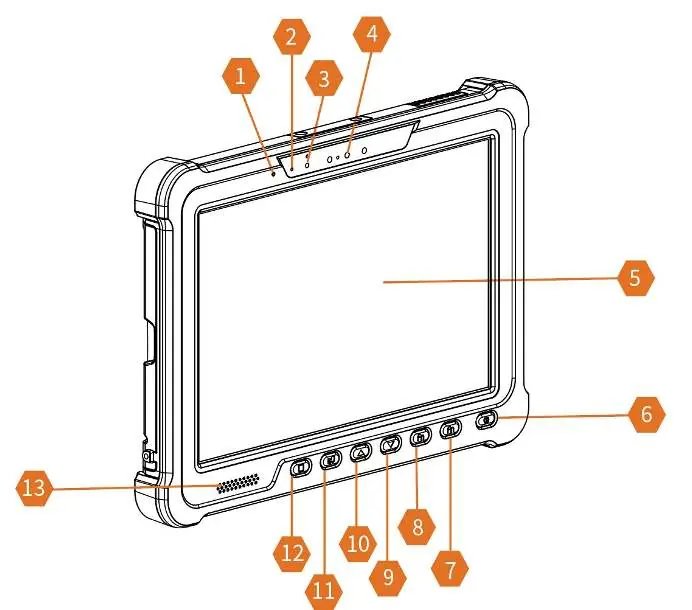
- Front: Mic, LED indicator, light sensor, 2MP IR camera, touch screen, power button, programmable buttons (including 2D scanner), volume controls, touch mode switch, home button, and speaker.
- Rear: Bumper protector, fan cover, ventilation, peripheral kit dummy cover, 8MP rear camera, stylus, battery box, docking connector, access covers for MicroSD/GPS, HDMI/Audio/USB/Charging, and a service door for internal components (Nano SIM, SSD, WIFI, LTE).
Battery Management
The tablet supports hot-swapping, allowing you to replace the battery without powering off the device.
- Press the Home button for two seconds to enter hot-swapping mode; the display will dim.
- The LED indicator will blink and a beeping sound will play.
- You have four minutes to replace the battery.
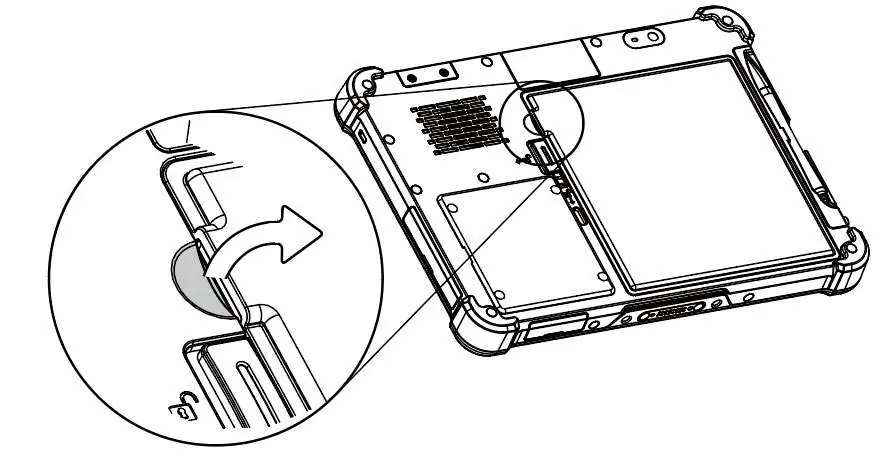
- Place the tablet face down, slide the small latch down, then slide the big latch left to unlock the battery cover.
- Use a coin or fingernails at the notch to lift and release the battery box.
Installation and Expansion
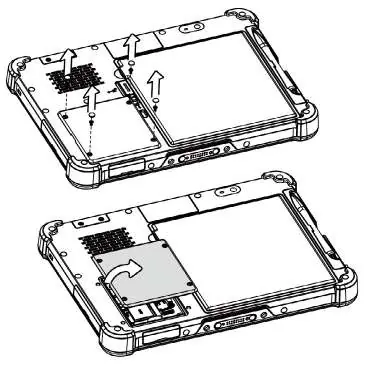
SIM Card Installation: Remove the service door screws and rubber pads. Remove the SSD card by removing its screw. Insert the SIM card with gold contacts facing down and the cut-off corner facing in until it clicks. Attach the rubber pad to the rear of the SIM card for a secure fit.
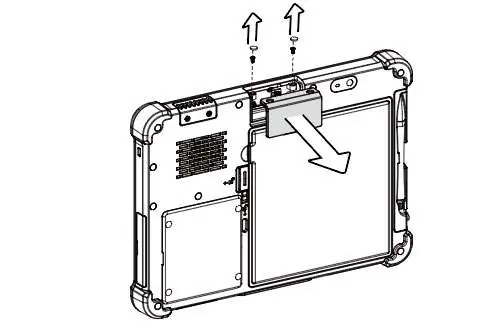
Peripheral Kits: You can expand the tablet with 2D scanner, COM, LAN, and USB kits. To install, remove the dummy cover screws and rubber pads. Connect the module to the FPC connector on the tablet. For COM, LAN, and USB kits, place a foam tape pad under the FPC connector to adjust for height differences before connecting.
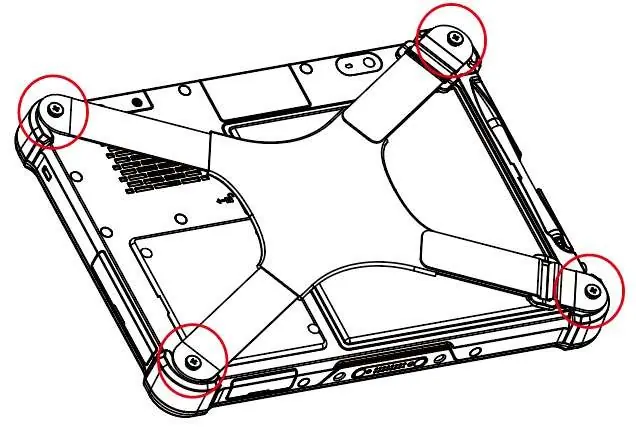
Hand Strap: Align the hand strap to the back of the tablet and fasten the four screws to secure it.
LED Indicators
- Green: Battery fully charged (plugged in or in dock).
- Orange: Battery charging (plugged in or in dock).
- Red/Flashing: Low battery.
- Red: Battery nearly empty.
Safety and Disposal
Only use approved and UL-listed accessories, battery packs, and chargers. Do not charge damp or wet devices. Ensure all components are dry before connecting to power. Dispose of used batteries according to local regulations. This equipment must be earthed via a properly wired ground socket outlet.
Practical help
Common problems
Tablet will not turn on
Ensure the battery is not in shipping mode. Connect the power adapter to release the battery from shipping mode and charge it.
Hot swapping fails
Ensure you press the Home button for two seconds to enter hot-swapping mode (display will dim) before attempting to remove the battery.
Peripheral kit connection issues
Ensure a foam tape pad is placed under the FPC connector for COM, LAN, and USB kits to account for height differences.
Before use
- Remove the protective plastic overlay from the LCD screen.
- Release the battery from shipping mode by plugging in the power adapter.
- Fully charge the battery before the first use.
- Ensure all service door screws and rubber pads are securely fastened after installation.
Specs in practice
- Hot Swapping
- Ability to replace the battery while the tablet is running.
Images and diagrams
- Buttons 1-13: Front panel controls including power, volume, and programmable buttons.
- Buttons 14-24: Rear panel components including battery box, service door, and expansion ports.
Model compatibility
- Supports expansion kits: 2D scanner, Long distance 2D scanner, COM kit, LAN kit, and USB kit.
- Requires specific foam tape pad for COM/LAN/USB kit installation.

Manual page author
Michael Turner
Technical manual editor
Reviews PDF manuals for structure, safety notes, and practical product details so readers can find the right information quickly.