HVAC / Heaters & Fireplaces
Installation Manual for Terma HX Radiator
A comprehensive installation guide for the Terma HX radiator. This manual provides step-by-step instructions for wall mounting, drilling requirements, and valve installation for water and dual-fuel versions.
Table of contents
Manual images
Click an image to enlargeQuick Installation Guide
This manual outlines the installation process for the Terma HX radiator. Before beginning, ensure you have the necessary tools and that the wall structure is suitable for the radiator's weight. The installation involves drilling, mounting brackets, and securing the radiator, followed by valve installation for water or dual-fuel models.
Installation Steps
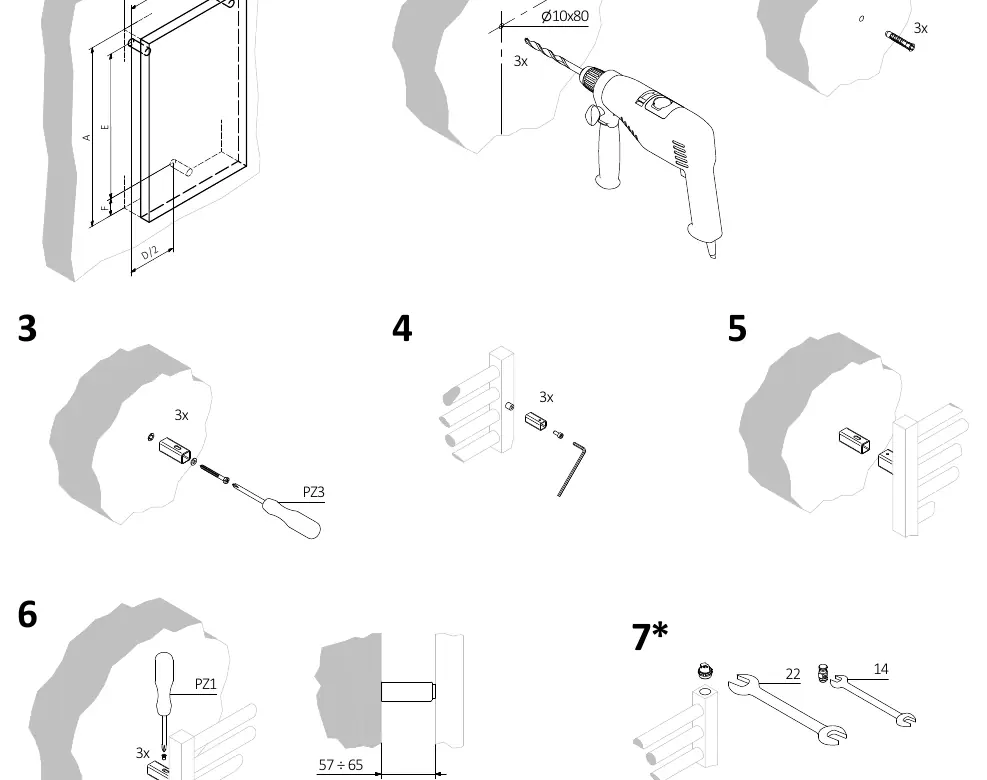
- Preparation: Mark the mounting points on the wall according to the radiator dimensions (A, B, D, E, F).
- Drilling: Drill holes with a 10mm diameter and 80mm depth.
- Wall Plugs: Insert the wall plugs into the drilled holes.
- Brackets: Screw the mounting brackets into the wall plugs.
- Mounting: Attach the radiator to the brackets.
- Securing: Tighten the mounting screws to secure the radiator. The distance from the wall should be between 57 and 65 mm.
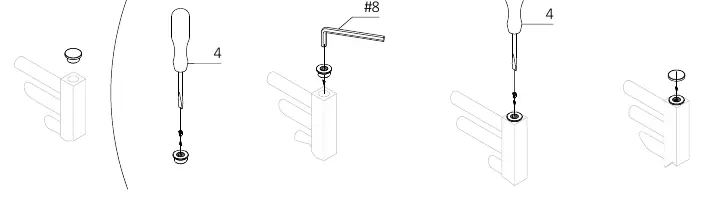
- Valve Installation: For water and dual-fuel versions, install the valves and plugs as shown in steps 7 and 8.
Technical Requirements
- Drill Bit: 10 mm diameter.
- Wall Distance: 57-65 mm.
- Tools Required: Drill, PZ3 screwdriver, PZ1 screwdriver, 14mm wrench, 22mm wrench.
Maintenance and Safety
Ensure all connections are tight to prevent leaks. For water and dual-fuel versions, follow the specific valve installation steps carefully to ensure proper sealing. If you are unsure about the installation process, consult a professional installer.
Practical help
Common problems
Radiator is not level or stable
Adjust the mounting bracket depth to ensure the radiator is positioned within the 57-65mm distance range from the wall.
Wall plugs do not fit
Ensure the holes are drilled to exactly 10mm diameter and 80mm depth.
Before use
- Verify the wall structure can support the radiator weight
- Ensure you have a 10mm drill bit
- Check for PZ1 and PZ3 screwdrivers
- Have 14mm and 22mm wrenches ready
- Confirm if you are installing a water or dual-fuel version
Images and diagrams
- Steps 1-6 illustrate the wall mounting process including drilling and bracket attachment.
- Steps 7-8 detail the valve and plug installation specifically for water and dual-fuel radiator versions.
Model compatibility
- Steps marked with an asterisk (*) apply only to water and dual-fuel versions.

Manual page author
Michael Turner
Technical manual editor
Reviews PDF manuals for structure, safety notes, and practical product details so readers can find the right information quickly.