Automotive / Garage Equipment
User Manual for Sealey 1600KG Coil Spring Compressor Kit RE225.V3
Quick guide for the Sealey 1600KG Coil Spring Compressor Kit (RE225.V3). Includes safety instructions, operating procedures for McPherson struts, maintenance tips, and technical specifications.
Table of contents
Manual images
Click an image to enlargeQuick guide from the manual
The Sealey 1600KG Coil Spring Compressor Kit is designed for compressing and expanding McPherson strut springs. Safety is critical: never allow spring windings to touch, always use the correct jaw size for the spring, and ensure the spring is securely seated. The compressor must be mounted on a vice during operation. Always install the safety wire before compressing.
Safety Warnings
- DANGER: Stop compressing immediately if coil windings touch.
- Wear approved safety eye protection and protective gloves.
- Do not use the compressor for purposes other than intended.
- Do not overload the compressor.
- Ensure the work area is clean, uncluttered, and well-lit.
- Keep hands and body clear of the spring during operation.
- Do not leave a compressed spring unattended.
- Do not make any construction changes to the unit, especially the safety pin.
Specifications
- Capacity: 1600kg
- Small Yoke: Ø80 - 120mm
- Large Yoke: Ø80 - 195mm
- Drive: 27mm hex
- Maximum Jaw Opening: 335mm
- Bolt Torque (Jaws): 60Nm
- Compression Torque Limit: 120Nm
Operation
Removing the McPherson Spring Strut
- Remove the McPherson spring strut from the vehicle according to the vehicle manufacturer's instructions.
- Select the correct size of jaws and mount them on the spring compressor. Ensure the spring is clean where the jaws will be mounted.
- Fit the retaining bolts and tighten them firmly to 60Nm.
- Mount the compressor on a vice by clamping the front head of the compressor.
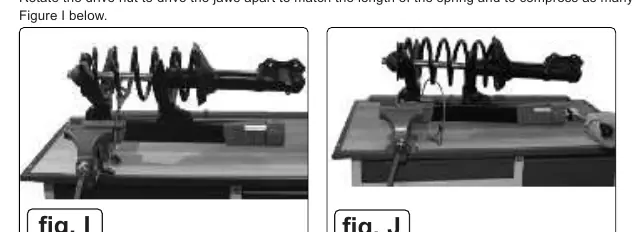
- Rotate the drive nut to drive the jaws apart to match the length of the spring.
- Ensure the spring is centered in the jaws and the spring windings are seated correctly.
Safety Wire Installation
Always ensure the safety wire is securely installed around the spring and the quick link is locked before starting the compression process. Ensure the wire does not get pinched during the process. If needed, the wire can be slid out of the retaining slots for more space, but must be snapped back in place upon completion.
Compressing the Spring
- Preload the compressor by turning the handwheel until the jaws have a firm grip on the spring.
- Compress the spring by rotating the drive nut using a socket wrench (limit torque to 120Nm).
- Do not continue to drive when the upper or lower travel ends of the compressor are reached.
- Once safely compressed, remove the top bearing of the strut.
- Remove the damper and carefully release the tension on the spring.
Maintenance
- Maintenance should be performed by qualified personnel.
- Perform a regular check every month. If damage or deformation is found, stop use immediately.
- Keep the unit clean and dry.
- Always pack the jaws away with the compressor as delivered.
- Grease the guide spindle using graphite grease if necessary, or at least every six months. Clean the spindle before applying grease.
Contact Information
Sealey Group, Kempson Way, Suffolk Business Park, Bury St Edmunds, Suffolk. IP32 7AR. Phone: 01284 757500. Email: [email protected]. Website: www.sealey.co.uk
Official resources from the manual
Manufacturer information
Sealey Group
Practical help
Common problems
Spring windings touching
Stop compressing immediately.
Damaged or missing parts
Do not use the compressor; contact your supplier for repair or replacement.
Spring slipping out of jaws
Ensure the spring is clean, centered, and resting securely within the outer rib and safety ridges.
Safety pin overload
Do not exceed 120Nm torque when compressing.
Before use
- Check the unit for full functional capability.
- Ensure the work area is clean and well-lit.
- Wear safety eye protection and protective gloves.
- Verify the correct jaw size for the spring diameter.
- Ensure the spring is clean where jaws will be mounted.
- Verify jaw bolts are tightened to 60Nm.
Specs in practice
- Compression Torque
- Limit to 120Nm to avoid overloading the safety pin.
Images and diagrams
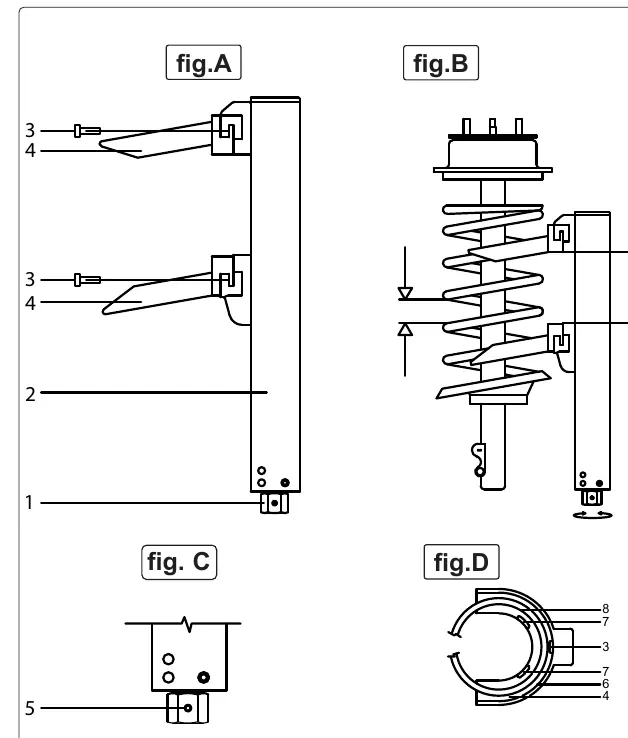
- Fig A-D: Illustrates components, correct spring seating, and jaw alignment.
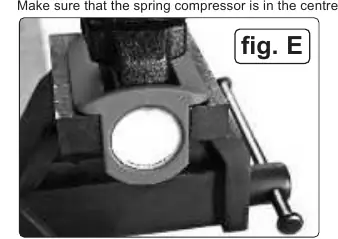
- Fig E: Shows how to mount the compressor on a vice.
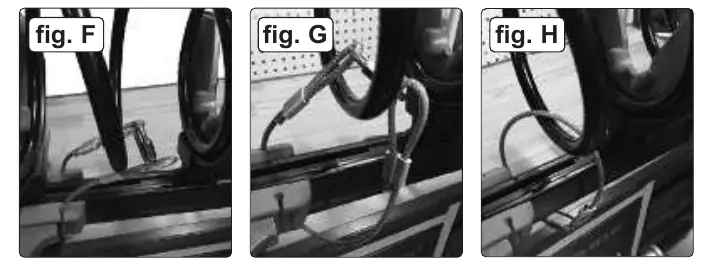
- Fig F-H: Demonstrates correct installation of the safety wire.
- Fig I-J: Shows the preloading and compression process.
Model compatibility
- Exclusively for McPherson strut springs.
- Suitable for use with air impact wrench.
- For indoor use and at room temperature only.

Manual page author
Emily Carter
User documentation editor
Prepares concise manual descriptions and highlights the most useful setup, operation, and maintenance information for readers.