Tools / Power Tools
User Manual for Sealey GSA6006.V2 1/2" Sq. Drive Composite Impact Wrench
Quick guide for the Sealey GSA6006.V2 impact wrench. Includes setup, air supply requirements, operation, maintenance, and safety instructions for professional garage use.
Table of contents
Manual images
Jump to the sectionQuick Guide to Setup and Safety
The Sealey GSA6006.V2 is a professional-grade air impact wrench. To ensure safe and efficient operation, always maintain an air pressure of 90psi. Never connect quick-change couplings directly to the tool; use a leader hose to prevent vibration damage. Always wear appropriate PPE, including eye protection, ear defenders, and gloves.
Safety Precautions
- Air Pressure: Do not exceed 90psi. High pressure or unclean air will shorten tool life and cause damage.
- Personal Protection: Wear approved safety eye/face shields, ear defenders, and hand protection.
- Usage: Only use impact-rated sockets. Do not use worn or damaged sockets.
- Handling: Do not carry the wrench by the air hose or with your hand on the trigger.
- Environment: Keep children and non-essential persons away from the work area. Ensure the floor is not slippery.
- Asbestos Warning: When working near vehicle brake systems, wear suitable respiratory protection due to potential asbestos dust.
Specifications
- Model: GSA6006.V2
- Drive: 1/2" sq.
- Operating Pressure: 90psi (6bar)
- Air Consumption: 6.5cfm
- Breakaway Torque: 1180lb.ft (1600Nm)
- Maximum Torque: 737lb.ft (1000Nm)
- Free Speed: 8500rpm
- Inlet Size: 1/4" BSP
Preparation and Air Supply
Ensure the air supply is clean and dry. Drain your compressor air tank daily to prevent water from entering the air line, which can damage the wrench. Use a minimum hose diameter of 1/4" I.D. with matching fittings. For hoses longer than 8 meters, increase line pressure to compensate for pressure drop.
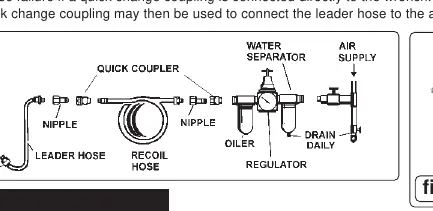
Connection Procedure: To prevent vibration failure, connect a leader hose to the wrench, then attach the quick-change coupling to the leader hose, not directly to the tool.
Operation
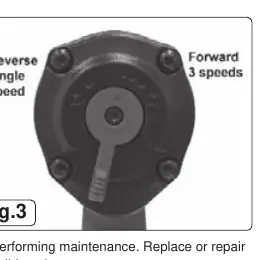
Connect the wrench to the air supply as described in the preparation section. Place the socket fully over the nut before depressing the trigger. Use the air regulator located on the rear of the wrench body to adjust the direction and torque settings.
Maintenance and Troubleshooting
Disconnect the wrench from the air supply before performing any maintenance or changing accessories. If your air system lacks an oiler, lubricate the tool daily by dripping a few drops of Sealey air tool oil into the air inlet.
Troubleshooting: If the wrench loses power or acts erratically, check for excessive drain on the air line, moisture, or incorrect hose connectors. If grit or gum deposits are suspected, remove the air strainer (located at the inlet) and clean it. Flush the tool with gum solvent oil or a mixture of SAE No 10 oil and paraffin.
Hand Arm Vibration Warning
This tool may cause Hand Arm Vibration Syndrome if not managed correctly. Ensure the length of leader hoses is sufficient to allow unrestricted use, as this helps reduce vibration. We recommend a program of health surveillance to detect early symptoms of vibration injury.
Manufacturer information
Sealey Group
Practical help
Common problems
Loss of power or erratic action
Check air supply for moisture or restrictions. Ensure hose connectors are the correct size. Clean the air strainer at the inlet and flush the tool with gum solvent oil or an SAE No 10 oil/paraffin mix.
Vibration damage to couplings
Do not connect quick-change couplings directly to the wrench. Use a leader hose between the wrench and the air line.
Before use
- Ensure air supply is clean and set to 90psi.
- Drain compressor air tank of water.
- Connect a leader hose to the wrench before attaching quick-change couplings.
- Wear eye, ear, and hand protection.
- Check that all hose connections are secure.
- Verify the socket is impact-rated.
Specs in practice
- Breakaway torque
- 1180lb.ft (1600Nm) - The maximum force available to loosen a tight nut.
- Maximum torque
- 737lb.ft (1000Nm) - The maximum force available for tightening.
- Air consumption
- 6.5cfm - The volume of air required for the tool to operate correctly.
- Operating pressure
- 90psi (6bar) - The recommended air pressure for optimal performance.
Images and diagrams
- Fig 1: Illustrates the correct air supply setup, including the water separator, regulator, oiler, and the use of a leader hose.
- Fig 3: Shows the air regulator on the rear of the wrench, used to control direction and torque.
Model compatibility
- Use only impact-rated sockets.
- Minimum hose diameter: 1/4 inch I.D.

Manual page author
Michael Turner
Technical manual editor
Reviews PDF manuals for structure, safety notes, and practical product details so readers can find the right information quickly.