Power / Batteries & Chargers
Sealey CHARGE 106.V3 Series Battery Charger
Quick guide for the Sealey CHARGE 106.V3 series battery chargers. Includes safety instructions, operation steps, charging procedures, and maintenance tips.
Table of contents
Manual images
Click an image to enlargeQuick guide from the manual
This manual covers the operation and safety requirements for the Sealey CHARGE 106.V3 series battery chargers. Before use, ensure the charger is in good condition and the battery capacity is compatible. Always connect the charger to the mains supply only after connecting the clamps to the battery. Monitor the charging process regularly as the unit does not switch off automatically.
Introduction
The Sealey battery chargers are single-phase units featuring a steel case with a carry handle and ventilation to maintain low transformer temperatures. They include an ammeter to display the charge rate and a dash-mounted fuse for polarity protection. These chargers are suitable for regular and low-maintenance lead-acid batteries.
Specifications
The series includes models CHARGE106, CHARGE107, CHARGE110, CHARGE112, CHARGE115, and CHARGE124. All models operate on 230V supply and provide 12/24V output. Battery capacity ranges vary by model from 10-95Ah (CHARGE106) up to 25-320Ah (CHARGE124). Polarity protection is provided by fuses ranging from 15A to 40A depending on the model.
Operation
Preparation: Ensure the battery capacity is compatible with the charger output. Charging current should not exceed one-tenth of the battery capacity (amp hours). Remove battery caps to allow gases to escape and check electrolyte levels, topping up with distilled water if necessary (5-10mm above plates).
Connecting to Battery: Ensure the charger is unplugged from the mains. Set the voltage rocker switch to match the battery (12V or 24V). Initially, set the Charge Rate rocker switch to 'MIN'. Connect the POSITIVE (Red/+) lead to the positive terminal and the NEGATIVE (Black/-) lead to the negative terminal.
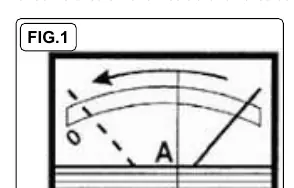
Charging: Connect to the mains and switch on. Monitor the ammeter; the pointer will move to the left as the battery charges. If a boost charge is needed, ensure an initial charge has built up before switching to 'BOOST'. Stop charging when the ammeter reads '0' to prevent damage to battery plates.
Advanced charging
Sealed Batteries: Charge slowly and monitor voltage across terminals. Stop charging when voltage reaches 14.4V for 12V batteries or 28.8V for 24V batteries.
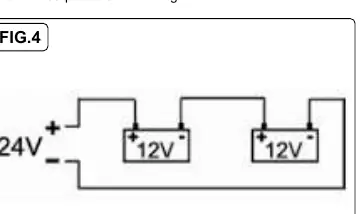
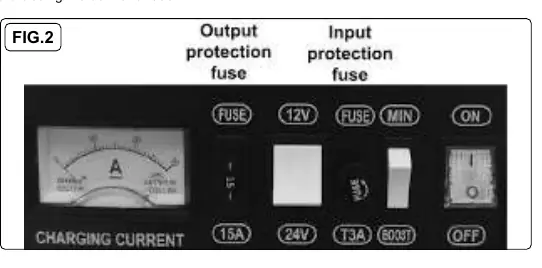
Multiple Battery Charging: Do not charge batteries of different types, capacities, or discharge levels simultaneously. Multiple batteries can be charged in parallel, or two batteries can be charged in series using the 24V output.
Maintenance and troubleshooting
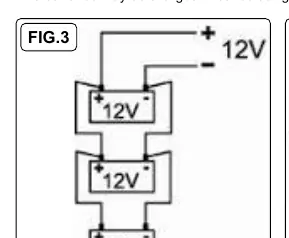
Fuses: The charger has two front-mounted fuses. The output protection fuse (left) protects against overload, short circuits, or cross-connection. The input protection fuse (right) protects the mains input. If a fuse blows, disconnect from the mains, allow the unit to cool, identify the cause, and replace with an identical fuse. Do not use fuses with copper bridges.
Thermal Protection: If the charger overheats due to high current, internal thermal protection will cut off the current. It will automatically reconnect once the unit has cooled sufficiently.
Manufacturer information
Sealey Group
Practical help
Common problems
Fuse blows
Disconnect from mains, allow to cool, identify cause (overload, short circuit, or cross-connection), and replace with an identical fuse.
Charger overheats
Internal thermal protection has cut off current. Wait for the unit to cool down; it will automatically reconnect.
Battery not charging
Check connections, ensure battery capacity is compatible, and verify electrolyte levels.
Before use
- Check battery capacity compatibility with charger output.
- Ensure battery terminals are clean and free from oxidation.
- Check electrolyte levels (if applicable) and top up with distilled water if needed.
- Verify charger voltage matches battery voltage (12V/24V).
- Ensure charger is disconnected from mains before connecting clamps.
- Set Charge Rate rocker switch to 'MIN' initially.
Specs in practice
- Output Charge Peak (EN)
- The maximum current the charger can deliver to the battery.
- Battery Range
- The recommended capacity (Ah) of batteries suitable for the specific charger model.
- Polarity protection
- Fuse type protecting the unit against incorrect connection of clamps.
Images and diagrams
- Fig 1: Ammeter reading during charging process.
- Fig 2: Control panel layout showing fuses and switches.
- Fig 3: Parallel connection method for multiple batteries.
- Fig 4: Series connection method for 24V output.
Model compatibility
- Do not simultaneously charge batteries of different types, capacities, or discharge levels.
- Suitable for regular and low maintenance lead-acid batteries.
- Use only Sealey genuine parts for fuse replacements.

Manual page author
David Miller
Documentation analyst
Organizes user manual content into clear summaries, with attention to model details, product context, and everyday usability.