Power / Batteries Chargers
User Manual for Sealey AUTOCHARGE1200HF Smart Charger & Maintainer
Quick guide for the Sealey AUTOCHARGE1200HF smart charger and maintainer. Learn how to connect, select charging modes, interpret LCD codes, and maintain your battery charger safely.
Table of contents
Manual images
Jump to the sectionImportant Information
The Sealey AUTOCHARGE1200HF is a dual-voltage smart charger and maintainer designed for EFB, AGM/GEL (stop/start), Lithium, and conventional lead-acid batteries. It is suitable for a wide range of vehicles, including cars, boats, motorcycles, and 24V commercial vehicles. Always ensure the charger is disconnected from the mains before attaching or detaching clamps. Do not use the charger to start an engine while connected to the battery.
Product Overview
The charger features a heavy-duty case with simple controls and a digital display. It includes inbuilt reverse polarity protection and a 9-stage charging process to ensure batteries are kept fully charged and ready for use.
Specifications
- Battery Range: 1.3-400Ah
- Output Voltage: 12V / 24V
- Output Charge: 12A at 12V, 6A at 24V
- Cable Length: 1.4m (including clamps)
- Fuse Rating: 5A
- IP Rating: IP20
- Supply: 230V
Operation
The charger is operated via the control panel. Follow these steps to charge a battery:
- Connection: Connect the charger to the battery before connecting to the mains supply. Ensure the red clamp is connected to the positive (+) terminal and the black clamp to the negative (-) terminal or vehicle chassis.
- Mode Selection: Use the buttons on the control panel to select the battery type (STD, AGM, GEL, Lithium), voltage (12V/24V), and charging current (2A, 4A, 8A, 12A, or Auto).
- Start Charging: Press the Enter/Exit button to begin the charging process.
- Completion: Once charging is complete, disconnect the unit from the mains power supply before disconnecting the clamps from the battery.
LCD Display and Fault Codes
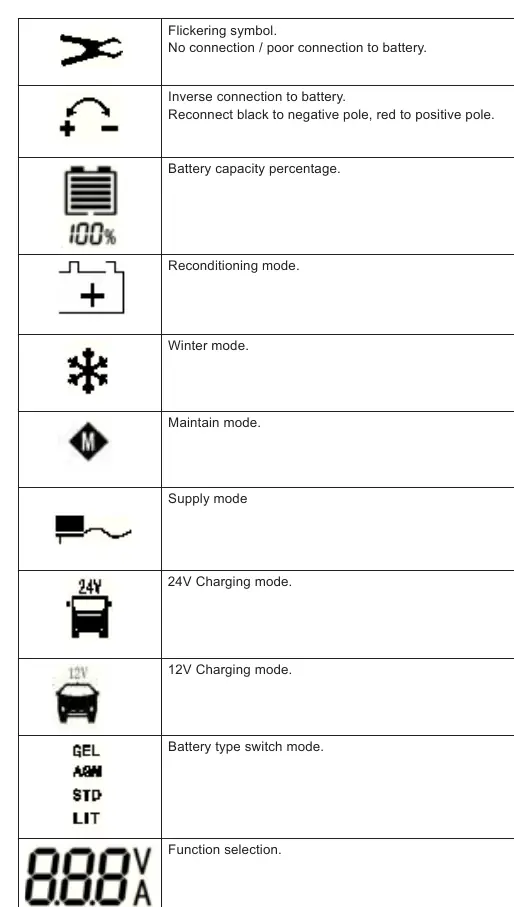
The LCD display provides real-time information on charging status and potential faults. Common icons include battery capacity percentage, reconditioning mode, winter mode, and supply mode. If a fault occurs, the display will show a code:
- F01: Short circuit protection
- F02: Over-voltage protection
- F03: Over-current protection
- F04: Over-temperature protection
- F05: Over-time charging
- F06: Reverse connection protection
Troubleshooting
If the charger does not react when powered on, check the mains connection and power supply. If an icon is permanently displayed, check for incorrect polarity. If an icon is flashing, check the battery connections and cables for damage. Note that charging modes can only be selected when the battery is not connected.
Maintenance
Disconnect from the power supply before performing any maintenance. Use a dry cloth to wipe battery corrosion, dirt, or oil from the connectors, cords, and charger case. Ensure all components are in good working condition. Servicing does not require opening the unit as there are no user-serviceable parts. Store the charger in a cool, dry place when not in use.
Manufacturer information
Sealey Group
Practical help
Common problems
No reaction when powered on
Check mains connection and power supply. Return to Sealey stockist if the issue persists.
Icon permanently displayed
Indicates incorrect polarity. Swap battery connections (red to positive, black to negative).
Flashing icon
Check connections to the battery and inspect for broken cables.
Mode cannot be selected
Ensure the battery is not connected. Mode can only be changed when the battery is disconnected.
Before use
- Inspect power supply leads, plugs, and all electrical connections for wear or damage.
- Ensure the charger voltage matches the battery voltage.
- Ensure the charger is placed in a well-ventilated area to prevent explosive gas buildup.
- Remove personal metallic items like rings, bracelets, and watches.
- Clean battery terminals if they are corroded or dirty before attaching clamps.
Specs in practice
- Battery Range (1.3-400Ah)
- The capacity range of batteries the charger can safely handle.
- Output (12/24V)
- The charger supports both 12V and 24V battery systems.
- Fuse Rating (5A)
- The specific fuse required for the plug; replace only with an identical rating.
Images and diagrams
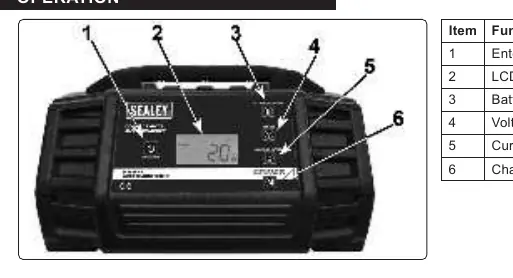
- Controls Panel: Shows the Enter/Exit button, LCD display, and buttons for battery type, voltage, current, and mode selection.
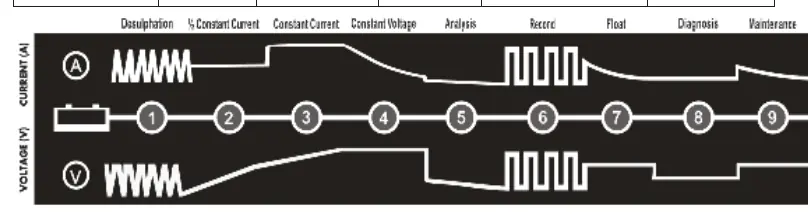
- 9-Stage Charging: Illustrates the process from desulphation to maintenance.
Model compatibility
- Compatible with EFB, AGM/GEL (stop/start), Lithium, and conventional lead-acid batteries.
- Do not use to charge non-rechargeable batteries.
- Do not simultaneously charge batteries of different capacities or discharge levels.

Manual page author
Emily Carter
User documentation editor
Prepares concise manual descriptions and highlights the most useful setup, operation, and maintenance information for readers.