Power / Batteries & Chargers
Sealey SPI10S 10A 12V Intelligent Battery Charger
Quick guide for the Sealey SPI10S 10A 12V Intelligent Battery Charger. Learn about setup, safety precautions, charging procedures, and troubleshooting.
Table of contents
Quick Guide for Sealey SPI10S
The Sealey SPI10S is a fully automatic, microprocessor-controlled battery charger and maintainer designed for 12V lead-acid batteries. It features Speed Charge technology and a float mode to keep batteries maintained. Before use, ensure the battery voltage matches the charger (12V) and that the battery is in good condition.
Safety Precautions
- Electrical Safety: Always inspect cables and plugs for wear before use. Use an RCD (Residual Current Device) if possible.
- Personal Safety: Wear eye protection and protective clothing. Keep fresh water and soap nearby in case of battery acid contact. Remove metallic items like rings or watches.
- Ventilation: Charge in a well-ventilated area to prevent the buildup of explosive gases. Do not cover ventilation louvres.
- Prohibitions: Do not charge non-rechargeable batteries, frozen batteries, or lithium-ion batteries. Do not smoke or allow sparks near the battery.
Preparation
Before connecting the charger:
- Uncoil all cables and remove cable ties.
- Clean battery terminals to remove corrosion.
- If the battery has removable caps, check the fluid level and top up with distilled water if necessary.
- Determine the battery voltage and ensure it is 12V.
- Ensure the charger is placed on a stable, dry, non-flammable surface.
Charging Procedure
Charging Inside a Vehicle
- Identify if the vehicle is negative or positive earthed.
- For negative-earthed vehicles: Connect the positive (RED) clip to the positive battery post. Connect the negative (BLACK) clip to the vehicle chassis or engine block, away from the battery and fuel lines.
- For positive-earthed vehicles: Connect the negative (BLACK) clip to the negative battery post. Connect the positive (RED) clip to the vehicle chassis or engine block.
- Connect the charger to the mains.
Charging Outside a Vehicle
- Connect a 24-inch (61cm) 6-gauge insulated battery cable to the negative battery post.
- Connect the positive (RED) charger clip to the positive battery post.
- Connect the negative (BLACK) charger clip to the free end of the cable attached to the negative post.
- Connect the charger to the mains.
Control Panel and Operation
The control panel features a digital display, language selection button, and charging status LED.
- Digital Display: Shows battery status and messages. It enters sleep mode during charging; press the button to wake it.
- Language Button: Press for 5 seconds to select the display language.
- LED Indicator: Solid green indicates charging; pulsing green indicates the battery is charged and in maintain mode; flashing green indicates an aborted charge.
Maintenance
- Unplug the charger before cleaning.
- Use a dry cloth to wipe away corrosion, dirt, or oil from connectors and the case.
- Ensure all components, such as plastic boots on clips, are in good condition.
- Store in a cool, dry place.
Troubleshooting
- Charger won't turn on: Check the mains outlet, fuse, and cable connections.
- "Connect Clamps" message: Ensure clamps are making a good connection and the in-line fuse is intact.
- "Charge Aborted": The battery may be too large, have a shorted cell, or the voltage is below 10V. Have the battery checked.
Manufacturer information
Sealey Group
Practical help
Common problems
Charger will not turn on
Check the mains outlet, circuit breaker, and ensure the mains cable and plug are secure.
Display shows 'CONNECT CLAMPS'
Ensure clamps are making a good connection to the battery terminals and check if the in-line fuse has blown.
Display shows 'CHARGE ABORTED-BAD BATTERY'
The battery may be too large, have a shorted cell, or voltage is below 10V. Have the battery tested or replaced.
Battery connectors do not spark
This is normal. The charger has an auto-start feature and will not supply current until a battery is properly connected.
Before use
- Verify battery is 12V lead-acid (including AGM/GEL, calcium, stop/start).
- Ensure battery terminals are clean and free of corrosion.
- Check battery fluid levels if caps are removable.
- Uncoil all cables and remove cable ties.
- Ensure the charger is placed on a stable, dry, non-flammable surface.
- Verify the charger is disconnected from the mains before attaching clamps.
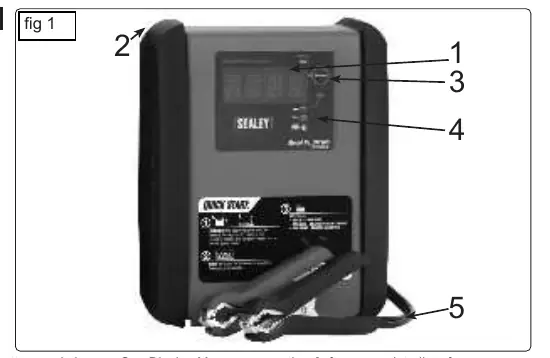
Images and diagrams
- 1: Digital display for status messages.
- 2: Hook attachment for storage.
- 3: Language selection button.
- 4: Charging status LED indicator.
- 5: Battery clamps (Quick connect).
Model compatibility
- Compatible with 12V lead-acid batteries (conventional, calcium, AGM/GEL, leisure, stop/start).
- Not suitable for dry-cell batteries (e.g., home appliances) or lithium-ion batteries.
- Marine batteries must be removed from the boat and charged on shore.

Manual page author
Emily Carter
User documentation editor
Prepares concise manual descriptions and highlights the most useful setup, operation, and maintenance information for readers.