General / Service Manuals
User Manual for Sealey 1153CX.V5 3 Tonne Long Chassis Trolley Jack
Quick guide for the Sealey 1153CX.V5 3 Tonne Long Chassis Trolley Jack. Includes safety instructions, operating procedures, maintenance, and troubleshooting steps.
Table of contents
Manual images
Jump to the sectionQuick guide from the manual
The Sealey 1153CX.V5 is a 3-tonne long chassis trolley jack designed for garage and recovery use. Before using the jack for the first time, you must purge the hydraulic unit to remove air. To do this, place the handle onto the release valve, open it by turning anti-clockwise, then place the handle into the jacking point and pump for 30 to 40 seconds. Always ensure the jack is used on level, solid ground and that the vehicle is secured with the handbrake engaged and in gear (or Park). Never use the jack to support a load; always use axle stands.
Safety instructions
- DANGER: Use the jack for lifting only, NOT for supporting the lifted load.
- Always use suitable capacity axle stands under the vehicle before proceeding with any task.
- Ensure the jack is in sound condition and good working order.
- Use the jack on level and solid ground, preferably concrete. Avoid tarmacadam as the jack may sink.
- Ensure the vehicle handbrake is engaged, the engine is switched off, and the transmission is in gear (or PARK).
- Ensure a minimum distance of 0.5m between the vehicle and static objects.
- DO NOT exceed the rated capacity of the jack (3 tonne).
- DO NOT adjust the safety overload valve.
- DO NOT allow persons to ride on the jack.
- When not in use, store the jack fully lowered in a safe, dry, childproof area.
Specifications
- Capacity: 3 tonne
- Min. saddle height: 140mm
- Max. saddle height: 432mm
- Max. chassis height: 165mm
- Length: 625mm
- Weight: 19kg
Operation
Jacking the vehicle
- Place the handle onto the release valve and turn it clockwise to close the valve.
- Place the handle into the socket and commence pumping until the saddle reaches the vehicle jacking point.
- Ensure the jacking point is centrally located on the saddle before raising the vehicle.
- If the jack becomes overloaded, a safety excess pressure valve will open and stop the vehicle from lifting.
Lowering the vehicle
- If using axle stands, raise the jack high enough to remove the stands.
- Place the handle on the release valve and turn it anti-clockwise very slowly to open the valve.
- The lowering speed is controlled by the amount you turn the handle. Lower carefully to avoid sudden descent.
Maintenance
IMPORTANT: Only fully qualified personnel should attempt hydraulic maintenance or repair.
- Keep the jack clean and lubricate all moving parts regularly.
- Before each use, check for broken, cracked, bent, or loose parts.
- After one year, the oil should be replaced to extend the life of the jack. Use hydraulic jack oil only.
- To check oil level: Fully lower the jack. Remove the front cover plate and filler plug. The correct level is the bottom of the screw hole. If low, fill as required. Pump the jack 5 or 6 times to expel air, then pump to full height and pour off excess oil before refitting the plug.
- WARNING: DO NOT use brake fluid or any fluid other than hydraulic jack oil, as this will cause serious damage and invalidate the warranty.
Troubleshooting
If the jack fails to operate correctly, check the following:
- Jack will not lift: Check for overload, low oil level, or air in the system. Ensure the release valve is closed.
- Jack feels spongy: Likely air in the system or incorrect oil level.
- Jack will not hold load: The release valve may be partially open, or there is dirt on the valve seats.
- Jack will not lower completely: May require lubrication, or the frame/link system is distorted due to overloading.
Manufacturer information
Sealey Group
Practical help
Common problems
Jack will not lift the load
Check for overload, low oil level, or air in the system. Ensure the release valve is closed.
Jack feels spongy
Check oil level (fill or remove excess) or purge air from the system.
Jack will not hold load
Check if the release valve is partially open or if there is dirt on the valve seats.
Jack will not lower completely
Lubricate external moving parts or check if the release valve is fully open.
Before use
- Ensure the jack is on level, solid ground (concrete preferred).
- Check for damaged, cracked, or loose parts before use.
- Ensure the vehicle handbrake is engaged and the engine is off.
- Purge the hydraulic unit of air before first use.
- Locate lifting points recommended by the vehicle manufacturer.
- Ensure axle stands are available to support the load.
Specs in practice
- Min. saddle height
- 140mm (lowest point of the saddle).
- Max. saddle height
- 432mm (highest point of the saddle).
Images and diagrams
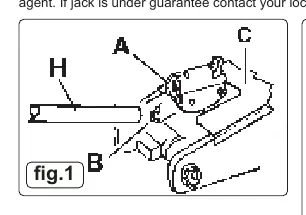
- Fig 1: Identifies the handle (H), release valve (B), and jacking point (A).
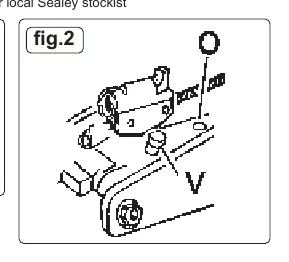
- Fig 2: Identifies the filler plug (O) and safety overload valve (V).
Model compatibility
- Use only hydraulic jack oil; do not use brake fluid.
- Use only on level, solid ground; avoid tarmacadam.

Manual page author
Michael Turner
Technical manual editor
Reviews PDF manuals for structure, safety notes, and practical product details so readers can find the right information quickly.