Industrial / Space Heaters
User Manual for Sealey 2000W Convector Heater CD2013TT.V4
Comprehensive user guide for the Sealey 2000W Convector Heater (CD2013TT.V4). Includes assembly instructions, operation of the turbo fan and 24-hour timer, safety warnings, and maintenance procedures.
Quick answers from the manual
Quick answer
- The Sealey CD2013TT.V4 is a 2000W convector heater with a turbo fan and 24-hour timer. To operate, plug it in, set the thermostat, and select the desired heat level (I for 1250W, II for 2000W). p. 2
Key actions
- Attach feet to the base using the provided screws. p. 2
- Set the timer by rotating the outer ring to the current time and pushing pins outwards for active periods. p. 2
First start
- Ensure the heater is on a stable surface, plug into the mains, turn the thermostat to a high setting, and select the heat level. p. 2
Problems and fixes
Safety cut-out activation
Switch off, unplug, allow to cool, and check for obstructions at the air inlet/outlet.
p. 3Maintenance and reset
- Clean with a soft dry cloth; do not use abrasives. Periodically clean air inlet/outlet with a soft brush. p. 3
Technical specifications
| Parameter | Value | Meaning | Pages |
|---|---|---|---|
| Power | 1250/2000W | Adjustable heat output settings. | p. 2 |
| Weight | 2.8kg | Unit weight. | p. 2 |
| Supply | 230V | Required voltage. | p. 2 |
Where to find it in the PDF
- Safety Instructions p. 1, 2
- Assembly and Operation p. 2
- Maintenance p. 3
Table of contents
Manual images
Click an image to enlargeQuick Guide
The Sealey 2000W Convector Heater is designed for indoor use to provide adjustable heating. Key safety requirements include maintaining a minimum distance of 1m from flammable materials (curtains, textiles) and ensuring the heater is placed on a stable, horizontal surface. Never cover the heater to avoid overheating.
Assembly
Before first use, the feet must be attached to the heater body:
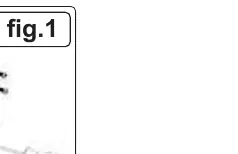
- Remove the self-tapping screws located in the base of the heater body.
- Use these screws to secure the feet to the base (see Fig. 1).
Operation
The heater features adjustable heat settings and a turbo fan for accelerated heating.
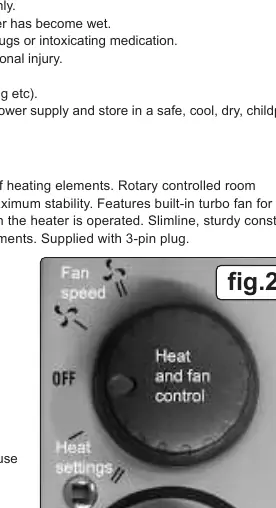
Heating and Fan Control
- Plug the heater into the mains supply.
- Turn the thermostat knob clockwise to a high setting.
- Heat Settings: Select 'I' for 1250W output or 'II' for 2000W output.
- Turbo Fan: Select the fan symbol (low I or high II speed) to boost air output. The fan can also be used for cool air circulation by switching off the heat setting switches.
- Thermostat Adjustment: Once the room reaches the desired temperature, turn the thermostat dial slowly counter-clockwise until the heat output light goes out and you hear an audible click. The heater will cycle on and off to maintain this temperature.
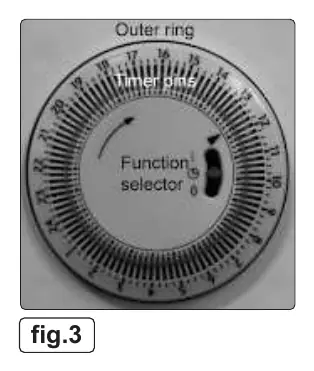
Timer Function
The heater includes a 24-hour timer:
- Set Time: Turn the outer ring clockwise to set the current time. This must be repeated if the heater is disconnected from the power.
- Function Selector: Set to 'Top' for permanent on, 'Centre' for timed operation, or 'Bottom' for off.
- Programming: Move the timer pins outwards for the periods you want the heater to be active. Each pin represents 15 minutes.
Safety Cut Out
The unit is equipped with a thermostatic safety cut-out. If the airflow is blocked or a technical malfunction occurs, the heater will turn off automatically. If this happens, unplug the unit, allow it to cool completely, and check the air inlet/outlet for obstructions before attempting to restart.
Maintenance
- Always unplug the heater and allow it to cool before performing maintenance.
- Clean the unit with a soft, dry cloth. Do not use abrasives or solvents.
- Periodically check the air inlet and outlet, cleaning with a soft brush to ensure the airway remains clear.
Manufacturer information
Sealey Group
Practical help
Common problems
Heater does not turn on
Check the power supply, ensure the plug is connected, and verify the thermostat is set high enough. If the safety cut-out has activated, unplug and allow to cool.
Heater overheats or shuts down unexpectedly
Check for obstructions at the air inlet or outlet. Ensure the heater is not covered and is on a stable surface.
Before use
- Inspect power supply leads, plugs, and connections for wear or damage.
- Ensure the heater is placed on a horizontal and stable surface.
- Maintain a minimum distance of 1m from furniture, curtains, and other flammable materials.
- Verify the voltage rating matches your power supply.
- Ensure the heater is not located immediately below a socket outlet.
Specs in practice
- Heat Settings
- I (1250W) and II (2000W) allow for gradual control of heating elements.
- Safety Cut Out
- Automatic shut-off feature triggered by blocked airflow or technical malfunction.
Images and diagrams
- Fig. 1: Shows the assembly of the feet to the base of the heater.
- Fig. 2: Illustrates the control panel, including fan speed, heat settings, and thermostat dial.
- Fig. 3: Illustrates the 24-hour timer dial and function selector.
Model compatibility
- Designed for indoor use only.
- Not suitable for use in bathrooms, showers, or swimming pool areas.
- Not for use in wet or damp environments.

Manual page author
David Miller
Documentation analyst
Organizes user manual content into clear summaries, with attention to model details, product context, and everyday usability.