Furniture / Storage Cabinets
User Manual for Sealey IR14 Infrared Cabinet Heater
Quick guide for the Sealey IR14 Infrared Cabinet Heater. Learn how to assemble, operate the 7-day timer, set temperature modes, and perform maintenance safely.
Table of contents
Manual images
Click an image to enlargeQuick guide from the manual
The Sealey IR14 is an infrared cabinet heater designed for indoor use. It features a powder-coated metal cabinet, two ruby halogen elements, an adjustable thermostat (15°C – 45°C), and a programmable 7-day timer. It includes safety features such as a tilt cut-out switch and open window detection.
Assembly
- Wheels: Attach the wheel sub-assemblies to the base using the provided bolts. Ensure lockable wheels are at the rear.
- Handle: Attach the handle to the top using the provided bolts and shaped spacers.
- Lamps: Remove the front grille by unscrewing the retaining screws. Carefully insert the lamps into the push-in side fittings. Do not touch the lamp glass with fingers; use a soft cloth or touch only the ceramic ends. Reassemble the grille.
Operation
Connect to the mains supply and turn on the red rocker switch. The screen will show 'OF' in standby mode.
- Power On/Off: Press the power button to start or stop the heater.
- Temperature Setting: The default is 30°C. Use the up/down arrows to adjust between 15°C and 45°C. The heater only works when the ambient temperature is lower than the set temperature.
- Power Settings: Press the power setting button to cycle through: Top element only, Bottom element only, or Both elements.
- Date and Time: Press the clock button for 3 seconds to set the current day, hour, and minutes.
- Timer Modes: You can set 7 daily programs with 3 working time modes per day. Use the clock button to navigate through day selection, mode selection (01, 02, 03), and time settings.
- Open Window Detection: If the ambient temperature drops by more than 5°C in 10 minutes, the heater will power off automatically and sound 3 beeps.
Safety Features
- Tilt Switch: The heater automatically switches off if tilted beyond 25° in any direction. If it does not turn on after being returned to vertical, tip it slightly in the opposite direction to reset the internal switch.
- Child Safety: Keep children under 3 years away unless supervised. Children aged 3-8 should not plug in, regulate, or clean the appliance.
Maintenance
- Cleaning: Always unplug and allow the unit to cool before maintenance. Remove the front grille to clean the reflector with a clean, dry cloth. Do not use abrasives or solvents.
- Element Replacement: Remove the front grille. Ease the sprung sockets on the ends of the element back to release it. Insert the new lamp into the push-in fittings.
- Battery: The battery for the clock is located on the lower PCB and should be replaced by a qualified person.
Manufacturer information
Sealey Group
Practical help
Common problems
Heater does not turn on
Ensure the unit is on a level surface (tilt switch may be active). Check if the ambient temperature is higher than the set temperature. Check power supply and fuse.
Heater turns off automatically
The open window detection function may have triggered due to a rapid temperature drop (>5°C in 10 mins). Press the power button to restart.
Heater does not heat
Ensure the ambient temperature is lower than the set temperature. Check that the correct power setting (1, 2, or 3) is selected.
Before use
- Ensure the heater is placed on a horizontal and stable surface.
- Maintain a minimum distance of 2m from flammable materials (curtains, textiles).
- Check that the power cable and plug are not damaged.
- Ensure the grille is properly fitted.
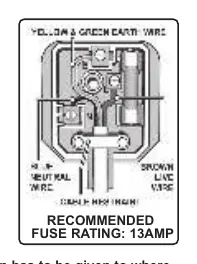
- Verify the fuse rating is 13A.
Specs in practice
- Thermostat Range
- Adjustable from 15°C to 45°C.
Images and diagrams
- Wiring Diagram: Shows the correct connection for the 13A plug (Green/Yellow to Earth, Brown to Live, Blue to Neutral).
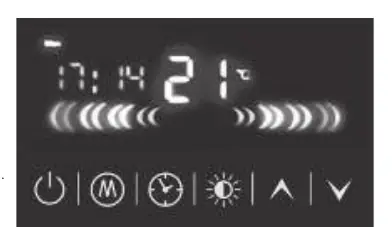
- Control Panel: Displays the LED screen, power button, mode button, clock button, and temperature adjustment arrows.
Model compatibility
- Indoor use only.
- Not for use in small rooms occupied by persons unable to leave the room without supervision.
- Do not use with external programmers or timers that switch the heater on automatically.

Manual page author
David Miller
Documentation analyst
Organizes user manual content into clear summaries, with attention to model details, product context, and everyday usability.