Industrial / Space Heaters
User Manual for Sealey IR20.V5 Infrared Heater
Quick guide for the Sealey IR20.V5 infrared heater. Includes setup, fuel requirements, operation, maintenance, and troubleshooting steps.
Quick answers from the manual
Quick answer
- The Sealey IR20.V5 is a multi-fuel infrared heater designed for well-ventilated areas. It runs on paraffin, kerosene, or diesel, with a 15L tank providing approximately 8 hours of runtime. p. 2
Key actions
- Starting the heater p. 3
- Stopping the heater p. 3
First start
- Run the heater outdoors for 10 minutes on the first burn to allow manufacturing oils to burn off. p. 3
Problems and fixes
Heater fires but shuts down
Check fuel filter, nozzle, photocell, or cooling fan.
p. 4Maintenance and reset
- Flush fuel tank every 200 hours. p. 3
- Clean spark plug every 600 hours. p. 3
Technical specifications
| Parameter | Value | Meaning | Pages |
|---|---|---|---|
| Fuel Tank | 15L | Capacity | p. 2 |
| Output | 20.5kW | Heat output | p. 2 |
Where to find it in the PDF
- Assembly p. 2
- Operation p. 2, 3
- Maintenance p. 3
- Troubleshooting p. 4
Table of contents
Manual images
Click an image to enlargeQuick guide from the manual
The Sealey IR20.V5 is a multi-fuel infrared heater designed for well-ventilated areas. It is compatible with paraffin, kerosene, or diesel. The unit features a 15L fuel tank providing approximately 8 hours of runtime. Important: This product is not suitable for primary heating purposes and must be used in well-ventilated areas to prevent carbon monoxide poisoning.
Assembly
Unpack the heater and check for any missing or damaged parts. To assemble:
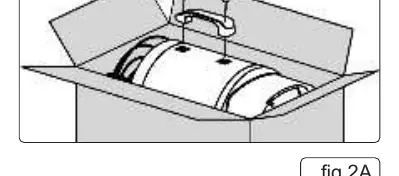
- Attach the handle by aligning the holes in the handle with the holes in the upper shell of the heater.
- Insert the screws and tighten securely.
- Remove all packaging material from the carton.
Operation
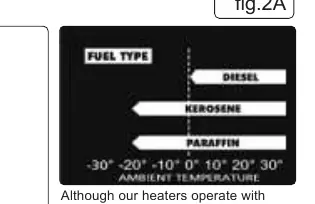
Fuelling: Use paraffin, kerosene, or diesel. For optimal performance, paraffin is recommended as it contains fewer contaminants. Do not use bio-diesel, benzene, alcohol, or other volatile fuels.
Starting the heater:
- Fill the tank with approved fuel until the gauge points to 'F'.
- Connect the heater to a power source (use an extension cable at least 1.8m long, 14 AWG).
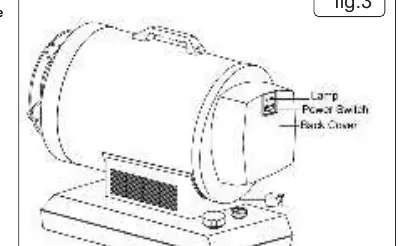
- Push the power switch to the 'ON' position. The power indicator lamp will light.
- Note: On the first ignition, you may hear a grinding sound as the fuel pump removes air from the line.
Stopping the heater:
- Turn the power switch to the 'OFF' position.
- The combustion will stop, and the cooling cycle will begin (approx. 7 minutes).
- Wait for the cooling cycle to complete before unplugging the unit.
Maintenance
Regular maintenance is required for safe and efficient operation:
- Long-term storage: Drain the fuel tank completely, rinse with a small amount of fresh fuel, and store in a dry, well-ventilated area.
- Fuel Tank: Flush every 200 hours of operation.
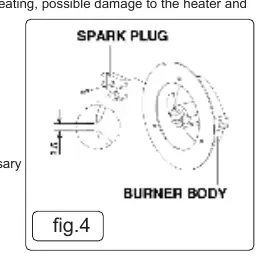
- Spark Plug: Clean and re-gap (0.140" / 3.5mm) every 600 hours.
- Fan Blades: Clean at least once per heating season.
- Nozzles: Clean or replace at least once per heating season.
- Photocell: Clean the lens with a cotton swab and water or alcohol at least once per heating season.
- Filters: Clean at least twice per heating season by rinsing in clean paraffin or diesel.
Safety
Always ensure the heater is on a level, stable surface. Maintain a minimum distance of 3m from the heater output and 2m from walls or objects. Never move the heater while it is operating or hot. Ensure adequate ventilation (minimum 64cm² opening for this heater).
Manufacturer information
Sealey Group
Practical help
Common problems
Heater fires but shuts down after a short period
Check for a dirty fuel filter, dirty nozzle, dirty/defective photocell, or obstructed cooling fan.
Heater will not operate or motor runs for a short time
Check fuel level, spark plug condition, electrical connections, or transformer.
Grinding noise
Air in the fuel pump. The sound should stop after 3 seconds. If it continues, add fuel to the tank.
Before use
- Ensure the heater is on a level, stable surface.
- Check fuel level (Paraffin/Kerosene/Diesel).
- Ensure adequate ventilation (minimum 64cm² opening).
- Check power supply and extension cable (min 1.8m, 14 AWG).
- Inspect for any damage to cables or plugs.
Specs in practice
- Ambient Temp
- Safe to operate at a minimum ambient temperature of -20°C.
Images and diagrams
- Fig 1: Handle assembly instructions.
- Fig 2A: Fuel type chart based on ambient temperature.
- Fig 3: Ignition and power switch location.
- Fig 4: Spark plug gap adjustment (0.140"/3.5mm).
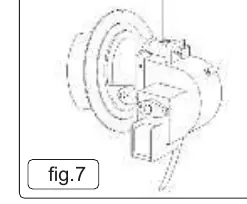
- Fig 7: Photocell assembly.
Model compatibility
- Not suitable for primary heating purposes.
- Do not use bio-diesel as it damages seals and filters.
- Use paraffin for optimal performance to avoid odors.

Manual page author
Michael Turner
Technical manual editor
Reviews PDF manuals for structure, safety notes, and practical product details so readers can find the right information quickly.