Home Appliances / Space Heaters
User Manual for Sealey IWMH2003.V2 Infrared Quartz Heater
Quick guide for the Sealey IWMH2003.V2 2000W infrared quartz heater. Includes installation steps, operation settings, safety warnings, and technical specifications.
Quick answers from the manual
Quick answer
- The Sealey IWMH2003.V2 is a 2000W infrared quartz heater. It is operated via a pull cord with three heat settings (L, M, H) and features an automatic tilt safety cut-out if tilted beyond 25 degrees. p. 2
Key actions
- Mounting the heater p. 2
- Operating the heater p. 2
First start
- Ensure the heater is mounted at the correct distance from objects and the floor, then plug in and pull the cord to select the heat setting. p. 1, 2
Problems and fixes
Heater cuts out
The tilt safety mechanism may have activated. Position the heater upright to turn it back on.
p. 2Maintenance and reset
- Disconnect from mains and allow to cool before cleaning. Clean with a soft damp cloth and mild detergent. p. 2
Technical specifications
| Parameter | Value | Meaning | Pages |
|---|---|---|---|
| Power | 2000W | Maximum heat output | p. 2 |
| Input supply | 230V-13A | Electrical requirements | p. 2 |
Where to find it in the PDF
- Safety Instructions p. 1
- Mounting and Operation p. 2
Table of contents
Manual images
Click an image to enlargeQuick guide from the manual
The Sealey IWMH2003.V2 is a 2000W infrared quartz heater designed for wall mounting. It features three heat settings controlled by a pull cord and an automatic tilt safety cut-out. The unit is IP44 rated, making it suitable for outdoor use. Always ensure the heater is mounted at least 900mm from any object, 450mm from the ceiling, and 1800mm from the floor level.
Safety Warnings
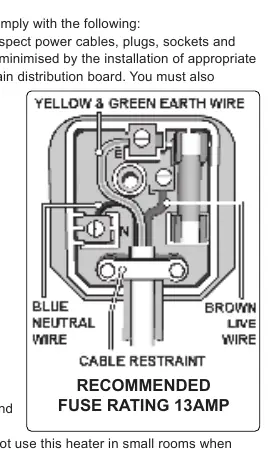
- Electrical Safety: Ensure the voltage matches the power supply. Use a Residual Current Circuit Breaker (RCCB) in the main distribution board. If fitting a plug, ensure the correct fuse (13A) is used.
- General Safety: Never touch the element glass directly with fingers. Do not use in small rooms occupied by persons unable to leave without supervision. Do not use with automatic timers. Do not cover the heater.
- Tilt Safety: The heater is fitted with a tilt safety mechanism. If tilted beyond 25 degrees, the heater will cut out. Position the heater upright to resume operation.
Specifications
- Power: 2000W
- Input Supply: 230V-13A
- Dimensions: 485 x 250 x 170mm
- IP Rating: IP44 (Suitable for outdoor use)
Mounting and Installation
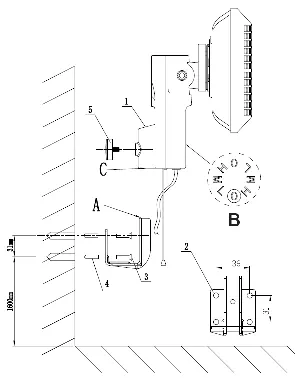
- Drill 4 holes in the wall to mount the wall bracket (2).
- Place wall plugs (4) into the holes.
- Align the wall bracket (2) with the holes and fix it using screws (3).
- Insert the wall bracket (A) into the hole (C) of the main heater body (1).
- Use the screw knob (5) to secure the main body (1) to the wall bracket (A).
Operation
Ensure the heater is at the required angle (0° to 25°) before switching it on. Plug in the heater and pull the string to cycle through the settings:
- Position 0: Off
- Position L: Middle element only
- Position M: Two outer elements
- Position H: All three elements
Maintenance
Always disconnect from the mains and allow the heater to cool completely before cleaning. Clean the exterior with a soft damp cloth and mild detergent. Do not use water, liquids, or abrasive cleaners. If the lamps need replacement, contact your authorised Sealey stockist.
Manufacturer information
Sealey Group
Practical help
Common problems
Heater does not turn on
Check power supply and ensure the heater is positioned upright (tilt safety mechanism may have cut power if tilted beyond 25 degrees).
Fuse blows
Ensure the fuse is replaced with an identical type and rating (13A).
Heater is too hot to touch
Allow the heater to cool down completely after switching off before attempting any cleaning or maintenance.
Before use
- Ensure the heater is at least 900mm from any object, 450mm from the ceiling, and 1800mm from the floor.
- Inspect power cables, plugs, and connectors for wear or damage.
- Verify that the voltage matches the power supply.
- Check that element guards are in place, undamaged, and firmly attached.
- Ensure the heater is in good condition before use.
Specs in practice
- Input Supply
- 230V-13A electrical requirement.
Images and diagrams
- Wiring diagram: Shows the connection of the Green/Yellow earth wire to terminal E, Brown live wire to terminal L, and Blue neutral wire to terminal N.
- Mounting diagram: Illustrates the assembly of the wall bracket (2), screws (3), wall plugs (4), and the screw knob (5) used to secure the heater body.
Model compatibility
- Suitable for industrial or domestic applications.
- Suitable for outdoor use (IP44 Rated).
- Not for use in small rooms with vulnerable persons without constant supervision.

Manual page author
Emily Carter
User documentation editor
Prepares concise manual descriptions and highlights the most useful setup, operation, and maintenance information for readers.