Tools / Drills
User Manual for Sealey PDM Series Floor Pillar Drill
Quick guide for the Sealey PDM Series floor pillar drill. Includes assembly instructions, speed settings, maintenance tips, and troubleshooting for models PDM170F.V2, PDM210F.V2, PDM240F.V2, and PDM260F.V2.
Table of contents
Manual images
Click an image to enlargeQuick guide from the manual
This manual provides essential instructions for the safe operation and maintenance of the Sealey PDM Series floor pillar drills. Always disconnect the drill from the power supply before performing any maintenance or changing accessories. Ensure the drill is securely bolted to the floor and that all guards are in place before operation.
Safety
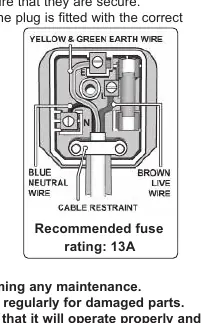
- Electrical Safety: Ensure the voltage rating matches your power supply. The drill is fitted with a 13A plug. Repairs must be carried out by a qualified electrician.
- General Safety: Wear eye and ear protection. Use a face mask if dust is generated. Keep the work area clean, well-lit, and free of unrelated materials. Secure the workpiece with clamps or a vice; never hold it by hand.
- Operational Safety: Do not operate the drill if damaged or if parts are missing. Do not use in wet or damp locations.
Assembly
- Place the column assembly on the base and secure with bolts and washers.
- Install the table bracket onto the column, engaging the gear with the rack.
- Install the rack collar and tighten firmly.
- Attach the table adjusting handle and pivoted clamp bolt.
- Install the table and table clamp bolt.
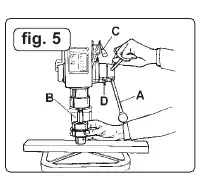
- Place the head assembly over the column, align with the base, and secure with the two set screws on the side of the head.
- Fit the feed handle to the pinion shaft hub.
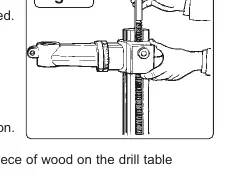
- Install the chuck: Open jaws, place wood on the table, insert arbor into the spindle, and use the feed handle to seat the arbor tapers.
- Install the safety guard on the quill shaft flange.
Operation
- Drill Bit: Insert into chuck jaws to 25mm deep and center before tightening.
- Table Adjustment: Use the clamp bolt and bracket handle to adjust height. Use the work table bolt to adjust tilt.
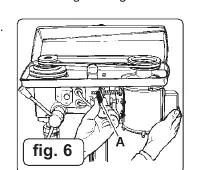
- Speed Adjustment: Open the pulley case, loosen belt tension lock screws, and move belts to the desired position according to the speed chart inside the pulley cover.
- Belt Tension: With lock screws loose, use hand pressure on the adjusting handle to set tension (max 13mm belt give).
- Drill Depth: Use the scale on the side of the head, loosen the locking screw, set the desired depth, and retighten.
Maintenance
- Clean the tool after each use.
- Apply maintenance spray to the table and column to prevent rust.
- Periodically lubricate the table elevation rack, gear, worm mechanism, and spindle sleeve exterior.
- Blow out accumulated dust from the motor.
- For belt changing, isolate the power, remove tension, replace the belt, and re-tension.
Troubleshooting
If the machine will not start, check that the chuck guard is deployed and the belt cover is secure. If the drill binds, reduce feed pressure, adjust belt tension, or check the drill bit. If the drill burns or smokes, reduce speed, clean the bit, or use a new bit.
Manufacturer information
Sealey Group
Practical help
Common problems
Machine will not start
Ensure the chuck guard is deployed and the belt cover is securely closed.
Excessive noise
Check belt tension, lubricate the spindle/quill, tighten the pulley, or replace the bearing.
Drill binds in the workpiece
Apply less feed pressure, adjust belt tension, tighten chuck jaws, or reduce speed.
Drill burns or smokes
Reduce speed, clean the drill bit, use a new bit, or apply lubrication while drilling.
Table is difficult to raise/lower
Lubricate with light oil or straighten the rack.
Before use
- Ensure the drill is unplugged before maintenance.
- Check all guards and holding screws are in place and tight.
- Secure the drill to the floor.
- Wear approved eye and ear protection.
- Remove adjusting keys and wrenches from the machine.
- Use clamps or a vice to secure the workpiece.
Specs in practice
- Drilling Capacity
- The maximum diameter of the drill bit the chuck can hold.
- Spindle Travel
- The maximum vertical distance the drill bit can move during operation.
Images and diagrams
- Wiring Diagram: Shows the correct connection of Live, Neutral, and Earth wires to the 13A plug.
- Assembly Figures: Illustrate the installation of the table bracket, rack, head assembly, and chuck.
Model compatibility
- Models covered: PDM170F.V2, PDM210F.V2, PDM240F.V2, PDM260F.V2.
- Optional Keyless Chuck (PDM/KC) is available for all models.

Manual page author
David Miller
Documentation analyst
Organizes user manual content into clear summaries, with attention to model details, product context, and everyday usability.