Tools / Tool Storage
User Manual for Sealey AP6310BE.V2 Mobile Tool Cabinet
Quick guide for the Sealey AP6310BE.V2 mobile tool cabinet. Includes assembly instructions, safety warnings, maintenance tips, and specifications for the 1600mm unit with power charging drawer.
Table of contents
Manual images
Click an image to enlargeQuick guide from the manual
The Sealey AP6310BE.V2 is a heavy-duty steel mobile tool cabinet. Due to the weight of the unit, it is essential to obtain the help of at least one other person before attempting to unpack or move it. Always operate the unit on level, solid ground, preferably concrete. To prevent tipping, open only one drawer at a time and ensure all drawers are closed and secured before moving the cabinet.
Safety instructions
- Ensure compliance with local health and safety and workshop practice regulations.
- Do not use the unit outdoors or in damp/wet locations where condensation may occur.
- Do not clean surfaces with solvents that may damage the protective coating.
- Do not step on the drawers.
- Do not overload the drawers; the weight limit is 36kg per drawer.
- Keep children and unauthorized persons away from the work area.
Assembly
The cabinet requires minor assembly before use:
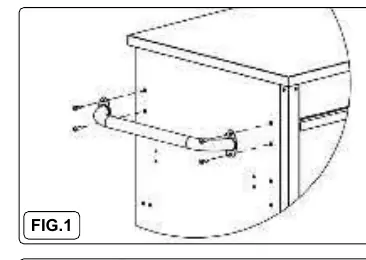
- Handle: Mount the side handle onto the left-hand end of the cabinet using the 4 provided M6 x 16mm bolts.
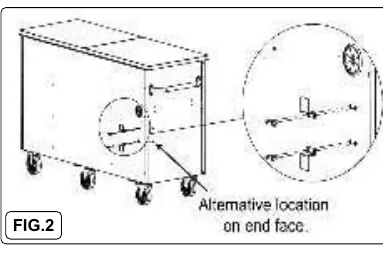
- Storage Hooks: Mount the storage hooks using bolts at each end of the cabinet, or alternatively, mount one set on the reverse face of either end.
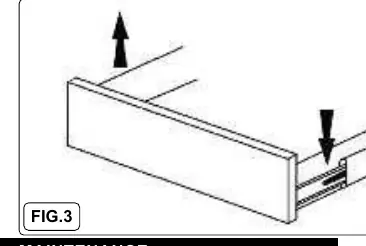
- Bottle Opener: Fit the bottle opener to the left-hand (handle) end of the cabinet using two M6 x 16mm bolts.
- Power Rail: Mounting holes are provided at both ends of the cabinet for an optional power rail (Model No. EL34USBB, not included).
Drawer operation
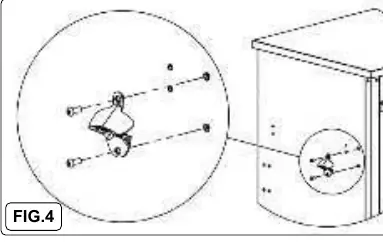
To remove a drawer with roller sliders:
- Pull the drawer out completely.
- Press down the right tab and lift up the left tab simultaneously.
- Pull the drawer off the slides.
To reinstall the drawer, realign it with the internal drawer slide and push until it locks in place.
Maintenance
- Periodically lubricate wheel axles and tighten all nuts and bolts.
- Keep all surfaces clean by brushing off and wiping down with a damp cloth and mild detergent.
- Lubricate the drawer slides sparingly every six months.
- Use a non-abrasive cleaner to remove stubborn grease and oil marks.
Technical specifications
- Overall Size: 1600 x 584 x 988mm.
- Power Charging Area: Includes 4 x 230V sockets and 2 x 5V 2.4A USB sockets.
- Drawer Load Limit: 36kg per drawer.
- Construction: Heavy-duty steel with steel inner walls and 45mm ball-bearing drawer slides.
Manufacturer information
Sealey Group
Practical help
Common problems
Unit tipping over
Ensure only one drawer is open at a time. Close and secure all drawers before moving the cabinet.
Drawer sticking or difficult to move
Check if the drawer is overloaded (max 36kg). Lubricate the drawer slides sparingly every six months.
Surface damage
Do not use solvents for cleaning. Use a non-abrasive cleaner for stubborn grease or oil marks.
Before use
- Ensure the unit is placed on level, solid ground (preferably concrete).
- Verify the work area is clean, uncluttered, and well-lit.
- Check that all bolts (handle, hooks, bottle opener) are tightened.
- Ensure the unit is not overloaded (max 36kg per drawer).
- Confirm that all drawers are closed and secured before moving the unit.
Specs in practice
- Overall Size
- 1600 x 584 x 988mm (W x D x H).
- Drawer Load Limit
- Maximum 36kg per drawer.
- Power Sockets
- 4 x 230V sockets and 2 x 5V 2.4A USB sockets located in the charging drawer.
Images and diagrams
- Fig 1: Shows the installation of the side handle using 4 bolts.
- Fig 2: Shows the mounting locations for the storage hooks on the cabinet ends.
- Fig 3: Illustrates the tab mechanism for removing and reinstalling drawers.
- Fig 4: Shows the installation of the bottle opener.
Model compatibility
- Compatible with optional power rail Model No. EL34USBB (not included).
- Mounting points for the power rail are provided at both ends of the cabinet.

Manual page author
Michael Turner
Technical manual editor
Reviews PDF manuals for structure, safety notes, and practical product details so readers can find the right information quickly.