General / Service Manuals
User Manual for Sealey 1050CXHV 2 Tonne Trolley Jack
Quick guide for the Sealey 1050CXHV 2 Tonne Trolley Jack. Includes assembly instructions, operating procedures, maintenance tips, and troubleshooting steps for safe and efficient use.
Table of contents
Manual images
Click an image to enlargeQuick guide from the manual
This manual provides essential instructions for the Sealey 1050CXHV 2 Tonne Trolley Jack. Before use, ensure the jack is on level, solid ground and that you have axle stands available to support the load. Always purge the hydraulic system of air before the first use. Never exceed the 2-tonne capacity and never use the jack to support a load for an extended period; always transfer the load to axle stands.
Safety instructions
- Use the jack only on level and solid ground (preferably concrete).
- Ensure the vehicle handbrake is engaged and the transmission is in gear or PARK.
- Always use axle stands to support the vehicle before working underneath it.
- Do not exceed the rated capacity of 2 tonnes.
- Do not adjust the safety overload valve.
- Keep the jack clean and store it fully lowered in a safe, dry area.
Assembly
To assemble the jack for operation:
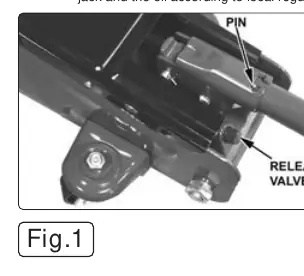
- Handle Installation: Place the handle into the jacking socket and turn it to engage the external pin (see Fig.1).
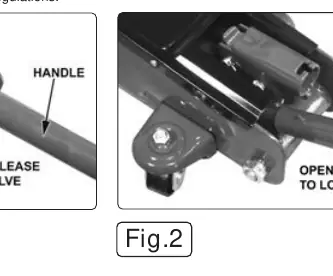
- Release Valve Operation: Engage the cross pin in the open end of the handle with the slot in the end of the release valve (see Fig.2).
Operation
Before first use
Purge the hydraulic unit to eliminate air:
- Place the handle onto the release valve nut and turn it anti-clockwise to open the valve.
- Place the handle back into the jacking socket and pump for 30 to 40 seconds.
- Close the release valve by turning the nut clockwise.
- Apply a few drops of hydraulic jack oil to the pump piston and pump the handle to distribute the oil.
Jacking and lowering
- Jacking: Close the release valve using the handle. Place the handle in the socket and pump until the saddle reaches the vehicle lifting point. Ensure the lifting point is stable and centered.
- Lowering: Raise the jack slightly to remove axle stands. Place the handle onto the release valve nut and turn it anti-clockwise very slowly. The lowering speed is controlled by the degree of rotation.
Maintenance
- Lubrication: Keep the jack clean and lubricate all moving parts regularly.
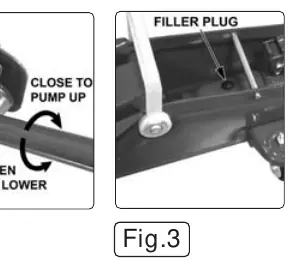
- Oil Level: To check the oil, fully lower the jack and remove the oil filler plug (see Fig.3). The level should be just below the bottom of the plug. Use only hydraulic jack oil.
- Storage: Store the jack in its lowest position to minimize corrosion.
Troubleshooting
If the jack fails to operate correctly, check the following:
- Jack will not lift: Check for overload, low oil level, or an incorrectly closed release valve.
- Spongy feel: Often caused by air in the system. Open the release valve and pump the handle several times to purge air.
- Jack will not lower: Ensure the release valve is fully open and check for lack of lubrication on moving parts.
Manufacturer information
Sealey Group
Practical help
Common problems
Jack will not lift the load
Check if the jack is overloaded, oil level is low, or the release valve is not closed. If air is in the system, open the valve and pump the handle several times.
Jack feels spongy
This usually indicates air in the system. Open the release valve and pump the handle several times to purge air, then close and retry.
Jack will not lower completely
Check if the unit requires lubrication, the release valve is only partially open, or if the frame is distorted due to overloading.
Before use
- Ensure the jack is on level, solid ground (not tarmacadam).
- Verify the vehicle handbrake is engaged and the engine is off.
- Ensure axle stands are available to support the vehicle.
- Check for any visible damage to the ram, pump, or frame.
- Purge the hydraulic system of air before the first use.
Specs in practice
- Max. saddle height
- 330mm, the highest point the jack can lift.
- Min. saddle height
- 130mm, the lowest clearance required to position the jack.
Images and diagrams
- Fig.1: Shows how to insert the handle into the jacking socket and engage the pin.
- Fig.2: Shows how to engage the handle with the release valve nut to control lowering.
- Fig.3: Shows the location of the oil filler plug for maintenance.
Model compatibility
- Use only hydraulic jack oil. Do not use brake fluid.
- Only use genuine Sealey parts for repairs.
- Hydraulic maintenance must be performed by a qualified person.

Manual page author
David Miller
Documentation analyst
Organizes user manual content into clear summaries, with attention to model details, product context, and everyday usability.