Lighting / Work Lights
User Manual for Sealey PC310.V2 Wet & Dry Valeting Machine
Comprehensive user guide for the Sealey PC310.V2 20L Wet & Dry Valeting Machine. Includes assembly instructions, operation modes, maintenance tips, and troubleshooting steps.
Quick answers from the manual
Quick answer
- The Sealey PC310.V2 is a 1400W wet and dry valeting machine with a 20L drum, suitable for cleaning carpets, upholstery, and car interiors. p. 1, 2
Key actions
- Emptying the tank p. 4
- Cleaning filters p. 4
First start
- Assemble the base and wheels, attach the detergent tank, install the appropriate filters, and connect the hose and brushes. p. 3
Problems and fixes
Weak suction
Clean filters, tubes, hose, or suction port; ensure head unit is connected correctly.
p. 5Maintenance and reset
- Clean filters after heavy use and add lubricating oil to sealing locks and pipe jacks. p. 4
Technical specifications
| Parameter | Value | Meaning | Pages |
|---|---|---|---|
| Motor Power | 1400W | Power rating of the vacuum motor. | p. 2 |
| Drum Size | 20L | Capacity of the waste container. | p. 2 |
Where to find it in the PDF
- Safety and Introduction p. 1
- Specification and Contents p. 2
- Assembly and Operation p. 3, 4
- Maintenance and Troubleshooting p. 4, 5
Table of contents
Manual images
Click an image to enlargeQuick guide from the manual
The Sealey PC310.V2 is a 1400W wet and dry valeting machine designed for cleaning carpets, car interiors, fabrics, and upholstery. Before first use, ensure all parts are assembled correctly, including the wheels, detergent tank, and appropriate filters. Always check the power supply voltage and inspect cables for damage before operation.
Assembly
Follow these steps to prepare the machine:
- Base & Wheels: Press the two front wheels into the base and screw in the two rear wheels.
- Detergent Tank: Fit the tank onto the base, ensuring humps align with slots, and buckle it securely.
- Filters: Install the HEPA filter. Insert the water valve unit into the head unit and lock it by turning clockwise. For dry vacuuming, attach the dust bag to the suction port.
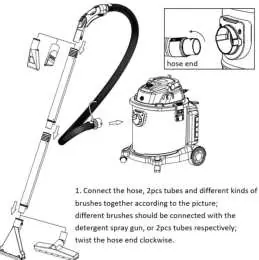
- Hose & Accessories: Connect the hose, extension tubes, and chosen brush. Ensure all connections are tight to prevent suction or water leakage.
Operation
The machine features a three-position switch: (I) ON, (O) OFF, and a dedicated setting for the detergent pump and spray gun.
- Carpet & Sofa Washing: Ensure the detergent tank is filled (max 3L). Use the detergent spray gun to apply fluid. On first use, hold the trigger for 10 seconds to prime the pump. Move the brush slowly across the surface.
- Blowing Function: Insert the hose into the blower port and lock it clockwise.
- Filter Cleaning: If suction drops due to thick dust, press the filter-cleaning button on the back of the unit several times.
- Water Valve: A protective valve stops suction when the dirty water tank is full. If the motor noise increases, turn off the unit and empty the tank.
Maintenance
Regular maintenance ensures optimal performance:
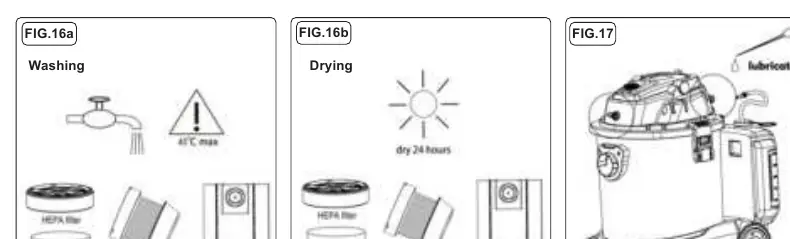
- Cleaning: After heavy use, remove the head unit, empty the tank, and wash the filters (HEPA and sponge). Allow filters to dry completely before reinstallation.
- Lubrication: Apply moderate lubricating oil to sealing locks and pipe jacks to ensure smooth operation.
Troubleshooting
If you encounter issues, check the following:
- Leaks: Verify that all accessory joints are tight and the detergent pipe seal is intact.
- Weak Suction: Check for blockages in filters, tubes, or the hose. Ensure the head unit is buckled correctly.
- Abnormal Noise: Empty the dirty water tank. Ensure the vacuum is upright.
- Smoke: Switch off immediately, unplug, and contact your stockist.
Manufacturer information
Sealey Group
Practical help
Common problems
Dust, liquid, or detergent leaks
Check that all accessory joints are tight and the rubber seal ring on the detergent pipe is present and intact.
Weak suction
Clean filters, tubes, and hose. Use the filter-cleaning button. Ensure the head unit is properly buckled to the tank.
Abnormal noise during operation
The dirty water tank is likely full; empty it. Ensure the vacuum is standing upright.
Dirty water or foam blowing out
Check filter installation, replace old filters, or switch to a low-foaming detergent.
Before use
- Inspect power supply leads, plugs, and connections for wear or damage.
- Ensure the voltage rating matches your local power supply.
- Assemble wheels, detergent tank, and filters correctly.
- Fill the detergent tank (max 3L) with appropriate detergent.
- Ensure the dust bag is removed for wet cleaning and installed for dry cleaning.
Specs in practice
- Detergent Tank
- Maximum capacity of 3L.
Images and diagrams
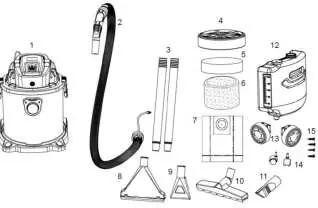
- The parts diagram (Page 2) identifies the tank unit, hose, tubes, filters, and various brushes.
- Assembly figures (Page 3) illustrate the connection of the hose, tubes, and detergent pipe.
Model compatibility
- Use low-foaming detergent to prevent excess foam in the tank.
- Thick detergent should be diluted to prevent pipe blockage.

Manual page author
David Miller
Documentation analyst
Organizes user manual content into clear summaries, with attention to model details, product context, and everyday usability.