Tools / Power Tools
User Manual for Sealey CP20VMT 20V Oscillating Multi-Tool
Quick guide for the Sealey CP20VMT 20V Oscillating Multi-Tool. Learn how to safely operate, change accessories, maintain the tool, and understand technical specifications.
Quick answers from the manual
Quick answer
- The Sealey CP20VMT is a 20V oscillating multi-tool for sanding, scraping, and cutting. To operate, insert a compatible 20V battery, attach the desired accessory using the quick-release lever and locking collar, set the speed, and use the On/Off switch. p. 1, 2
Key actions
- Remove battery before changing accessories or performing maintenance. p. 2
- Attach accessories by lifting the quick-release handle, unscrewing the locking collar, placing the accessory on the drive shaft, and tightening the collar. p. 2
First start
- Ensure the battery is charged, insert it into the tool, set the speed controller to 1, and slide the On/Off switch to the On position. p. 2
Problems and fixes
Loss of power or sparking
Carbon brushes may be worn; have them replaced by an authorized service center.
p. 2Technical specifications
| Parameter | Value | Meaning | Pages |
|---|---|---|---|
| No Load Speed | 5000 - 20000 RPM | Operating speed range | p. 1 |
| Vibration | 15.258m/s² | Vibration emission value | p. 1, 2 |
Where to find it in the PDF
- Safety and Specifications p. 1
- Operation and Maintenance p. 2
- Vibration Warning and Environmental Info p. 3
Table of contents
Manual images
Click an image to enlargeQuick guide from the manual
This manual provides essential instructions for the safe operation and maintenance of the Sealey CP20VMT 20V Oscillating Multi-Tool. Always disconnect the battery before changing accessories, performing maintenance, or storing the tool. Ensure you wear appropriate personal protective equipment (PPE), including eye protection, a mask, and ear protection during operation.
Product Overview
The CP20VMT is a cordless oscillating multi-tool featuring a durable composite housing with a soft grip. It is designed for sanding, scraping, and cutting various materials. Key features include a built-in LED work light, a quick blade change system, and 6-speed settings. Note that the battery and charger are sold separately.
Operation
Battery Removal: Depress the spring-loaded button on the battery pack and slide it off the tool. Do not touch the metal battery terminals.
Fitting Accessories:
- Ensure the battery is removed from the tool.
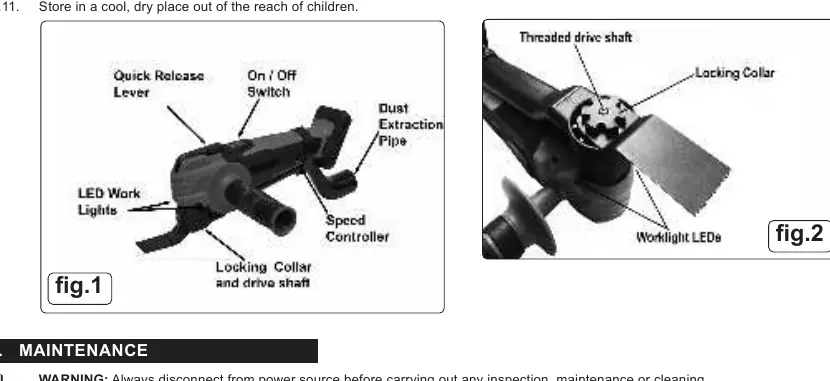
- Lift the quick-release handle (see Fig. 1).
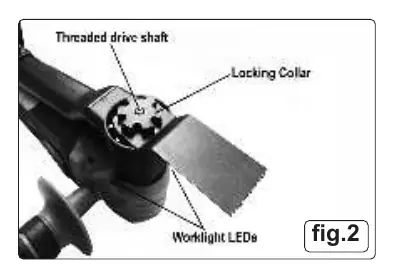
- Unscrew the locking collar from the drive shaft (see Fig. 2).
- Locate the accessory tool onto the drive shaft spigots.
- Refit the locking collar and tighten it.
- Close the quick-release handle and confirm the accessory is firmly attached.
Using the Tool:
- Ensure the speed controller is set to speed 1.
- Slide the On/Off switch to the On position.
- Select the appropriate speed for your specific task.
- When finished, remove the tool bit, clean the tool, and store it in a cool, dry place.
Maintenance
Regular maintenance is required to ensure tool longevity and safety:
- General Inspection: Regularly check that all fixing screws are tight.
- Cleaning: Keep the tool clean. Use a soft brush or dry cloth. Never use caustic agents on plastic parts. If necessary, use a mild detergent on a damp cloth. Ensure the tool is completely dry before use.
- Lubrication: Lightly lubricate moving parts at regular intervals with a suitable spray lubricant.
- Brushes: If you experience loss of power, intermittent failure, or visible sparking, the carbon brushes may be worn. Have them replaced by an authorized service center.
Safety and Vibration
This tool is subject to vibration testing. Prolonged use may cause Hand Arm Vibration Syndrome. It is recommended to conduct a health and safety assessment to determine suitable duration of use. Always keep handles dry, clean, and free from oil and grease to maintain control.
Manufacturer information
Sealey Group
Practical help
Common problems
Loss of power, intermittent failure, or visible sparking
The carbon brushes inside the motor may be worn. Have them replaced by an authorized service center.
Accessory not secure
Ensure the locking collar is tightened and the quick-release handle is fully closed.
Before use
- Ensure the battery is fully charged and compatible (20V).
- Check that the tool is switched off before inserting the battery.
- Verify that the work area is well-lit and free of hazards like electrical wires or water pipes.
- Wear approved safety eye protection, ear protection, and a mask.
- Secure loose workpieces with a clamp or vice.
- Ensure the speed controller is set to speed 1 before starting.
Specs in practice
- No Load Speed
- The operating speed range of the tool (5000 - 20000 RPM).
Images and diagrams
- Fig 1: Shows the location of the Quick Release Lever, On/Off Switch, Speed Controller, LED Work Lights, and Dust Extraction Pipe.
- Fig 2: Shows the Threaded Drive Shaft and Locking Collar for accessory attachment.
Model compatibility
- Requires compatible 20V battery and mains charger (sold separately).
- Compatible with CP20VBP2 (2Ah), CP20VBP4 (4Ah), and CP20VBP6 (6Ah) batteries.

Manual page author
Emily Carter
User documentation editor
Prepares concise manual descriptions and highlights the most useful setup, operation, and maintenance information for readers.