HVAC / Thermostats & Controls
Installation Guide for Secure Holm Pendant 24896LEDD
A comprehensive installation guide for the Secure Holm Pendant 24896LEDD. Includes safety instructions, required tools, wiring procedures, and recommended dimmer switches for optimal performance.
Quick answers from the manual
Quick answer
- The Secure Holm Pendant 24896LEDD must be installed by a qualified electrician on a standard 4-inch metal octagon outlet box. Ensure power is disconnected at the circuit breaker before starting. p. 1
Key actions
- Disconnect power at the circuit breaker. p. 1
- Connect wires using wire nuts and secure with electrical tape. p. 2
Problems and fixes
Fixture flickering
Use recommended dimmers (Lutron Skylark SELV-300P or Diva DVELV-300P).
p. 1Show 2 more answers Show less
Technical specifications
| Parameter | Value | Meaning | Pages |
|---|---|---|---|
| Mounting Box | 4-inch metal octagon outlet box | Required junction box type | p. 1 |
| Clearance | 6 inches | Minimum distance from combustible materials | p. 1 |
Where to find it in the PDF
- Safety and Requirements p. 1
- Installation Steps p. 2
Table of contents
Manual images
Click an image to enlargeQuick Guide from the Manual
This document provides the necessary steps to install the Secure Holm Pendant 24896LEDD. Before beginning, ensure you have the required tools and that the power is disconnected at the circuit breaker. This fixture is designed for mounting to a standard 4-inch metal octagon outlet box.
Safety Instructions
- Always disconnect power at the circuit breaker or fuse box before starting installation. Turning off the light switch is not sufficient.
- Do not install the fixture in hazardous locations.
- Maintain a minimum distance of 6 inches from any curtain or similar combustible material.
- Consult a qualified electrician to ensure correct branch circuit conductors.
Tools and Requirements
What you need:
- Screwdriver
- Wire cutters
- Wiring supplies as specified by the local electrical code
Recommended Dimmers:
- Lutron Skylark SELV-300P
- Lutron Diva DVELV-300P
Installation Steps
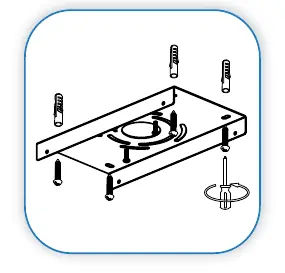
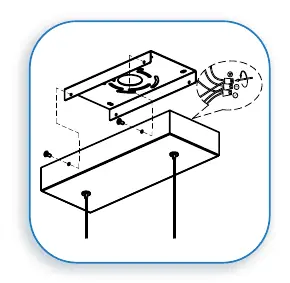
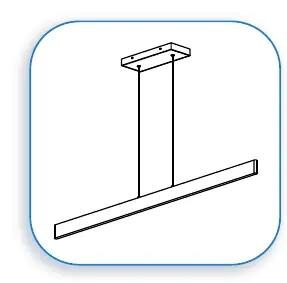
1. Attach Mounting Bracket
If an existing fixture is present, remove it first. Position the mounting bracket into the junction box (J-box) and secure it using the supplied screws.
2. Make Wire Connections and Mount Canopy
Expose the supply wires from the J-box and pull them through the hole in the mounting bracket. Connect the black supply wire to the black fixture wire and the white supply wire to the white fixture wire, securing both with the provided wire nuts. Attach the green J-box wire to the green hexagonal head screw or the green supply grounding wire. Secure all connections with electrical tape (not supplied). Tuck the wires into the J-box, align the canopy with the mounting bracket, and secure it with the supplied screws.
3. Restore Power
Once the fixture is securely mounted, restore electricity at the circuit breaker and check the operation of the light.
Practical help
Common problems
Fixture flickering or not operating correctly
Ensure you are using a compatible dimmer switch, such as the Lutron Skylark SELV-300P or Lutron Diva DVELV-300P.
Mounting difficulties
Verify that the junction box is a standard 4-inch metal octagon outlet box that is directly supported by the building structure.
Before use
- Disconnect power at the circuit breaker
- Gather screwdriver and wire cutters
- Verify 4-inch metal octagon outlet box is installed
- Ensure 6-inch clearance from combustible materials
- Consult a qualified electrician if unsure about wiring
Show more Show less
Specs in practice
- Recommended Dimmers
- Specific ELV dimmers required for proper LED operation to prevent flickering or damage.
- Mounting Requirement
- Must be installed on a standard 4-inch metal octagon outlet box supported by the building structure.
Images and diagrams
- Step 1: Shows the mounting bracket being screwed into the junction box.
- Step 2: Illustrates the wiring connections (black-to-black, white-to-white, green-to-ground) and canopy alignment.
- Step 3: Shows the final assembled pendant light.
Model compatibility
- Compatible with Lutron Skylark SELV-300P dimmer
- Compatible with Lutron Diva DVELV-300P dimmer

Manual page author
David Miller
Documentation analyst