Health / Medical Devices
Sencor SBP 1150WH Digital Blood Pressure Monitor
Quick guide for the Sencor SBP 1150WH digital blood pressure monitor. Learn how to set up, measure blood pressure, interpret results, and troubleshoot common errors.
Table of contents
Manual images
Click an image to enlargeQuick guide from the manual
The Sencor SBP 1150WH is a fully automatic digital blood pressure monitor designed for household use on the upper arm. It measures systolic and diastolic blood pressure as well as pulse rate using the oscillometric method. The device supports two users and stores up to 199 measurements per user.
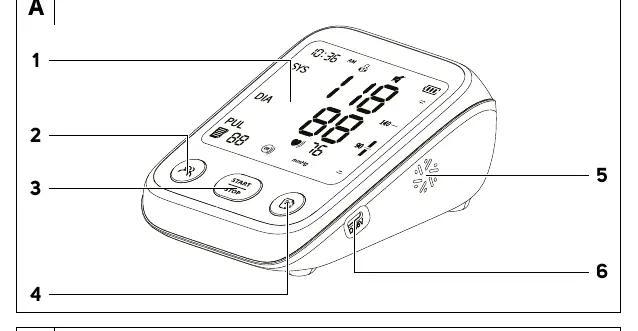
Device description
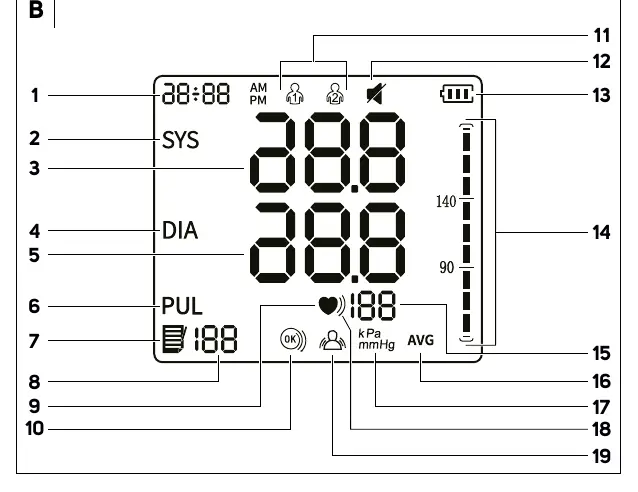
The device features a display (A1), a user/settings button (A2), an On/Off button (A3), a memory button (A4), a speaker (A5), and a USB-C input slot (A6). The display shows time, date, systolic/diastolic pressure, pulse rate, memory icons, and user indicators.
Preparation and settings
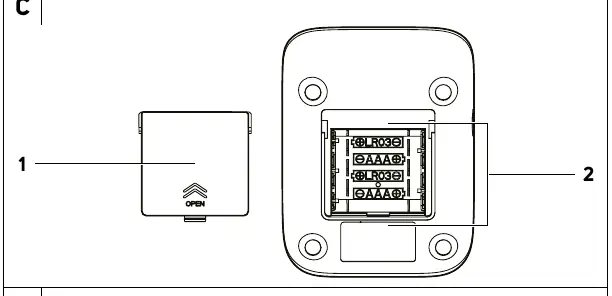
Power Source: The device operates on 4x AAA batteries or a 5V DC power adapter with a USB-C connector (not included). Ensure correct polarity when inserting batteries.
Settings: With the device off, press and hold the user/settings button (A2) for 3 seconds to enter date/time settings. Use the memory button to adjust values and the settings button to confirm. You can also toggle sound (on/off) and units (mmHg/kPa) by holding the START/STOP button for 5 seconds when the device is off.
Measuring blood pressure
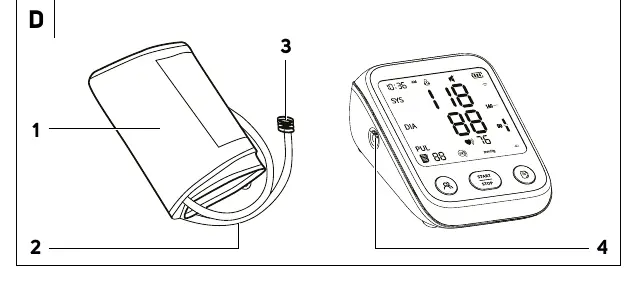
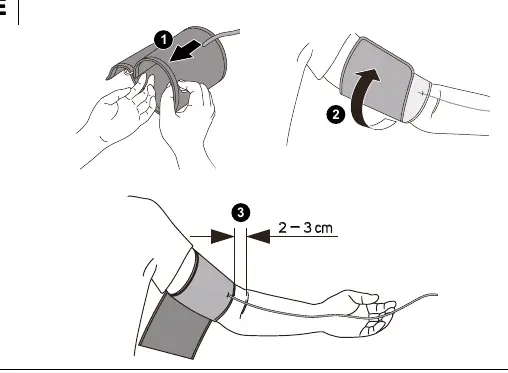
Attaching the cuff: Insert the air hose plug into the device. Remove tight clothing from your arm. Slide the cuff onto your upper arm so the bottom edge is 2-3 cm above the elbow pit. The cuff should be at heart level. Ensure it is not too loose or too tight (one finger space).
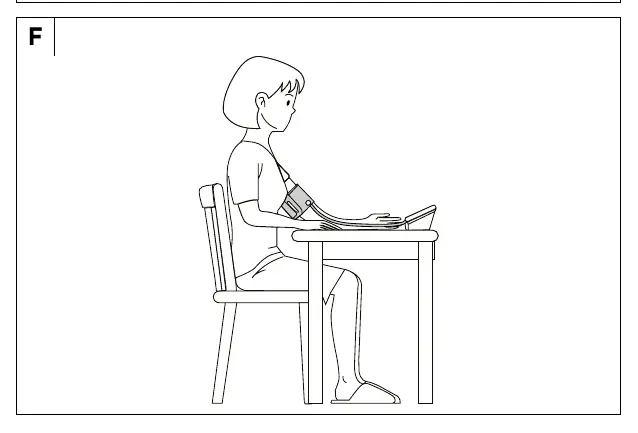
Measurement procedure: Sit calmly for at least 5 minutes before measuring. Do not talk or move during the measurement. Press the START/STOP button to begin. The device will automatically inflate and deflate the cuff. Results will appear on the display.
Memory and settings
The device automatically saves measurements. To view them, ensure the device is off, press the memory button to see the average of the last 2-3 measurements, then press again to cycle through individual records. To delete memory, select the user, press START/STOP, then press the settings button, and hold the memory button for 3 seconds.
Cleaning and maintenance
Clean the device with a soft, damp cloth. Do not use thinners or alcohol. The cuff can be cleaned with a dampened cloth and gentle soap solution. Never submerge the device or cuff in water. Disinfect the cuff regularly if used by multiple people, but avoid high-temperature steam or UV radiation.
Troubleshooting
If the device does not turn on, check the batteries or USB-C power source. If pressurisation fails, check the air hose connection. If you receive error codes: Er U (pressure not reached), Er H (inflation too high), Er 1 (pulse measurement failed), or Er 2 (disruptive effects like movement/talking), relax for a few minutes and repeat the measurement.
Technical specifications
Measurement range: 57–255 mmHg (systolic), 25–195 mmHg (diastolic). Pulse: 40–199 pulses/minute. Cuff size: 22–42 cm. Memory: 2x 199 measurements. Automatic shut-off after 1 minute of inactivity.
Manufacturer information
Sencor
Practical help
Common problems
Device does not turn on
Check if batteries are installed correctly or if the USB-C power adapter is connected.
Pressurisation not occurring
Ensure the air hose plug is properly inserted into the device socket.
Improbable values measured
Ensure you are sitting correctly, not talking, and the cuff is positioned properly at heart level.
Air leaking from cuff
Check if the cuff is torn or if it is fitted too loosely/tightly.
Before use
- Rest for at least 5 minutes before measurement.
- Do not smoke, eat, or drink coffee/tea 30-45 minutes before.
- Empty your bladder if necessary.
- Sit in an upright position with feet flat on the floor.
- Do not cross your legs.
- Ensure the cuff is at the same level as your heart.
Specs in practice
- Measurement Range
- Systolic 57–255 mmHg, Diastolic 25–195 mmHg.
- Memory Capacity
- Stores 199 measurements for each of the 2 users.
- Power Source
- 4x AAA batteries or 5V DC USB-C adapter.
Images and diagrams
- A: Device overview showing display, buttons, and ports.
- B: Display icons including systolic, diastolic, pulse, and user indicators.
- C: Battery compartment location.
- D: Cuff and air hose connection points.
- E: Correct cuff placement (2-3 cm above elbow).
Model compatibility
- Not intended for infants, toddlers, or pregnant women.
- Not suitable for use with high-frequency surgical equipment.
- Consult a doctor if you have heart arrhythmia or other serious medical conditions.

Manual page author
Emily Carter
User documentation editor
Prepares concise manual descriptions and highlights the most useful setup, operation, and maintenance information for readers.