Home Appliances / Microwaves
User Manual for Sencor SES 1721BK Portafilter Coffee Machine
Comprehensive user guide for the Sencor SES 1721BK portafilter coffee machine. Includes setup, operation, coffee preparation, milk frothing, cleaning, descaling, and troubleshooting steps.
Quick answers from the manual
Quick answer
- The Sencor SES 1721BK is a portafilter coffee machine. To use it, fill the water tank, preheat the machine, insert the portafilter with ground coffee, and press the brewing button. p. 7, 8
Key actions
- Preheating the machine p. 8
- Frothing milk p. 8
First start
- Rinse the water tank, drip tray, portafilter, and baskets with clean water before first use. p. 7
Problems and fixes
Coffee machine cannot be turned on
Check power connection.
p. 9
No steam
Wait for steam light, clean nozzle, use correct milk.
p. 10Maintenance and reset
- Regularly descale the machine using a descaling agent suitable for espresso machines. p. 9
Technical specifications
| Parameter | Value | Meaning | Pages |
|---|---|---|---|
| Rated voltage | 220-240 V~ | Operating voltage | p. 10 |
| Rated power | 1050 W | Power consumption | p. 10 |
Where to find it in the PDF
- Product Overview p. 3
- Control Panel p. 3
Table of contents
Manual images
Click an image to enlargeQuick Guide
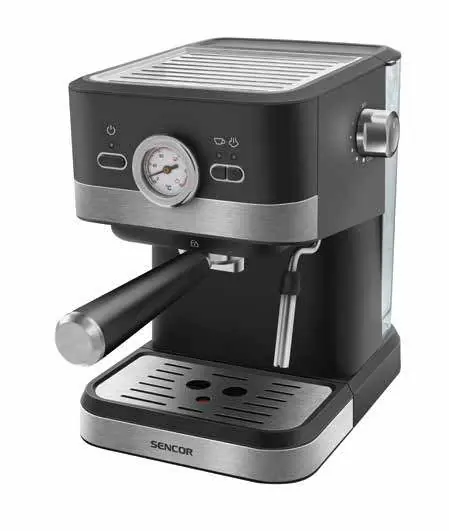
The Sencor SES 1721BK is a portafilter coffee machine designed for home use. To get started, ensure the machine is placed on a flat, stable surface with 15 cm of clearance. Before first use, rinse the water tank, drip tray, portafilter, and baskets. Always use fresh, cold water and ground coffee suitable for espresso machines. The machine features a built-in thermal fuse and will shut off automatically after 25 minutes of inactivity.
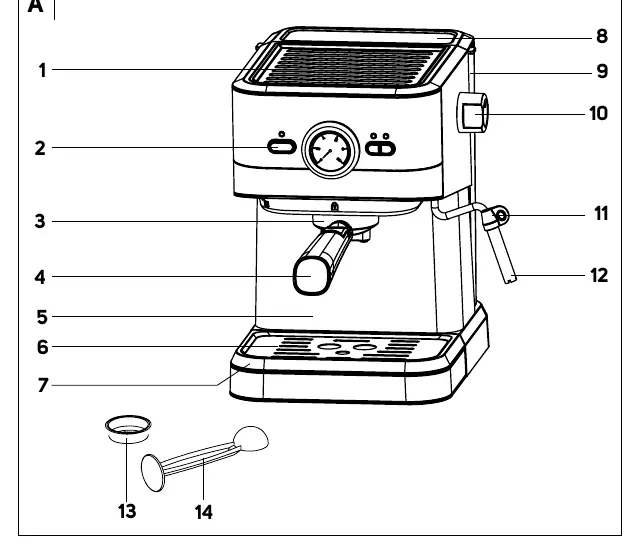
Description of the Coffee Machine
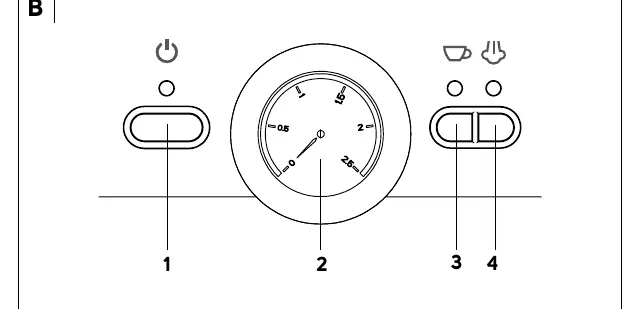
The machine consists of a cup warming plate, control panel, brew head, portafilter, drip tray, water tank, steam/hot water dispenser control, and steam nozzle. The control panel includes a power button, temperature indicator, coffee brewing button, and steam dispenser button.
Before First Use
- Remove all promotional labels and packaging.
- Place the machine on a flat, dry surface with at least 35 cm of space above and 15 cm on the sides.
- Rinse the water tank, drip tray, portafilter, and baskets with clean water and a small amount of neutral detergent.
- Wipe the outer surface with a damp sponge and dry thoroughly.
Preparing Before Use
- Drip Tray: Ensure it is correctly installed. Empty it when the fullness indicator (float) rises.
- Water Tank: Fill with cold drinking water up to the max mark. Do not use hot water or milk.
- Coffee Preparation: Use the appropriate basket (1-cup or 2-cup). Fill with ground coffee, spread evenly, and tamp with the flat end of the measuring scoop. Clean the edges of the basket before inserting into the brew head.
- Portafilter Installation: Align the portafilter with the brew head, insert, and turn to the right to lock.
Using the Coffee Machine
Turning on and Preheating: Press the power button. The light turns red. When the coffee brewing button light turns green, the machine is ready. Perform a rinse cycle by running water through the spout and steam nozzle before the first coffee preparation.
Coffee Preparation
- Insert the basket into the portafilter and fill with ground coffee.
- Attach the portafilter to the brew head.
- Place a cup under the portafilter.
- Press the coffee brewing button.
- For the 1-cup basket, stop the dispensing manually by pressing the button again. For the 2-cup basket, dispensing stops automatically.
Dispensing Hot Water
- Place a cup under the steam nozzle.
- Press the coffee brewing button.
- Turn the steam/hot water control to the hot water position.
- Once the desired amount is reached, press the button again and turn the control to OFF.
Milk Frothing
- Fill a container with cold semi-skimmed or whole milk (no more than 1/3 capacity).
- Press the steam button and wait for the light to indicate the boiler is ready.
- Turn the steam control to the steam position to purge excess water, then turn OFF.
- Insert the nozzle just below the milk surface and turn the control to the steam position.
- Hold the container tilted to create a swirling motion.
- Once frothed, turn the control to OFF and remove the container.
Cleaning and Maintenance
- After each use: Clean the portafilter, baskets, and steam nozzle.
- Drip Tray: Empty and wash regularly.
- Outer Case: Wipe with a damp cloth.
- Warning: Do not submerge the appliance in water. No components are dishwasher safe.
Descaling
Regular descaling is necessary to remove mineral deposits. Use a descaling agent suitable for espresso machines. Follow the instructions on the descaling agent packaging, run the solution through the brew head and steam nozzle, then rinse thoroughly with clean water.
Troubleshooting
If the machine does not turn on, check the power connection. If water leaks, empty the drip tray. If there is no steam, ensure the steam button light is green and the nozzle is clean. If the coffee smells acidic, perform a descaling cycle.
Technical Specifications
- Rated voltage range: 220-240 V~
- Rated frequency: 50-60 Hz
- Rated power input: 1050 W
- Noise level: 75 dB(A)
Practical help
Common problems
Coffee machine cannot be turned on
Ensure the power cord is properly inserted into the power socket.
Water leaking from the bottom
The drip tray is full; remove and empty it.
Water coming out of the portafilter
Ensure the portafilter is installed correctly and the edge is free of coffee grounds.
No steam
Wait for the steam button light to turn green, ensure the nozzle is clean, and use semi-skimmed or whole milk.
Before use
- Remove all promotional labels and tags.
- Place on a flat, dry, stable surface with 15cm clearance.
- Rinse the water tank, drip tray, portafilter, and baskets.
- Fill the water tank with cold, fresh water.
- Perform a rinse cycle by running water through the spout and steam nozzle.
Specs in practice
- Rated power input
- 1050 W
- Water tank capacity
- 1.4 L
Images and diagrams
- A: Main unit components (1-14)
- B: Control panel (1-4)
Model compatibility
- Use only ground coffee designed for espresso machines.
- Use semi-skimmed or whole milk for frothing.

Manual page author
David Miller
Documentation analyst
Organizes user manual content into clear summaries, with attention to model details, product context, and everyday usability.