Tools / Saws
User Manual for Senix X2 20V Cordless Leaf Blower BLAX2-M
Quick guide for the Senix X2 20V Cordless Leaf Blower (BLAX2-M). Includes assembly, operation, charging, maintenance, and troubleshooting steps.
Quick answers from the manual
Quick answer
- The Senix X2 20V Cordless Leaf Blower (BLAX2-M) is designed for clearing light debris and leaves from hard surfaces. It operates on a 20V Max battery system. p. 1, 6
Key actions
- Install the blower tube by aligning and inserting it until the release button snaps into place. p. 8, 9
First start
- Fully charge the battery pack before using it for the first time. p. 10
Problems and fixes
Product does not start
Ensure battery is attached, charged, and not damaged. Check trigger/cruise control settings.
p. 12Maintenance and reset
- Clean air vents with a soft brush and store in a dry, frost-free place. p. 11
Technical specifications
| Parameter | Value | Meaning | Pages |
|---|---|---|---|
| Max. wind speed | 80 MPH | Maximum air velocity | p. 8 |
Where to find it in the PDF
- Know Your Unit p. 6
- Specifications p. 8
- Troubleshooting p. 12
Table of contents
Manual images
Click an image to enlargeQuick guide from the manual
This manual provides instructions for the Senix X2 20V Cordless Leaf Blower (Model BLAX2-M). This tool is intended for household use only, specifically for clearing light debris and leaves from hard surfaces.
Assembly
Before using the blower, ensure all parts are present and undamaged. The package includes the blower power head and the blower tube.
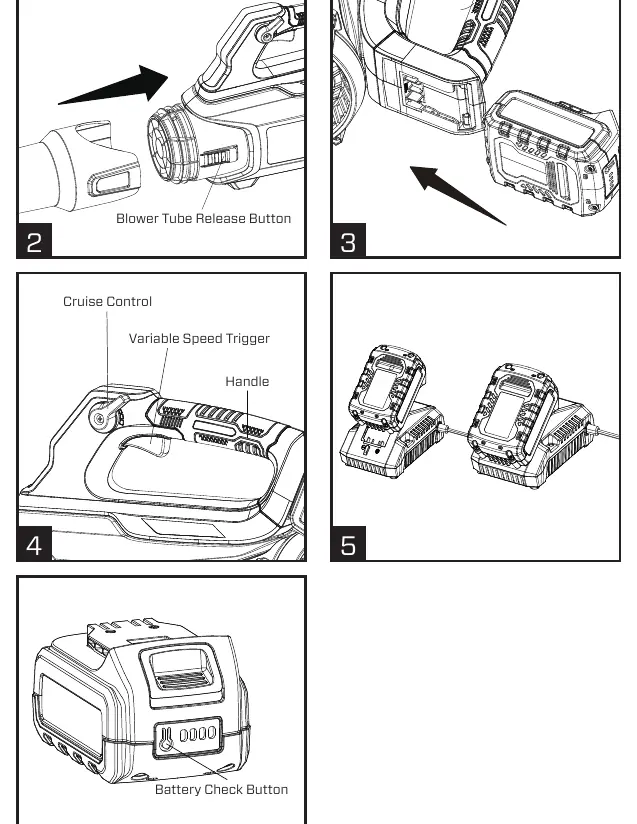
- Align and insert the blower tube into the power head.
- Ensure the blower tube release button snaps securely into the slot on the tube.
- Do not insert the battery pack until the tool is fully assembled.
Operation
Hold the product in the operating position. To start the blower, press the variable speed trigger or lower the cruise control lever to a speed position. The cruise control locks the trigger in the ON position for constant speed. To stop, release the trigger or push the cruise control lever all the way up.
Charging the battery
The battery pack is shipped partially charged. Use only the specified charger (CHX2) to charge the battery.
- Connect the charger to a power supply.
- Align the raised ribs of the battery pack with the slot in the charger.
- Insert the battery pack into the charger. The indicator light will turn green and flash.
- Charging is complete when all four lights on the battery pack are illuminated.
Maintenance
Always switch off the blower and remove the battery pack before performing any maintenance. Keep air vents clean and free of debris using a soft brush. Store the product in a dry, frost-free, and well-ventilated place. Ensure the battery is charged at least once per year to prolong its life.
Troubleshooting
If the product does not start, check that the battery is properly attached and charged. If the product does not reach full power, check for blocked air vents. If the unit vibrates excessively, ensure all bolts and nuts are tightened.
Practical help
Common problems
Product does not start
Ensure the battery pack is properly attached, charged, and not damaged. Check that the variable speed trigger is depressed or the cruise control is set to a speed lock position.
Product does not reach full power
Charge the battery pack or clean the air vents if they are blocked.
Excessive vibration or noise
Check for loose bolts or nuts and tighten them.
Product suddenly stops
The battery may be too hot or the capacity is too low. Remove the battery and charge it or let it cool down.
Before use
- Ensure the battery pack is fully charged
- Check that the blower tube is securely attached
- Wear eye, hearing, and respiratory protection
- Clear the work area of debris
- Inspect the tool for any damage or missing parts
Specs in practice
- Input voltage
- 18V d.c. (20V Max*)
- Max. wind speed
- 80 MPH
- Max. wind volume
- 350 CFM
- Charging time
- 135 min (with 4.0 Ah battery)
Images and diagrams
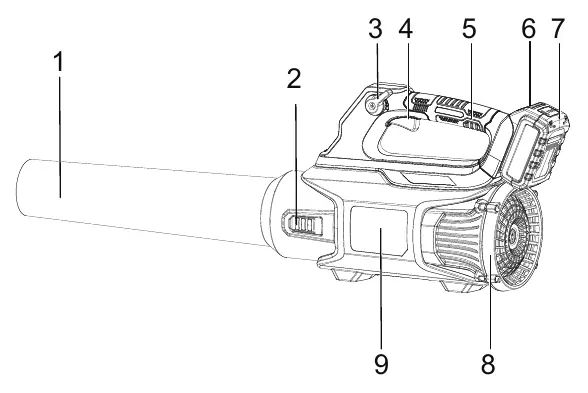
- 1: Blower Tube
- 2: Blower Tube Release Button
- 3: Cruise Control
- 4: Variable Speed Trigger
- 6: Battery Pack Unlock Button
Model compatibility
- Only use with SENIX X2 batteries.
- Commercial use is prohibited and will void the warranty.

Manual page author
Michael Turner
Technical manual editor
Reviews PDF manuals for structure, safety notes, and practical product details so readers can find the right information quickly.