Tools / Saws
User Manual for SENIX X2 20V Cordless Push Lawn Mower LPPX2-L-EU
Comprehensive user guide for the SENIX X2 20V Cordless Push Lawn Mower (LPPX2-L-EU). Includes assembly instructions, operation, maintenance, safety warnings, and troubleshooting steps.
Quick answers from the manual
Quick answer
- The SENIX X2 20V Cordless Push Lawn Mower (LPPX2-L-EU) is a domestic lawn mower with a 32cm cutting width, 5-position height adjustment, and 2-in-1 mulching/bagging capability. p. 1, 6, 7
Key actions
- Start the mower p. 10
- Adjust cutting height p. 10
- Replace the blade p. 12, 13
First start
- Charge the battery pack before first use. p. 9
Problems and fixes
Mower fails to start
Check battery charge, ensure it is clicked in, allow to cool, or clear deck of debris.
p. 16Technical specifications
| Parameter | Value | Meaning | Pages |
|---|---|---|---|
| Input Voltage | 18 V (20 V Max) | Nominal voltage is 18V. | p. 7 |
| Cutting Capacity | 32 cm | Width of cut. | p. 7 |
| Weight | 10 kg | Tool only. | p. 7 |
Where to find it in the PDF
- Know Your Unit p. 6
- Assembly p. 7, 8
- Maintenance p. 12, 13
Table of contents
Manual images
Click an image to enlargeQuick guide from the manual
This guide provides essential information for the safe and efficient operation of your SENIX X2 20V Cordless Push Lawn Mower. Always read the full safety instructions before use. Ensure the battery is fully charged before the first use. The mower is designed for domestic grass cutting and features 2-in-1 mulching and bagging capabilities.
Know your unit
The mower consists of several key components, including the switch trigger, safety button, grass bag with volume indicator, cutting-height adjustment lever, and battery compartment. Familiarize yourself with these parts before assembly.

Assembly
Follow these steps to prepare your mower:
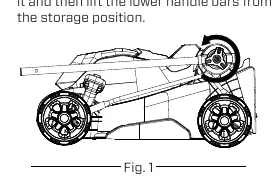

- Handle Installation: Rotate the lower handle knobs counterclockwise to lift the handle bars from the storage position. Secure the upper handle assembly using the provided knobs and bolts.
- Grass Bag Assembly: Push the handle into the openings on the grass bag. Slide the bag onto the frame and secure the side and bottom clips.
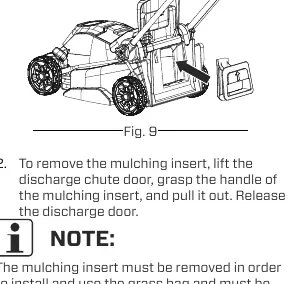
- Mulching Insert: To use the mulching function, lift the discharge chute door and insert the mulching insert until it is securely seated.
Operation
Starting and Stopping: To start, press the safety button and pull the switch trigger upward to meet the handle. To stop, simply release the switch trigger. The blade will continue to rotate for a few seconds after stopping.
Cutting-Height Adjustment: The mower offers 5 height positions between 25 mm and 65 mm. Use the adjustment lever to select the desired height.
Protection Features: The mower includes built-in overload and overheat protection. If the motor stops due to overload, clear the deck of grass and debris. If it stops due to overheating, allow the unit to cool down before restarting.
Maintenance
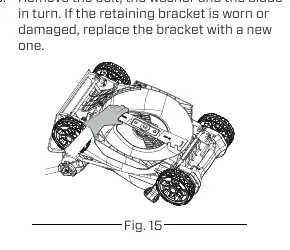
Blade Care: Regularly inspect the blade for damage. If dull, sharpen it or replace it. Always wear heavy-duty gloves when handling the blade. To remove, switch off the mower, remove the battery, turn the mower on its side, and loosen the blade bolt.
Cleaning and Storage: Clean the mower after each use with a brush. Do not use strong detergents. Store in a dry, cool place. The handle can be folded for compact storage.
Practical help
Common problems
Mower fails to start
Check if the battery is depleted, ensure it is properly clicked into the compartment, allow the unit to cool down if overheated, or clear the deck of grass and debris.
Mower cuts unevenly
Sharpen or replace a dull blade, adjust the cutting height to a higher setting, or clean the deck to ensure the blade has freedom of movement.
Excessive vibration
Tighten the blade bolt, balance the blade if it is unbalanced, or replace the blade if it is bent.
Mower stops while mowing
The mower may be in an overload condition; raise the cutting height or slow down your mowing pace. Also, check for clogs in the deck.
Before use
- Charge the battery pack fully before first use.
- Inspect the lawn for stones, sticks, wires, or other foreign objects.
- Ensure the blade is sharp and properly secured.
- Check that the grass bag or mulching insert is correctly installed.
- Wear appropriate personal protective equipment: eye protection, dust mask, safety footwear, and gloves.
- Ensure the handle is locked into position.
Specs in practice
- Input Voltage
- 18V (20V Max). The nominal voltage is 18V.
- Cutting Capacity
- 32 cm cutting width.
- Height Adjustment
- 5-position adjustment ranging from 25 mm to 65 mm.
Images and diagrams
- The unit diagram identifies the switch trigger, safety button, grass bag, and adjustment levers.
- Handle installation involves loosening knobs and securing the upper assembly.
- Grass bag assembly requires attaching the handle and securing clips to the frame.
- Blade replacement involves removing the bolt and washer while wearing protective gloves.
Model compatibility
- Use only SENIX X2 batteries (B40X2/B50X2/B60X2/B80X2).
- Use only specified chargers (CHX2/CHQX2/CHQX2-M-EU/CHDX2-M-EU).

Manual page author
David Miller
Documentation analyst
Organizes user manual content into clear summaries, with attention to model details, product context, and everyday usability.