Electronics / Cameras
User Manual for SereneLife SLSPSKT100 Portable Mono Solar Panel Starter Kit
Comprehensive user guide for the SereneLife SLSPSKT100 100W solar panel kit. Includes installation instructions, wiring diagrams, 30A PWM controller settings, and troubleshooting tips.
Quick answers from the manual
Quick answer
- To install the SereneLife SLSPSKT100, mount the solar panel using the Z-brackets, then connect the system in this specific order: Battery to Controller, then Solar Panel to Controller. Always connect the battery first so the controller can detect the system voltage. p. 4, 5, 8
Key actions
- Connect battery to controller first p. 8
- Set battery type in controller menu p. 9
First start
- Ensure battery is connected first to allow the controller to identify 12V/24V voltage. p. 7
Problems and fixes
Solar panel not charging
Check for reverse connection, voltage mismatch, or shading.
p. 11Maintenance and reset
- Clean panel with soft cloth and neutral water; periodic inspection of connections by professionals. p. 6
Technical specifications
| Parameter | Value | Meaning | Pages |
|---|---|---|---|
| Power | 100W | Solar panel output | p. 13 |
| Controller | 30A PWM | Charge controller rating | p. 13 |
Where to find it in the PDF
- Installation p. 4, 5
- Controller Settings p. 8, 9
Table of contents
Manual images
Click an image to enlargeQuick guide from the manual
This solar panel kit is designed for off-grid applications such as RVs, 4WDs, and yachts. The system includes a 100W solar panel and a 30A PWM controller. Important: Always connect the battery to the controller first to allow the system to identify the battery voltage (12V/24V) before connecting the solar panel. Improper wiring sequence can damage the controller.
Safety Precautions
- Installation staff should use insulating equipment (e.g., insulating shoes and gloves) to prevent electric shock.
- The solar panel contains glass and is heavy; handle with two people and avoid dropping objects on the surface.
- Do not install the module if the back sheet or glass is damaged.
- Avoid installation in adverse weather conditions like high winds, rain, or snow.
- The controller will heat up during operation; install it on a flat, well-ventilated surface.
Packing List
- 100W Solar Panel (1pc)
- 30A PWM Controller (1pc)
- Mounting brackets (1 set)
- Wire fixer (10pcs)
- Extension lead 11AWG 20ft
- Battery lead 11AWG 8ft
- Fuse 15A (1pc)
Installation with Roof Rack
The kit includes Z-shape brackets for mounting. Follow these steps:

- Connect the solar panel to the Z-shape bracket using the provided bolts, nuts, and washers.
- Connect the Z-shape bracket assembly to the double nut aluminum plate and secure it to the roof rack.
- For installations without a roof rack, the double nut plate is not required.
System Wiring
Follow the correct sequence to avoid damaging the controller:
- Connect the battery to the controller with the correct polarity.
- Connect the solar module to the controller with the correct polarity.
- Connect the load to the controller with the correct polarity.
The reverse order applies when uninstalling.
Controller Operation
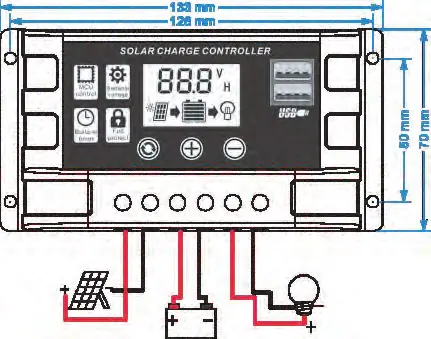
The 30A PWM controller features an LCD display and menu settings:
- Menu: Switch between interfaces or hold to enter/exit parameter settings.
- UP/DOWN: Adjust values.
- Battery Types: B01 (Lead-acid), B02 (Lithium-ion), B03 (LiFePO4).
- Load Modes: 24H (always on), 0H (light-controlled), 1-23H (timer-controlled).
Maintenance
- Clean the panel surface with a soft cloth or sponge using clean, neutral water. Avoid harsh cleaning methods that may scratch the glass.
- Periodic maintenance by qualified professionals should include verifying system isolation and the integrity of electrical/mechanical connections.
Technical Specifications
- Power Supply: 100W
- Controller: 30A PWM
- Battery Compatibility: 12V/24V Lead-acid, Lithium-ion, LiFePO4
- Operating Temperature (Controller): -20°C to 50°C
- Operating Temperature (Panel): -40°C to 85°C
- USB Output: 5V/2A
Practical help
Common problems
Solar panel not showing charging
Check for reverse connections, ensure solar panel voltage is higher than battery voltage, and check for shading or obstructions on the panel.
Charging current is very low
Ensure the panel is in direct sunlight. High battery voltage may also cause the controller to enter floating charge mode, naturally reducing current.
Load does not work
Verify load settings (e.g., light control mode vs. daytime), check battery power levels, and ensure all connections are secure and not burnt out.
Before use
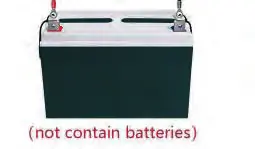
- Ensure your battery is 12V or 24V.
- Verify all components from the packing list are present.
- Use insulating equipment during installation.
- Install the controller as close to the battery as possible to prevent voltage drop.
- Ensure the installation surface is flat and well-ventilated.
Images and diagrams
- The wiring diagram shows the specific order: Battery -> Controller -> Solar Panel.
- Installation steps illustrate the use of Z-brackets and bolts for roof rack mounting.
Model compatibility
- Compatible with 12V/24V Lead-acid, Lithium-ion, and LiFePO4 batteries.
- Controller is for solar panel charging only; do not use other DC power sources.

Manual page author
Michael Turner
Technical manual editor
Reviews PDF manuals for structure, safety notes, and practical product details so readers can find the right information quickly.