Lighting / Fixtures
Operating Manual for Shada 240120X Water Resistant Luminaire
Quick guide for the Shada 240120X water-resistant luminaire with HF-motion sensor. Includes installation steps, sensor settings (range, timer, lux), and troubleshooting.
Quick answers from the manual
Quick answer
- The Shada 240120X is a water-resistant LED luminaire with an HF-motion sensor. It requires professional installation and features adjustable detection range (2-16m), timer (10s-30min), and light sensitivity (10-2000 Lux). p. 4, 7
Key actions
- Install the luminaire p. 5
- Adjust sensor settings p. 8
First start
- Ensure professional installation and verify power is disconnected before starting. p. 5
Show 4 more answers Show less
Problems and fixes
The light does not switch on
Check and adjust settings, change light, or switch ON the main switch.
p. 8
The light is on all the time
Check zone setting.
p. 8Maintenance and reset
- Clean with clear water and a soft cloth. Do not use detergents. p. 5
Technical specifications
| Parameter | Value | Meaning | Pages |
|---|---|---|---|
| Input voltage | 220-240V | Operating voltage | p. 3 |
| Degree of protection | IP65 | Dustproof and water jet protection | p. 3 |
| Impact strength | IK08 | Resistance to impact | p. 3 |
| Sensor Frequency | 5.8 GHz | Operating frequency of the motion sensor | p. 3 |
Where to find it in the PDF
- Installation p. 2
- Technical Data p. 3
- Sensor Settings p. 7, 8
Table of contents
Manual images
Click an image to enlargeQuick guide from the manual
The Shada 240120X is a water-resistant LED luminaire equipped with an integrated HF-motion sensor. This manual provides instructions for installation, sensor configuration, and maintenance. The product is designed for both indoor and outdoor use and requires professional installation.
Installation
Installation must be performed by a qualified technician. Follow these steps:
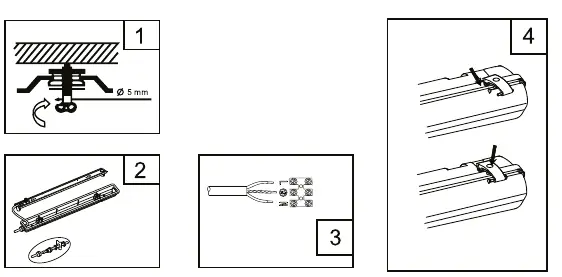
- Decide on the mounting location.
- Disconnect the luminaire from the mains power.
- Secure the power supply against being switched on again.
- Verify that there is no voltage on the cable.
- Follow the installation steps illustrated in Fig. 1 on page 2 of the manual.
Note: The sensor functions optimally when the product is mounted on the ceiling.
Sensor settings
The sensor unit features three dials to adjust performance:
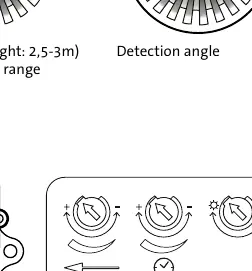
- SENS (Detection range): Adjustable from 2m to 16m radius. Turn anti-clockwise for minimum range and clockwise for maximum range.
- TIME (Timer): Adjustable from 10 seconds to 30 minutes. Turning the dial clockwise increases the duration. Any movement detected during the "on" time resets the timer.
- LUX (Photosensitivity): Adjustable from 10 to 2000 Lux. Turn anti-clockwise for dusk-to-dawn operation (10 Lux) and clockwise for daylight operation (2000 Lux).
Attention: Do not adjust the dials past their maximum settings, as this will damage the product.
Troubleshooting
If the light does not switch on, check the light-control settings, ensure the bulb is not broken, and verify that the main switch is ON. If the light stays on constantly, check for continuous movement within the detection zone. If the light switches on without visible movement, ensure the sensor is mounted securely and correctly.
Maintenance and disposal
Clean the product using only clear water and a soft cloth. Do not use detergents containing surface-active agents or scouring agents. When disposing of the product, do not throw it in the household trash; return it to an approved waste collection center.
Manufacturer information
Shada B.V.
Practical help
Common problems
Light does not switch on
Check light-control settings, ensure the bulb is functional, and verify the main switch is ON.
Light is on all the time
Check for continuous movement in the detection zone and adjust the detection range.
Light switches on without visible movement
Ensure the sensor is mounted securely and not affected by external factors like blowing leaves or small animals; lower sensitivity if necessary.
Before use
- Check the completeness of supplied parts.
- Verify the product is intact and undamaged.
- Ensure installation is performed by a qualified technician.
- Disconnect mains power before starting installation.
- Verify there is no voltage on the cable.
- Mount on the ceiling for optimal sensor function.
Show more Show less
Images and diagrams
- Fig. 1 illustrates the physical mounting process and wiring.
- The sensor unit contains three dials: SENS, TIME, and LUX for configuration.
Model compatibility
- Optimal sensor performance is only guaranteed with ceiling mounting.

Manual page author
David Miller
Documentation analyst