Tools / Measuring Tools
Installation Manual for Milex Foosball Cooler
Complete installation guide for the Milex Foosball Cooler. Includes a detailed parts list, step-by-step assembly instructions for the foosball rods and players, and safety guidelines for proper setup.
Quick answers from the manual
Quick answer
- The Milex Foosball Cooler is assembled by attaching handles to the rods, inserting the rods into the cooler, and mounting the players using the provided screws and Allen wrench. p. 2, 3
Key actions
- Assemble the foosball rods and players into the cooler box. p. 3
First start
- Ensure the product is completely and correctly assembled according to the instructions before use. p. 2
Problems and fixes
Customer inquiries
Contact [email protected]
p. 2Where to find it in the PDF
- Parts List p. 2
- Installation Steps p. 3
Table of contents
Quick guide from the manual
The Milex Foosball Cooler requires assembly of the foosball rods and players into the cooler unit. All necessary assembly tools are included in the box. The assembly process must be performed by an adult or under the direct supervision of an adult. Ensure the product is correctly assembled according to the instructions before use.
Parts list
Before beginning assembly, verify that all parts are present:
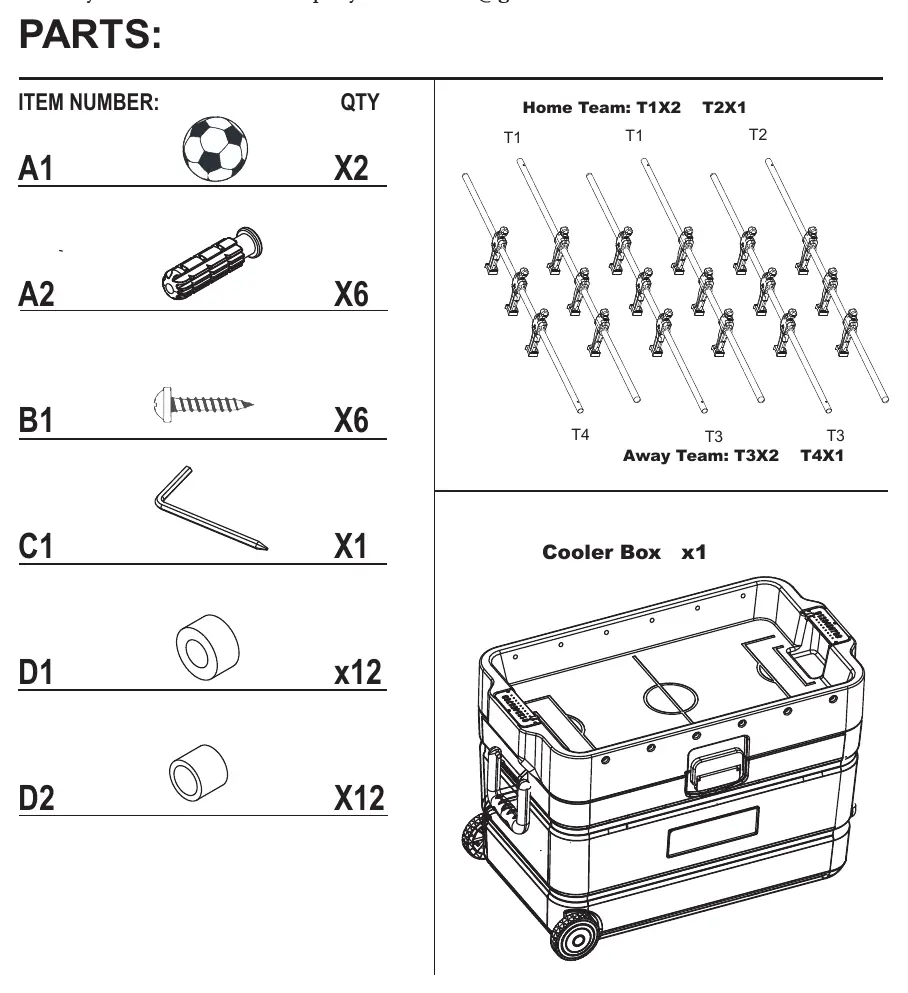
- A1: Ball (x2)
- A2: Handle (x6)
- B1: Screw (x6)
- C1: Allen wrench (x1)
- D1: Spacer/Bushing (x12)
- D2: Spacer/Bushing (x12)
- Cooler Box: (x1)
Installation steps
- Prepare teams: Remove the players from the tubes using the C1 screwdriver. Keep the player screws.
- Attach handles: Fit the A2 handle on one side of each tube. Use the B1 screws to secure them using the included Allen wrench (C1).
- Insert tubes: Fit the tubes into both sides of the cooler box, ensuring the handles are alternating.
- Add players: Add players to each tube in the following order: D1 - D2 - player - player - player - D2 - D1.
- Secure players: Complete the installation for each tube and fit all players using the player screws and the C1 screwdriver.
- Final check: Make sure all parts are correctly assembled before use.
Safety and support
For any customer-related inquiries, please contact the support team via email at [email protected]. Always ensure the assembly is done by an adult or under adult supervision to prevent injury or improper assembly.
Manufacturer information
Sharper Image
Practical help
Common problems
Missing parts or assembly issues
Contact customer support at [email protected] for assistance.
Difficulty with assembly
Ensure the process is performed by an adult or under adult supervision.
Before use
- Verify all parts (A1, A2, B1, C1, D1, D2) are present.
- Ensure assembly is performed by an adult.
- Check that all screws are tightened securely.
- Verify that handles are alternating on the cooler box.
- Confirm all players are attached in the correct order (D1-D2-player-player-player-D2-D1).
Images and diagrams
- The parts list diagram identifies all components required for assembly.
- The installation steps diagram illustrates the sequence of attaching handles, inserting tubes, and mounting players.

Manual page author
Michael Turner
Technical manual editor
Reviews PDF manuals for structure, safety notes, and practical product details so readers can find the right information quickly.