Tools / Measuring Tools
User Guide for Sharper Image Heated Fog-Free Shower Mirror
Quick guide for the Sharper Image Heated Fog-Free Shower Mirror (Item No. 205234). Includes installation steps, operation, cleaning instructions, and maintenance tips.
Quick answers from the manual
Quick answer
- The Sharper Image Heated Fog-Free Shower Mirror installs between your existing shower pipe and showerhead. It uses circulating shower water to heat the mirror surface, preventing fog. p. 2
Key actions
- Install the mirror p. 2
- Clean the mirror p. 3
First start
- Installation process p. 2
Problems and fixes
Leaking connection
Apply more plumbing tape to the threads.
p. 2Technical specifications
| Parameter | Value | Meaning | Pages |
|---|---|---|---|
| Magnification | 1X & 3X | Dual-sided mirror | p. 2 |
Where to find it in the PDF
- Installation and Operation p. 2
- Cleaning and Warranty p. 3
Table of contents
Manual images
Click an image to enlargeImportant Information
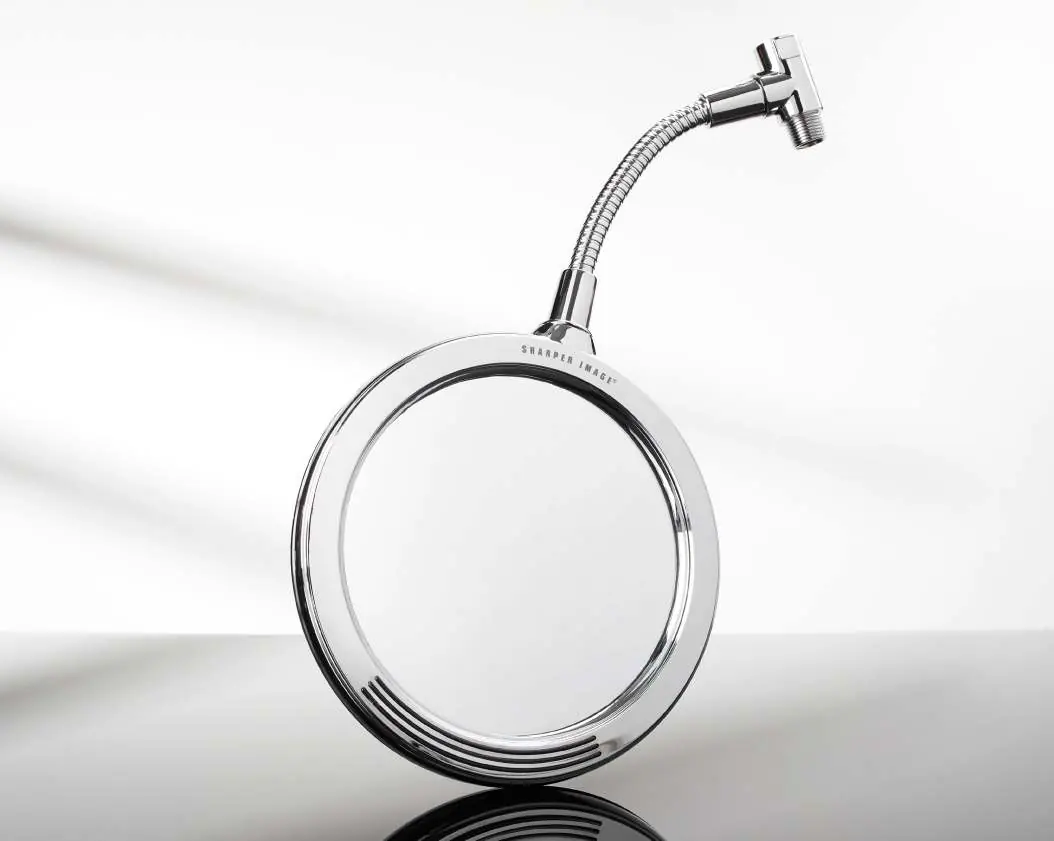
This guide provides instructions for the Sharper Image Heated Fog-Free Shower Mirror (Item No. 205234). The mirror is designed to be installed between your existing shower pipe and showerhead. It uses circulating shower water to heat the mirror surface, preventing fog. Please note that plumbing tape is required for installation but is not included.
Product Overview
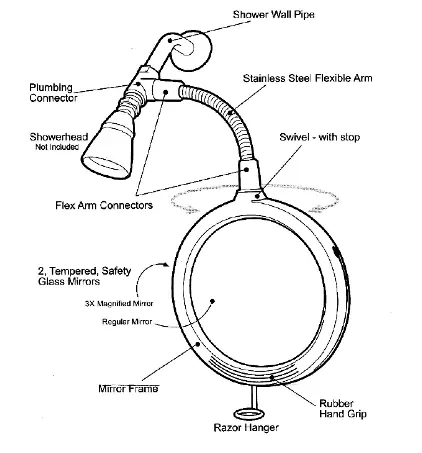
The mirror features a 6.5-inch dual-sided design with 1X and 3X magnification, a stainless steel flexible arm, and a chrome finish. It includes an adjustable razor hanger.
How It Works
When installed properly, a small amount of water from your shower circulates through a copper coil embedded in the mirror. This warms the mirror to the same temperature as the shower water, preventing fog from forming. The water then travels back through the flexible arm and out into the shower stream.
Installation
- Remove showerhead: Turn the showerhead connector counter-clockwise to remove it from the shower wall pipe. If necessary, use pliers with a soft cloth to prevent damage to the connector surface.
- Seal threads: Apply several turns of plumbing tape (not included) to the shower pipe threads.
- Align connection: Carefully align the mirror's plumbing connector with the threaded shower pipe.
- Connect mirror: Rotate the entire mirror around the shower wall pipe. Ensure the plumbing connector and shower wall pipe are properly aligned. If the mirror tightens in an undesired position, add more plumbing tape to the threads to adjust the final position.
- Connect showerhead: Screw the showerhead connector onto the threaded shower mirror fitting.
Operation
To switch between the 1X and 3X magnification sides, simply spin the mirror frame. Note that the mirror frame does not spin endlessly; it has a 300-degree rotation limit.
Cleaning and Maintenance
- Cleaning: Use only non-abrasive, liquid glass cleaner and a soft cloth.
- Avoid: Never use abrasive cleaners or paper towels, as they can scratch the mirror glass and chrome surface.
- Testing: Always test a small area before cleaning the entire surface.
- After use: Wipe the mirror and frame dry with a soft towel after each use to prevent water spots.
Warranty and Customer Service
Sharper Image items purchased from SharperImage.com include a 1-year limited replacement warranty. For questions, contact Customer Service at 1 (877) 210-3449, available Monday through Friday, 9:00 a.m. to 6:00 p.m. ET.
Official resources from the manual
Manufacturer information
Sharper Image
Practical help
Common problems
Mirror leaks at the connection
Apply more plumbing tape to the shower pipe threads.
Mirror is loose or in the wrong position after tightening
Add more plumbing tape to the shower pipe threads to influence the final tightened position.
Mirror frame will not spin
The mirror frame is designed to spin 300 degrees, not endlessly.
Before use
- Ensure you have plumbing tape (not included).
- Have a soft cloth and pliers (optional) ready.
- Verify the showerhead can be removed from the shower pipe.
- Ensure the shower pipe threads are clean.
Specs in practice
- 1X & 3X magnification
- Dual-sided mirror offering a standard view and a 3x zoomed view.
- 300-degree rotation
- The mirror frame has a stop point and does not rotate 360 degrees.
Images and diagrams
- The diagram illustrates the connection sequence: Shower Wall Pipe -> Plumbing Connector -> Flexible Arm -> Mirror Frame.
- The razor hanger attaches to the bottom of the mirror frame.
Model compatibility
- Requires a standard shower pipe connection.
- Plumbing tape is required for installation (not included).

Manual page author
Emily Carter
User documentation editor
Prepares concise manual descriptions and highlights the most useful setup, operation, and maintenance information for readers.