Tools / Measuring Tools
User Manual for Sharper Image Split Shift 2-In-1 RC Stunt Car
Quick guide for the Sharper Image Split Shift 2-In-1 RC Stunt Car. Learn how to install batteries, pair the remote, operate stunts, use the misting feature, and maintain your RC car.
Quick answers from the manual
Quick answer
- To pair the remote with the car, power on both units. The remote's red light will flash while searching and turn solid once the connection is established. p. 1
Key actions
- Pairing the remote p. 1
- Charging the car p. 1
- Using the misting feature p. 1
First start
- Install batteries in the remote and charge the car battery before first use. p. 1
Problems and fixes
Car not responding
Re-pair the remote by turning both devices off and on again.
p. 1Maintenance and reset
- Remove batteries if the toy will not be used for extended periods. p. 1
Technical specifications
| Parameter | Value | Meaning | Pages |
|---|---|---|---|
| Remote Batteries | 2 x 1.5V AA | Standard alkaline batteries required for the remote. | p. 1 |
| Car Battery | 3.7V | Rechargeable battery for the vehicle. | p. 1 |
Where to find it in the PDF
- Instruction Sheet p. 1
Table of contents
Manual images
Click an image to enlargeQuick guide from the manual
This guide provides essential instructions for operating the Sharper Image Split Shift 2-In-1 RC Stunt Car. Key procedures include battery installation, pairing the remote control to the vehicle, and utilizing the stunt and misting features.
Battery Installation and Charging
Remote Control: Uses 2 x 1.5V AA batteries. Use a Phillips screwdriver to open the battery compartment, insert batteries according to polarity, and secure the cover.
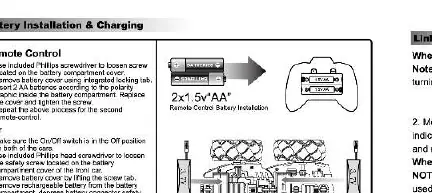
RC Car: Uses a 3.7V rechargeable battery. Ensure the car is switched to the OFF position before charging. Connect the provided USB charging cable to the car and a USB AC adapter. The red light on the charging cable indicates charging; it will turn off when fully charged.
Linking the Remote
To ensure proper communication between the remote and the car:
- Power on both the remote and the car using their respective power buttons.
- The remote's red indicator light will flash while searching for the car.
- Once the light becomes solid, the devices are paired.
- If using multiple vehicles, power on one car and its remote first to establish a unique connection before powering on the second set.
Operating the Car
The remote control features various buttons to perform stunts, including forward, backward, left/right turns, 45-degree traverse, 360-degree rotation, and auto demo mode. Refer to the control diagrams for specific stick movements.
Separating and Combining
To separate the car, locate the release button on the bottom of the car to center the guide wheels, depress the button, and pull the front and back parts apart. To combine, align the connector plug and push the parts together until they click and lock.
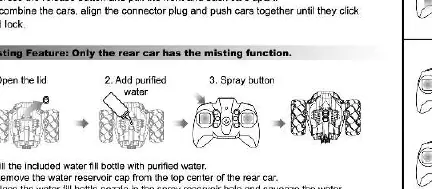
Misting Feature
To use the misting feature:
- Open the lid on the rear car.
- Add purified water using the provided water bottle.
- Secure the reservoir cap.
- Locate the spray button on the remote control to activate the mist.
- Press the button again to deactivate.
Care and Maintenance
- Remove batteries if the toy will not be used for extended periods.
- Clean the vehicle with a damp cloth.
- Do not expose the toy to extreme heat or submerge it in water.
- Inspect wheels regularly and remove any debris.
Manufacturer information
Sharper Image
Practical help
Common problems
Car does not respond to remote
Ensure both the car and remote are powered on. If they fail to link, turn both off and restart the pairing process.
Misting feature not working
Ensure the water reservoir is filled with purified water and the cap is securely closed.
Car wheels moving sluggishly
Inspect wheels for debris or hair and remove it.
Before use
- Install 2x 1.5V AA batteries in the remote control.
- Charge the car's 3.7V battery fully using the provided USB cable.
- Ensure the car is switched to the OFF position before charging.
- Fill the water reservoir with purified water if using the misting feature.
- Power on both the car and the remote to establish a connection.
Specs in practice
- Battery Type (Remote)
- Requires 2 x 1.5V AA batteries (not included).
- Battery Type (Car)
- Built-in 3.7V rechargeable battery.
Images and diagrams
- The remote control diagram illustrates stick movements for forward, backward, and various turning maneuvers.
- The car diagram shows the location of the power switch and the battery compartment.
- The misting diagram indicates the location of the water reservoir lid.
Model compatibility
- Not suitable for children under 3 years due to small parts.
- Do not operate in heavy rain, water, mud, or puddles.
- Full functionality is not available on carpets.

Manual page author
David Miller
Documentation analyst
Organizes user manual content into clear summaries, with attention to model details, product context, and everyday usability.