Smart Home / Energy Meters
User Guide for Shelly Pro 1 DIN Rail Relay Switch
A comprehensive user guide for the Shelly Pro 1 DIN Rail Relay Switch. Includes instructions for mobile app setup, device inclusion, web interface configuration, and troubleshooting.
Table of contents
Manual images
Click an image to enlargeQuick Start Guide
The Shelly Pro 1 is a smart relay switch that can be managed via the Shelly Cloud mobile app or an embedded web interface. To begin, ensure the device is installed according to safety instructions and powered on. The device will automatically create its own Wi-Fi Access Point (AP) for initial setup.
Mobile App Setup
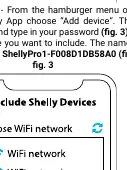
Download the Shelly Cloud application. Upon first launch, create an account. To add the device:
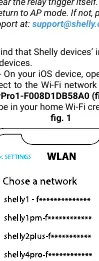
- Step 1: Ensure the device is powered on. If it does not create an AP network (SSID like ShellyPro1-XXXXXXXXXXXX), reset the device by powering it off and on, then pressing the connected switch/button 5 times consecutively.
- Step 2: Connect your phone to the device's Wi-Fi network (AP mode).
- Step 3: Open the Shelly app. For iOS, connect to the device Wi-Fi in phone settings first. For Android, use the 'Add device' option in the app menu.
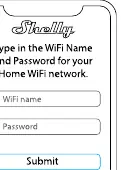
- Step 4: Follow the in-app prompts to connect the device to your home Wi-Fi network.
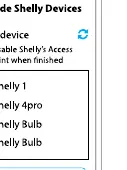
- Step 5: Once discovered, name the device, assign it to a room, and save.
Embedded Web Interface
You can manage the Shelly Pro 1 directly via a web browser:
- Connect to the device's Wi-Fi network (AP mode).
- Open a web browser and navigate to 192.168.33.1.
- The home page displays the switch state and functionality menus.
- Use 'Channel Settings' to configure input/output modes, PIN locks, and relay behavior.
Device Settings and Features
The device offers several advanced features accessible via the app or web interface:
- Timers: Configure 'Auto ON' or 'Auto OFF' to toggle the relay after a predefined time.
- Schedules: Set automatic on/off times based on the clock or sunrise/sunset. Requires an internet connection.
- Internet Settings: Configure Wi-Fi client mode, static IP, Ethernet, Cloud connectivity, Bluetooth, and MQTT.
- Button Type: Define how the physical switch controls the output (e.g., 'button' or 'switch' mode).
- Invert Switch: Allows you to reverse the input logic (on becomes off and vice versa).
- Webhooks: Trigger HTTP endpoints based on device events.
Troubleshooting and Reset
If you cannot find the device's AP network, ensure it is wired correctly. To perform a factory reset, you must use the physical switch/button connected to the SW terminal (power cycle and press 5 times). You can also perform a factory reset via the device settings menu in the app or web interface.
Practical help
Common problems
Device AP network not visible
Power cycle the device (off/on) and press the connected switch/button 5 times consecutively to force AP mode.
Forgot password
Use the 'Forgot Password' link on the login screen to receive a reset email.
Cannot control device remotely
Ensure the device is connected to your home Wi-Fi and that Cloud connectivity is enabled in the settings.
Before use
- Ensure the device is installed according to the safety and installation instructions.
- Power on the device to initiate the AP Wi-Fi network.
- Have your home Wi-Fi network name and password ready.
- Download the Shelly Cloud app on your smartphone.
- Verify the device is within range of your Wi-Fi router.
Specs in practice
- Invert Switch
- Reverses the input logic; useful if your physical switch wiring is inverted.
Images and diagrams
- Figures 1-4 illustrate the step-by-step process of connecting the device to the Shelly app on iOS and Android.
- The diagrams show selecting the device Wi-Fi, entering home credentials, and adding the device to a room.
Model compatibility
- Compatible with Amazon Echo and Google Home.
- Supports local network control without the cloud.
- Supports MQTT for advanced integration.

Manual page author
Emily Carter
User documentation editor
Prepares concise manual descriptions and highlights the most useful setup, operation, and maintenance information for readers.