Industrial / Vacuum Cleaners
Shop-Vac QPL 92 14RT Wet/Dry Vacuum Cleaner User Manual
Comprehensive user manual for the Shop-Vac QPL 92 14RT wet/dry vacuum. Includes detailed instructions for assembly, filter maintenance, operation, blower feature usage, and troubleshooting.
Table of contents
Manual images
Click an image to enlargeQuick Guide
This manual provides instructions for the Shop-Vac QPL 92 14RT wet/dry vacuum. Before operating, ensure the correct filter is installed for your cleaning task (General, Medium, or Fine filtration). Always disconnect the power plug before removing the tank cover or performing maintenance. Never operate the vacuum unattended or near flammable materials.
Safety Instructions
- Do not leave the appliance plugged in when not in use.
- Connect only to a properly grounded outlet.
- Do not use to pick up flammable liquids, combustible materials, or hazardous substances like asbestos or lead paint debris.
- Always wear safety goggles when operating the vacuum.
- Do not use without a filter or dust bag in place.
- If the motor housing becomes damaged, discontinue use immediately.
Assembly
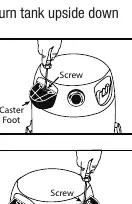
Caster System: Depending on your model, assemble the caster feet or rear caster dolly by turning the tank upside down. Align the caster feet (marked A and B) with the corresponding slots on the tank and secure with the provided screws. Insert caster stems into the feet using pressure and a twisting motion.
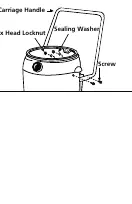
Carriage Handle: If equipped, spread the ends of the carriage handle to place them under the side tank handles. Align the holes and fasten securely with the provided screws, washers, and nuts. Ensure the rubber side of the washers faces the inside of the tank to prevent leaks.
Set Up and Operation
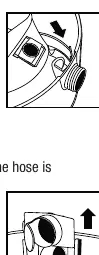
Ensure the correct filter is installed. Replace the tank cover and secure all lid latches. Insert the hose into the inlet on the front of the tank and tighten the locking nut. Connect the desired accessory to the hose end. Plug the cord into a grounded outlet. The switch positions are I for ON and O for OFF.
Filter Installation and Maintenance
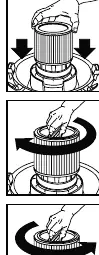
Cartridge Filter: Slide the cartridge over the lid cage and secure it with the filter retainer by turning it clockwise. For fine dust or powders, a high-efficiency filter bag must be used in conjunction with the cartridge filter.
Disposable Filter Bag: For models with an inlet deflector, remove the deflector, slide the bag collar over it, and reinsert the assembly into the deflector guide. Ensure the bag is expanded inside the tank.
Cleaning: Clean standard filters by shaking or brushing. Extremely dirty filters can be rinsed with water and must be dried completely (approx. 24 hours) before reuse. Do not use a damaged filter.
Blower Feature
To use the blower, clear the hose of debris. Remove the blower port cover on the back of the tank cover (if equipped). Insert the hose end into the blower port and twist to tighten. Use caution due to the powerful force of the air.
Emptying Liquid Waste
Turn off and unplug the unit. If your model has a tank drain, remove the drain cap to empty. If not, remove the tank cover and lift the tank using the side handles to pour out the liquid. Always clean and dry the tank and filters after wet pick-up.
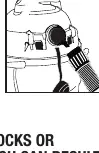
Troubleshooting
If the vacuum loses suction, check for a loose hose connection, a clogged filter, a full tank, or a hole in the hose. If the vacuum will not start, check the power source or contact customer service. For static shocks, add moisture to the air using a humidifier.
Practical help
Common problems
Loss of suction
Check for loose hose connection, clogged filter, full tank, or hole in the hose.
Vacuum will not start
Check power at the receptacle. If the switch or motor is defective, contact Shop-Vac customer service.
Dust discharging from exhaust
Ensure the filter is properly installed, not damaged, or clogged. Use a more efficient filter for fine dust.
Static shock
Add moisture to the air (use a humidifier). This is a temporary condition in dry environments.
Before use
- Check the tank for any accessories packed inside.
- Ensure the correct filter is installed for the intended task (wet or dry).
- Verify the power source is grounded.
- Ensure all lid latches are securely clamped.
- Inspect the power cord for damage.
Specs in practice
- 120V Circuit
- The vacuum is designed for use on a standard 120-volt nominal circuit.
- AWG (American Wire Gauge)
- Refers to the wire size required for extension cords based on length and amperage. Refer to Table A in the manual.
Images and diagrams
- Caster feet assembly: Align parts marked A and B with corresponding slots on the tank bottom.
- Filter retainer: Turn clockwise to lock the cartridge filter in place.
- Blower port: Located on the back of the tank cover; remove the cover to attach the hose.
Model compatibility
- Use a high-efficiency filter bag when vacuuming fine dust or powders.
- Do not use the vacuum for dry pick-up without a dry-use filter installed.
- Foam sleeve is required for vacuuming large quantities of liquid.

Manual page author
Michael Turner
Technical manual editor
Reviews PDF manuals for structure, safety notes, and practical product details so readers can find the right information quickly.