Electronics / Monitor Accessories
Installation Guide for SIIG 04-1349A Heavy Duty Gas Spring Monitor Arm
A comprehensive installation guide for the SIIG 04-1349A monitor arm. Includes step-by-step instructions for C-clamp and grommet mounting, VESA plate attachment, and tension adjustment procedures.
Table of contents
Manual images
Click an image to enlargeQuick Guide from the Manual
The SIIG 04-1349A is a heavy-duty gas spring monitor arm designed for professional installation. Before beginning, ensure your desk surface is solid (wood, concrete, or brick) and can support the combined weight of the equipment. The arm supports monitors weighing between 3kg and 23kg and is compatible with VESA patterns 75x75, 100x100, 200x100, and 200x200.
Unpacking and Safety
Carefully remove all contents and lay them on a protective surface. Verify all parts against the component checklist before starting. Caution: Improper installation may result in damage or serious injury. This product is intended for indoor use only and should be installed by professionals.
Installation Options
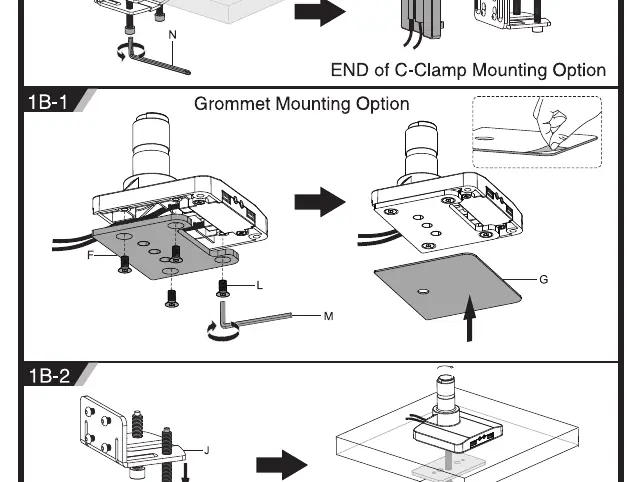
The monitor arm offers two primary mounting methods:
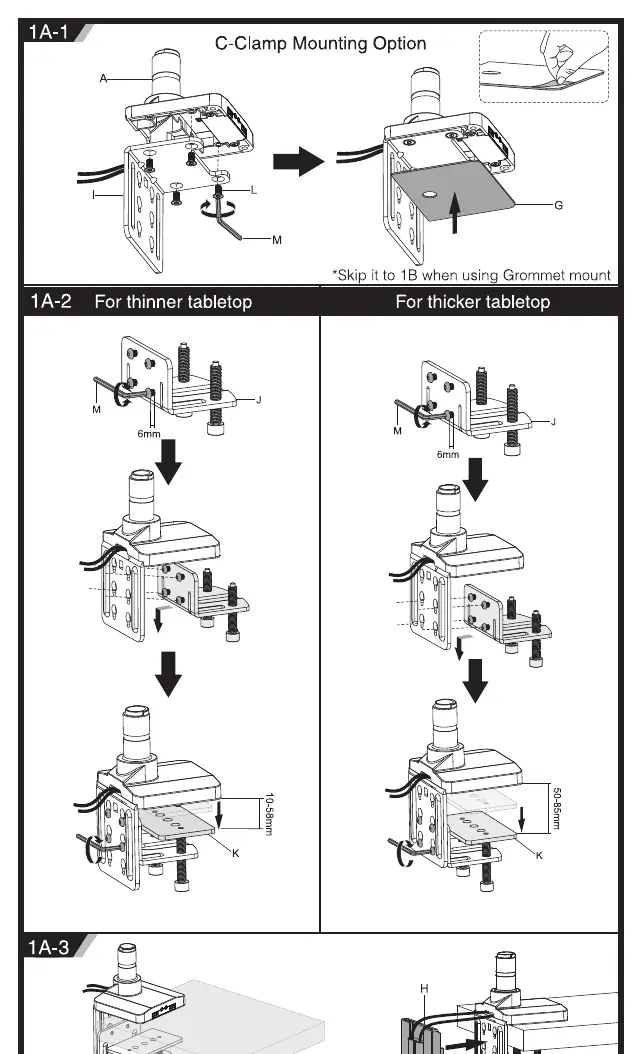
- C-Clamp Mounting: Suitable for desk edges. Follow the specific steps for thinner or thicker tabletops as detailed in the manual. Ensure the clamp is securely tightened.
- Grommet Mounting: Suitable for desks with existing holes. This method provides a secure, bolt-through installation.
VESA Mounting
Choose the appropriate VESA mounting option based on your monitor type:
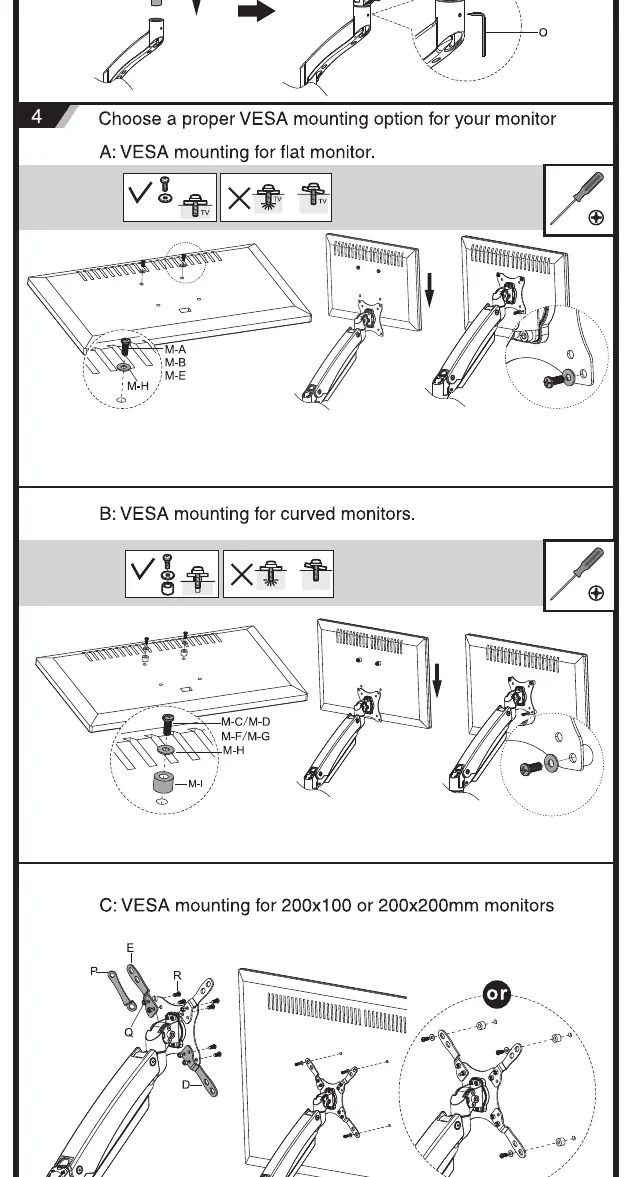
- Flat Monitors: Use the standard VESA plate configuration.
- Curved Monitors: Ensure the correct spacers and screws are used to accommodate the curvature.
- Large VESA Patterns: For 200x100 or 200x200 patterns, attach the provided extension brackets to the main VESA plate before mounting to the monitor.
Adjustment and Maintenance
Once installed, you may need to adjust the gas spring tension to match the weight of your monitor:
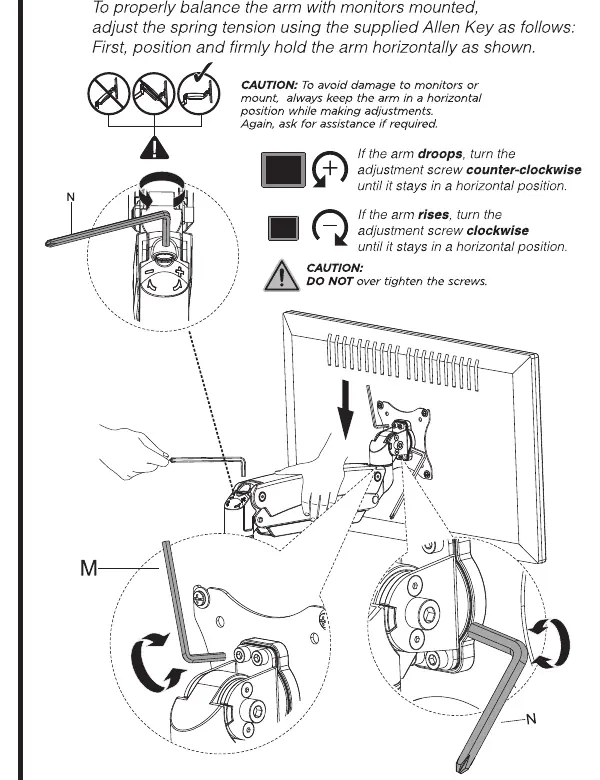
- If the arm droops: Turn the adjustment screw counter-clockwise.
- If the arm rises: Turn the adjustment screw clockwise.
- Rotation/Tilt: If the display does not stay in the desired position, tighten the screws at the respective joints.
Maintenance: Check that the bracket is secure and safe to use at regular intervals, at least every three months.
Manufacturer information
SIIG, Inc.
Practical help
Common problems
Monitor arm droops (sinks down)
Turn the adjustment screw on the arm joint counter-clockwise until it stays in a horizontal position.
Monitor arm rises (springs up)
Turn the adjustment screw on the arm joint clockwise until it stays in a horizontal position.
Display does not stay in desired rotation or tilt position
Tighten the screws at the specific joint to increase friction.
Before use
- Verify desk surface is solid (wood, concrete, or brick).
- Check that monitor weight is between 3kg and 23kg.
- Verify VESA pattern matches (75x75, 100x100, 200x100, or 200x200).
- Ensure all parts from the component checklist are present.
- Prepare proper tools for installation.
Specs in practice
- Weight Capacity
- Supports monitors weighing between 3kg and 23kg.
- VESA Compatibility
- Supports 75x75, 100x100, 200x100, and 200x200 mounting patterns.
- Max Screen Size
- Designed for monitors up to 49 inches.
Images and diagrams
- C-Clamp mounting: Attaches to the edge of the desk.
- Grommet mounting: Attaches through a hole in the desk.
- Tension adjustment: Located on the arm joint to balance monitor weight.
Model compatibility
- Not for outdoor use.
- Must be installed by professionals.
- Do not rotate monitor past the rear edge of the desk to prevent instability.

Manual page author
Emily Carter
User documentation editor
Prepares concise manual descriptions and highlights the most useful setup, operation, and maintenance information for readers.