General / Mounts Stands
Installation Guide for SIIG 04-1350A Single Monitor Arm
A complete installation and setup guide for the SIIG 04-1350A Single Monitor Arm with RGB lighting. Includes mounting instructions, tension adjustment, and remote control operation.
Table of contents
Manual images
Jump to the sectionQuick guide from the manual
This document provides instructions for installing the SIIG 04-1350A Single Monitor Arm. Before beginning, ensure your desk surface can support the combined weight of the arm and monitor. The product is designed for indoor use only and must be installed by professionals or following these instructions carefully. Always check that the bracket is secure at least every three months.
Installation
The installation process involves setting up the base, attaching the arm, and mounting the monitor.
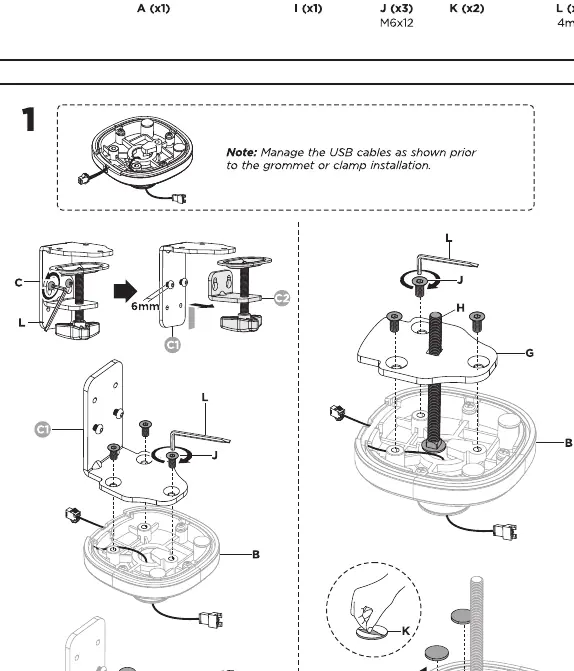
- Base Assembly: Choose between clamp or grommet installation. Manage USB cables through the base before securing it to the desk.
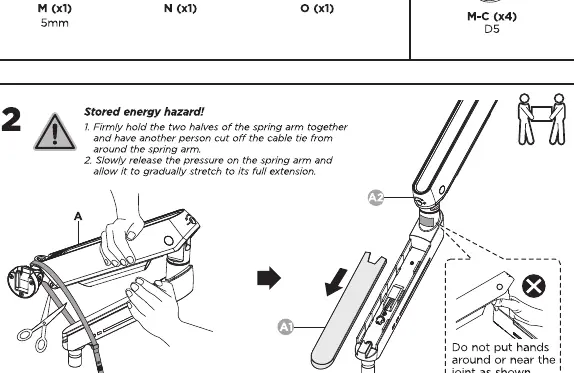
- Spring Arm Handling:Caution: The arm contains stored energy. Hold the two halves of the spring arm together firmly while removing the cable tie. Allow it to gradually stretch to its full extension.
- Attaching the Arm: Secure the arm to the base assembly.
- VESA Mounting: Attach the VESA plate to the back of your monitor using the appropriate screws (M-A, M-B, or M-C). Ensure the plate is oriented correctly with the 'TOP' indicator facing upward.
- Mounting the Monitor: Slide the monitor onto the arm and lock it into place.
Adjustments
Proper tension adjustment is critical for the arm to hold the monitor at the desired height.
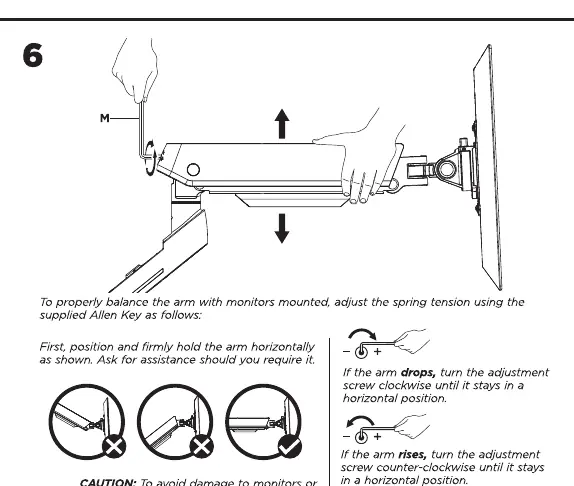
- Tension Adjustment: Use the supplied Allen Key (M) to adjust the spring tension. If the arm drops, turn the adjustment screw counter-clockwise. If the arm rises, turn the adjustment screw clockwise.
- Important: Always keep the arm in a horizontal position while making adjustments. Ask for assistance if necessary.
RGB Lighting
The monitor arm features integrated RGB lighting controlled by a remote.
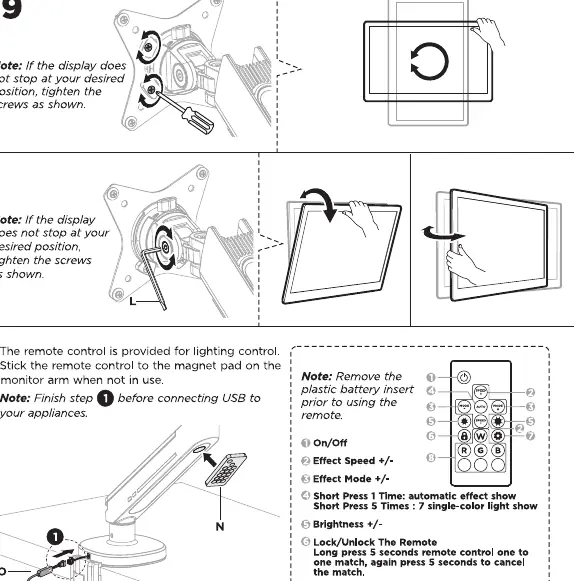
- Setup: Remove the plastic battery insert from the remote before use. Stick the remote control to the magnet pad on the monitor arm when not in use.
- Operation: Use the remote to toggle On/Off, adjust Effect Speed, change Effect Modes, and adjust Brightness.
- Lock/Unlock: Long press the 'Lock' button for 5 seconds to pair the remote.
Maintenance
Regularly check that the bracket is secure and safe to use. Ensure all screws are tightened as specified in the installation steps.
Manufacturer information
SIIG, Inc.
Practical help
Common problems
Monitor arm drops after mounting
Turn the tension adjustment screw counter-clockwise until the arm stays in a horizontal position.
Monitor arm rises after mounting
Turn the tension adjustment screw clockwise until the arm stays in a horizontal position.
Display does not stop at the desired position
Tighten the screws on the display mount as shown in step 9.
Before use
- Verify the desk surface can support the combined weight of the arm and monitor.
- Ensure the monitor weight is between 2kg and 9kg.
- Check that the VESA pattern is 75x75mm or 100x100mm.
- Remove the plastic battery insert from the remote control.
- Ensure you have the correct tools (Allen keys provided).
Specs in practice
- Weight Capacity
- Supports monitors weighing between 2kg and 9kg (4.4-19.8lbs).
- VESA Compatibility
- Fits monitors with 75x75mm or 100x100mm mounting patterns.
- Monitor Size
- Suitable for flat or curved monitors up to 34 inches.
Images and diagrams
- Step 1 illustrates both clamp and grommet mounting options for different desk types.
- Step 2 highlights the 'Stored energy hazard' and the correct way to release the spring arm.
- Step 6 shows the specific adjustment screw location for tension calibration.
- Step 9 details the remote control buttons and their functions.
Model compatibility
- Designed for indoor use only.
- Must be installed on solid wood walls or desk surfaces.
- Do not use with monitors exceeding the weight limit.

Manual page author
Michael Turner
Technical manual editor
Reviews PDF manuals for structure, safety notes, and practical product details so readers can find the right information quickly.