General / Mounts Stands
User Guide for SIIG 04-1419A Dual Monitor Arm
Quick setup guide for the SIIG 04-1419A Dual Monitor Arm. Includes installation steps, VESA compatibility, weight limits, and adjustment instructions for tilt, rotation, and tension.
Table of contents
Manual images
Jump to the sectionQuick Guide for SIIG 04-1419A
The SIIG 04-1419A is a light-duty dual monitor arm designed to support two screens. Before installation, ensure your desk thickness is between 18mm and 57mm. Each arm supports a monitor weight between 4.4 lbs and 19.8 lbs (2 kg to 9 kg). Ensure your monitors are VESA compatible (75x75mm or 100x100mm).
Installation
Follow these steps to assemble the mount:
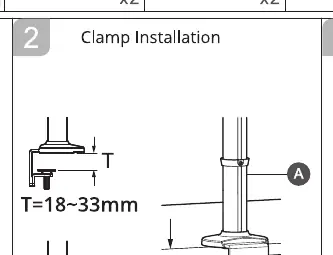

- Clamp Installation: Attach the clamp mount to your desk. The clamp supports two thickness ranges: 18-33mm or 38-57mm. Adjust the clamp base accordingly.
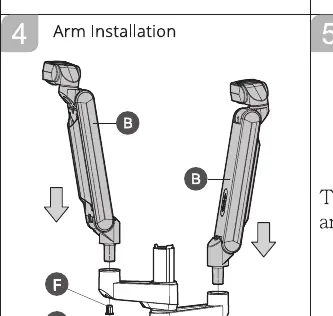
- Pole and Arm Installation: Secure the pole to the clamp base. Slide the arms onto the pole and secure them using the provided tools.
- VESA Plate Installation: Attach the VESA plates to the back of your monitors using the provided screws. Ensure the arrow on the plate points downward.
- Screen Installation: Slide the monitors onto the arm heads. Ensure they are securely locked in place.
Adjustments
Once installed, you can fine-tune the monitor position:
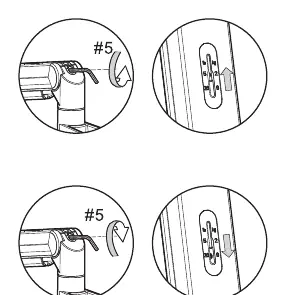
- Tension Adjustment: Use the provided tool to adjust the tension of the arm. This ensures the monitor stays at the desired height.
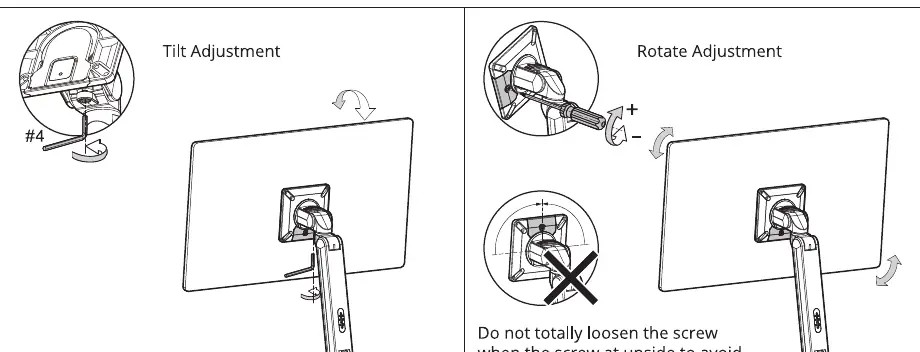
- Tilt Adjustment: Use the screw at the back of the VESA plate to adjust the tilt angle of the monitor.
- Rotate Adjustment: You can rotate the monitor for portrait or landscape orientation. Warning: Do not fully loosen the screw at the top of the rotation joint to prevent the monitor from falling off.
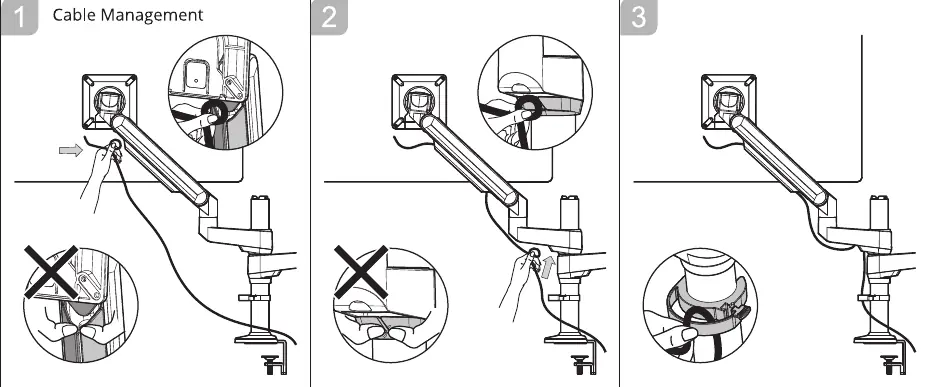
Cable Management
To keep your workspace tidy, route the monitor cables through the plastic clips located on the arms. Ensure there is enough slack in the cables to allow for full range of motion without pulling on the connectors.
Manufacturer information
SIIG, Inc.
Practical help
Common problems
Monitor does not stay at the desired height
Adjust the tension screw on the arm using the provided tool to match the weight of your monitor.
Monitor is tilting or rotating too loosely
Tighten the respective adjustment screws on the VESA plate or rotation joint.
Monitor falling off during rotation adjustment
Do not fully loosen the screw at the top of the rotation joint.
Before use
- Verify desk thickness is between 18mm and 57mm.
- Confirm monitor weight is between 4.4 lbs and 19.8 lbs (2-9 kg).
- Check that monitor VESA pattern is 75x75mm or 100x100mm.
- Ensure all parts (A-H) are present before starting assembly.
Specs in practice
- Weight Capacity
- Supports 2 kg to 9 kg (4.4 to 19.8 lbs) per arm.
- VESA Compatibility
- Supports standard 75x75mm and 100x100mm mounting patterns.
- Desk Thickness
- Compatible with desk thicknesses of 18-33mm or 38-57mm.
Images and diagrams
- The clamp installation diagram shows two different thickness settings for the desk mount.
- The VESA plate diagram highlights the correct orientation with the arrow pointing downward.
- The tension adjustment diagram indicates the direction to turn the tool to increase or decrease resistance.
Model compatibility
- Designed for monitors up to 32 inches.
- Not suitable for monitors exceeding 9 kg (19.8 lbs).

Manual page author
Michael Turner
Technical manual editor
Reviews PDF manuals for structure, safety notes, and practical product details so readers can find the right information quickly.