General / Mounts Stands
SIIG 04-1134BB Dual Monitor Gas Spring Wall Mount Installation Guide
Installation guide for the SIIG 04-1134BB dual monitor wall mount. Includes mounting instructions for wood studs and concrete walls, VESA plate attachment, and gas spring tension adjustments.
Table of contents
Manual images
Jump to the sectionQuick guide from the manual
The SIIG 04-1134BB is a dual monitor wall mount featuring gas spring arms for flexible positioning. Before starting, ensure your wall type is compatible (wood stud, solid concrete, or brick) and that the mounting surface can support the combined weight of the monitors. The weight capacity is 1-9kg per arm. Always use the provided hardware and do not over-tighten screws.
Installation
Wood Stud Installation:
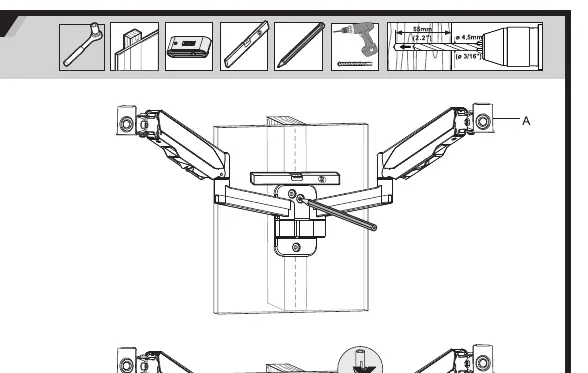
- Locate the stud and mark the mounting holes.
- Drill 4.5mm holes to a depth of 60mm.
- Secure the mount using the provided wood screws (W-A) and washers (W-C).
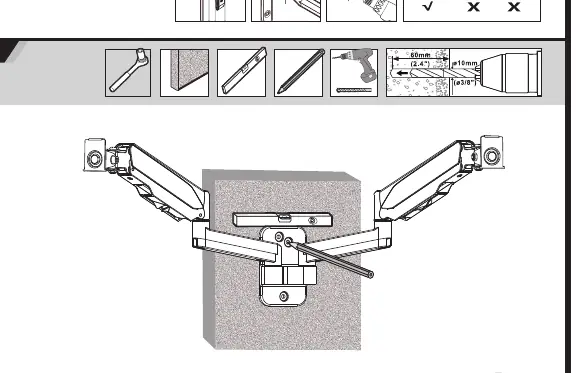
Concrete or Brick Wall Installation:
- Mark the mounting holes on the wall.
- Drill 10mm holes to a depth of 60mm.
- Insert anchors (W-B) into the holes.
- Secure the mount using the provided wood screws (W-A) and washers (W-C).
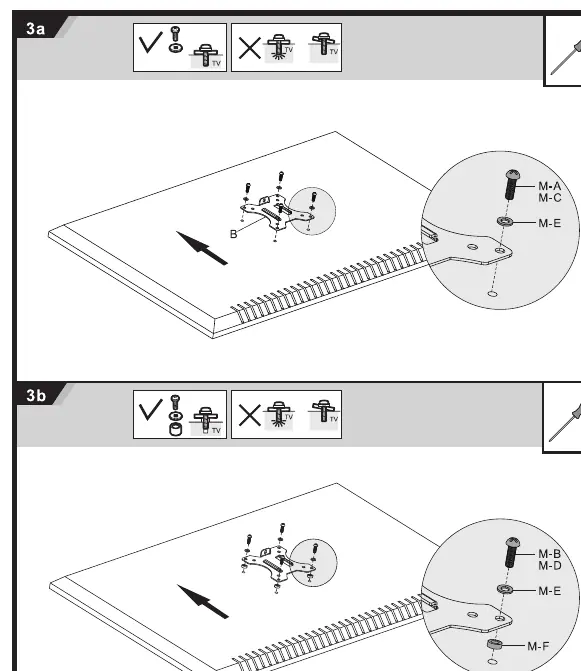
Monitor Attachment:
- Attach the VESA plates to the back of your monitors using the appropriate screws (M-A/M-B/M-C) and washers (M-D/M-E/M-F).
- Slide the monitor onto the arm and secure it with the provided knob (C).
Adjustments
Once installed, you can adjust the monitor position:
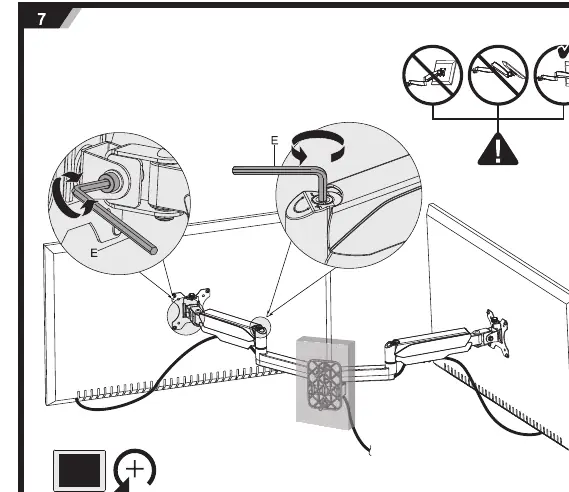
- Tension Adjustment: Use the provided 6mm Allen key (E) on the gas spring arm to adjust the tension. Turn towards the minus (-) sign if the monitor rises too high, or towards the plus (+) sign if it sinks.
- Tilt and Rotation: The mount allows for tilt and rotation adjustments to achieve the desired viewing angle.
Maintenance
Check that the bracket is secure and safe to use at regular intervals, at least every three months.
Manufacturer information
SIIG, Inc.
Practical help
Common problems
Monitor sinks or rises on its own
Adjust the gas spring tension using the 6mm Allen key (E). Turn towards (+) to increase tension if the monitor sinks, or towards (-) to decrease tension if it rises.
Mount feels unstable
Verify that the wall type is suitable (wood stud, solid concrete, or brick) and that all mounting screws are tightened correctly without being over-tightened.
Before use
- Verify wall type: wood stud, solid concrete, or brick.
- Check monitor weight: must be between 1kg and 9kg per arm.
- Check VESA pattern: must be 75x75mm or 100x100mm.
- Ensure you have necessary tools: drill, level, screwdriver, and the included 6mm Allen key.
- Confirm the mounting surface can support the combined weight of the equipment.
Specs in practice
- VESA 75x75/100x100
- The standard mounting hole pattern on the back of your monitor.
- Weight Capacity (1-9kg per arm)
- The weight range of the monitor that the gas spring can support.
Images and diagrams
- Step 1a/1b: Shows the specific drill bit sizes (4.5mm for wood, 10mm for concrete) and hardware required for different wall types.
- Step 7: Illustrates how to use the Allen key to adjust the gas spring tension for proper monitor balance.
Model compatibility
- Supports monitors up to 32 inches.
- Not suitable for installation on walls that cannot support the combined weight of the mount and monitors.
- Indoor use only.

Manual page author
Emily Carter
User documentation editor
Prepares concise manual descriptions and highlights the most useful setup, operation, and maintenance information for readers.