Electronics / Monitor Accessories
Installation Guide for SIIG 04-1418A Heavy Duty Desk Mount Monitor Arm
A comprehensive installation and adjustment guide for the SIIG 04-1418A monitor arm. This guide covers clamp installation, VESA mounting, cable management, and tension adjustments for monitors up to 49 inches.
Table of contents
Manual images
Click an image to enlargeQuick guide from the manual
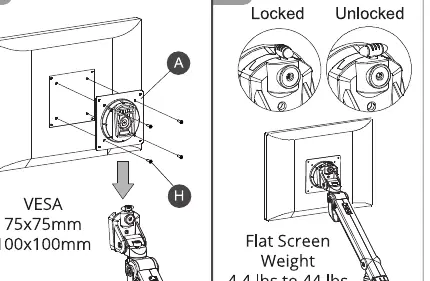
The SIIG 04-1418A is a heavy-duty desk mount monitor arm designed for screens up to 49 inches. Before installation, ensure your monitor weight is between 2kg and 20kg (4.4 lbs to 44 lbs). The mount supports VESA patterns of 75x75mm and 100x100mm. Always ensure the clamp is securely tightened and the side screws are balanced to prevent instability.
Parts List
- Monitor arm assembly
- Clamp base
- VESA plate
- M5x30 screws
- M4x10 screws
- Hex keys (#3, #4, #6)
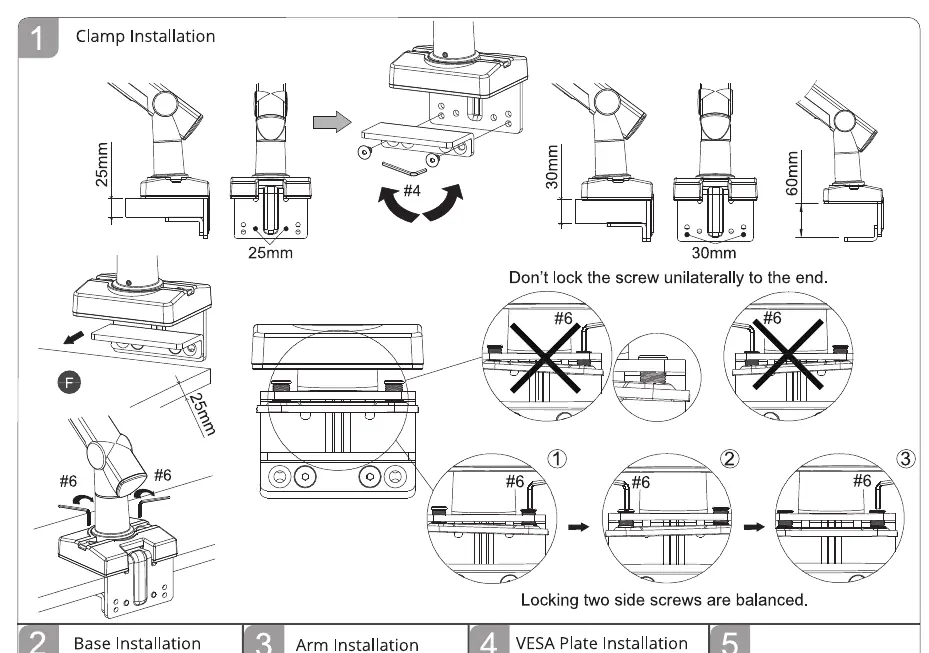
Clamp Installation
The clamp base can be adjusted to fit different desk thicknesses. Ensure the clamp is fully tightened against the desk edge. When securing the clamp, ensure the two side screws are balanced to maintain stability. Do not lock the screw unilaterally to the end.
Base and Arm Installation
Insert the arm assembly into the base. Ensure all connections are secure. Use the provided hex keys to tighten any loose joints during the assembly process.
VESA Plate Installation
Attach the VESA plate to the back of your monitor using the provided M4x10 screws. Ensure the VESA pattern matches your monitor (75x75mm or 100x100mm). Once attached, slide the monitor onto the arm assembly until it clicks or is securely fastened.
Cable Management
Route your cables through the designated channels on the monitor arm. This helps keep your workspace organized and prevents cable strain during arm movement.
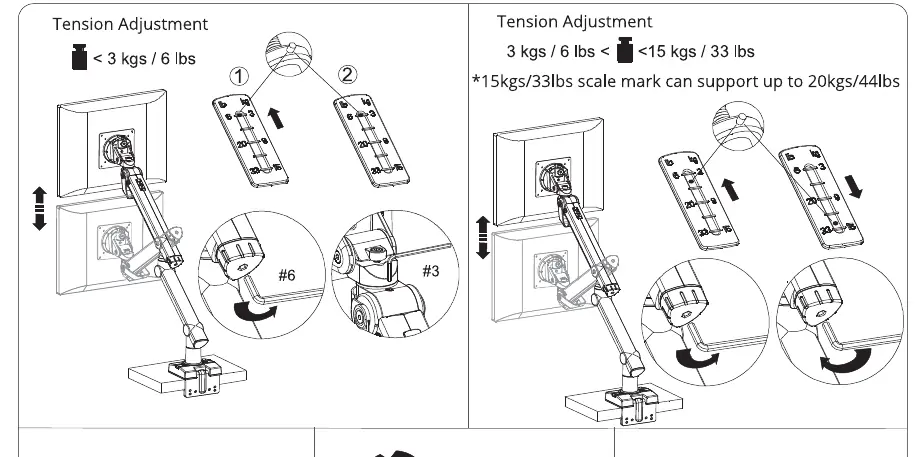
Tension Adjustment
Adjust the tension based on the weight of your monitor. If the monitor does not stay in position, use the hex key to adjust the tension screw. For monitors under 3kg (6 lbs), use the lighter tension setting. For monitors between 3kg and 15kg (up to 20kg/44lbs), adjust the tension screw accordingly to support the weight.
Tilt and Rotate Adjustment
Use the #4 hex key to adjust the tilt and rotation tension. This allows you to position your monitor at the desired angle and orientation. Ensure the screws are tightened sufficiently to hold the monitor in place after adjustment.
Manufacturer information
SIIG, Inc.
Practical help
Common problems
Monitor arm sagging or not holding position
Adjust the tension screw using the provided hex key. Increase tension if the monitor drops, or decrease if it is too difficult to move.
Clamp does not fit the desk thickness
Adjust the clamp base position using the screws to accommodate different desk thicknesses (25mm, 30mm, 60mm).
Before use
- Verify desk thickness is compatible with the clamp settings.
- Ensure monitor weight is between 2kg and 20kg (4.4 lbs - 44 lbs).
- Check VESA pattern (75x75mm or 100x100mm).
- Have the provided hex keys (#3, #4, #6) ready.
- Ensure the monitor is placed on a stable surface before mounting.
Specs in practice
- Weight Capacity
- Supports monitors weighing between 2kg and 20kg (4.4 lbs to 44 lbs).
- VESA Compatibility
- Supports 75x75mm and 100x100mm mounting patterns.
- Monitor Size
- Designed for monitors up to 49 inches.
Images and diagrams
- Clamp Installation: Shows how to adjust the base for different desk thicknesses and the importance of balancing side screws.
- Tension Adjustment: Illustrates how to increase or decrease tension based on monitor weight.
Model compatibility
- Supports monitors up to 49 inches.
- VESA patterns supported: 75x75mm and 100x100mm.
- Weight range: 2kg to 20kg.

Manual page author
David Miller
Documentation analyst
Organizes user manual content into clear summaries, with attention to model details, product context, and everyday usability.