Electronics / Audio
User Manual for SMSL Sanskrit 10th DAC
Quick guide for the SMSL Sanskrit 10th DAC. Learn how to connect inputs, use the remote control, operate the display, understand the auto-rotate feature, and perform a factory reset.
Table of contents
Manual images
Click an image to enlargeQuick Guide
The SMSL Sanskrit 10th is a high-resolution DAC. Key operational points include:
- Power/Input: Use the power/input key to turn the unit on/off and cycle through inputs (USB, Coaxial, Optical).
- Display: The unit features an internal accelerometer; it must be placed horizontally for the display to work correctly.
- Remote Control: Requires 2x AAA batteries. Press the 'C' key first when using the remote for the first time.
- Aux Power: When connecting to phones via USB, use a 5V DC power source to prevent overcurrent. Do not use Quick-Charge power adapters.
Safety and Installation
To ensure safe operation and longevity of the device:
- Install the unit in a well-ventilated, cool, dry, and clean place away from direct sunlight, heat sources, vibration, dust, moisture, or cold.
- Do not place other components, burning objects (like candles), or liquid containers on top of the unit.
- Do not cover the unit with newspapers, tablecloths, or curtains to avoid obstructing heat radiation.
- Use only the specified voltage.
- Disconnect the power cable during lightning storms or if the unit will be unused for long periods.
- Do not attempt to modify or fix the unit; contact qualified SMSL service personnel.
Parts and Connections
The device features the following interfaces:
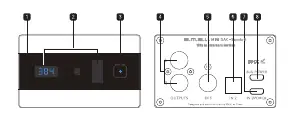
- Front: Remote window, display, and power/input key.
- Rear: Audio outputs, coaxial input, optical input, USB input, and auxiliary power supply input.
Remote Control
The remote control allows for full operation of the unit:
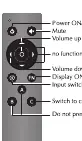
- Power ON/OFF: Toggle power.
- Mute: Mute audio output.
- Volume: Adjust volume levels.
- Display ON/OFF: Toggle the display.
- Input Switch: Cycle through inputs.
- C Key: Used to control the Sanskrit 10th.
Ensure a line of sight between the remote and the unit, within a distance of 5 meters (16 ft). Avoid direct sunlight or bright light on the signal receiver.
Operation
Power and Input: Hold the power/input key to switch the unit on or off. Press the key to cycle between inputs (in1, in2, in3).
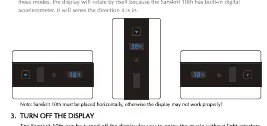
Display Settings: You can turn off the display using the 'FN' key on the remote. A blue LED will indicate the unit is on. Any operation will wake the display for 5 seconds.
Muting: Press the MUTE key on the remote to mute audio. If the display is on, it will flash the volume level.
Factory Reset
To perform a factory reset, plug in the power cable while holding down the POWER button until the unit turns on.
Specifications
The device supports the following technical parameters:
- Inputs: USB, Optical, Coaxial.
- Output Level: 2.1Vrms.
- THD+N: 0.0005%.
- Dynamic Range: 117dB.
- SNR: 118dB.
- USB Compatibility: Windows 7/8/8.1/10, Mac OS X10.6 or later, Linux.
- Sampling Rate (USB): PCM 44.1-384kHz, DSD 2.8224-11.2896MHz.
- Sampling Rate (Optical/Coaxial): 32-192kHz.
- Power Consumption: 1.5W (Standby <0.1W).
Practical help
Common problems
Display is not oriented correctly
Ensure the unit is placed horizontally. The device uses a built-in accelerometer to detect orientation.
Remote control is unresponsive
Check that 2x AAA batteries are installed. Ensure there is a clear line of sight to the receiver and avoid direct sunlight or bright light on the unit.
Display shows '---'
This indicates there is no input signal or the sampling rate exceeds the unit's range.
Before use
- Place the unit in a well-ventilated, cool, and dry location.
- Ensure the unit is placed horizontally for proper display orientation.
- Install 2x AAA batteries in the remote control.
- Connect audio sources to the appropriate inputs (USB, Optical, or Coaxial).
- If using a phone as a source, connect 5V DC power to the Aux Power input.
Specs in practice
- Output Level
- 2.1Vrms, the standard line-level output voltage.
- Power Consumption
- 1.5W during operation, less than 0.1W in standby.
Images and diagrams
- Front Panel: Shows the remote sensor, display screen, and the main power/input button.
- Rear Panel: Shows the layout of audio outputs and digital inputs (Coaxial, Optical, USB) and the Aux power port.
- Remote Control: Layout of buttons for power, volume, mute, and input selection.
Model compatibility
- USB Compatibility: Windows 7/8/8.1/10, Mac OS X10.6 or later, Linux.
- Aux Power: Do not use Quick-Charge power adapters; use a standard 5V DC power source.

Manual page author
Michael Turner
Technical manual editor
Reviews PDF manuals for structure, safety notes, and practical product details so readers can find the right information quickly.