Lighting / Fixtures
User Manual for Lucande 9616149 15W LED Outdoor Pillar Light
Quick guide for the Lucande 9616149 15W LED Outdoor Pillar Light. Includes installation steps, wiring instructions, and safety information for this IP65-rated outdoor fixture.
Table of contents
Quick guide from the manual
The Lucande 9616149 is a stationary outdoor pillar light designed for use along paths or in flower beds. It features an IP65 rating, ensuring protection against dust and water jets. Important: The LED light source and the control gear are integrated and cannot be replaced. If the light fails, the entire unit must be replaced.
Intended Use
This luminaire is intended for stationary outdoor use. It is suitable for installation along trails, paths, or in flower beds. Ensure the installation location is stable and suitable for outdoor conditions.
Package Contents
- 1x Pillar light
- Installation hardware
- Mounting instructions
Installation and Wiring
Before beginning installation, ensure the power supply is switched off at the mains. Follow these steps to install the light:
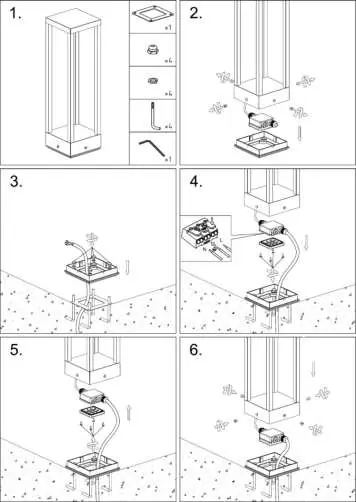
- Prepare the base and ensure all mounting hardware is available.
- Secure the base to the ground surface using the provided hardware.
- Prepare the electrical cable for connection.
- Connect the electrical wires to the terminal block. Ensure correct polarity: L (Live), Earth, and N (Neutral).
- Attach the light fixture to the secured base.
- Ensure all components are tightly fastened and the unit is stable before switching the power back on.
Technical Specifications
- Power: 15W LED
- Voltage: 230V ~ 50Hz
- Protection Class: IP65
Practical help
Common problems
Light does not turn on
Verify that the power supply is active and that the wiring connections (L, Earth, N) are secure and correctly matched to the terminal block.
Light source failure
The LED light source and control gear are non-replaceable. If the light stops working, the entire fixture must be replaced.
Before use
- Ensure the power supply is turned off before starting installation.
- Verify the mounting surface is stable and suitable for outdoor use.
- Check that all installation hardware is present.
- Confirm the electrical supply matches the 230V ~ 50Hz requirement.
Images and diagrams
- Step 1: Prepare the base and mounting hardware.
- Step 2-3: Secure the base to the ground.
- Step 4: Connect the electrical wires (L, Earth, N) to the terminal block.
- Step 5-6: Attach the light fixture to the base.
Model compatibility
- Designed for stationary outdoor use on trails or flower beds.
- Light source and control gear are non-replaceable.

Manual page author
David Miller
Documentation analyst
Organizes user manual content into clear summaries, with attention to model details, product context, and everyday usability.