Lighting / Outdoor Lighting
SOLPAD 10W Multifunctional Solar Flood Light
Quick guide for the SOLPAD 10W solar flood light. Learn about installation, solar panel angle adjustment, remote control operating modes, and technical specifications.
Table of contents
Manual images
Click an image to enlargeQuick guide from the manual
Before using the SOLPAD 10W for the first time, the solar panel must be charged in full sunlight for 8 to 9 hours to ensure optimal performance. The lamp is designed to light up automatically at dusk. Please note that during continuous rainy or cloudy days, the run time may be reduced as the battery will not be fully charged. The internal battery pack is replaceable; if needed, contact support for the correct replacement.
Installation
The fixture supports both wall and pole mounting.
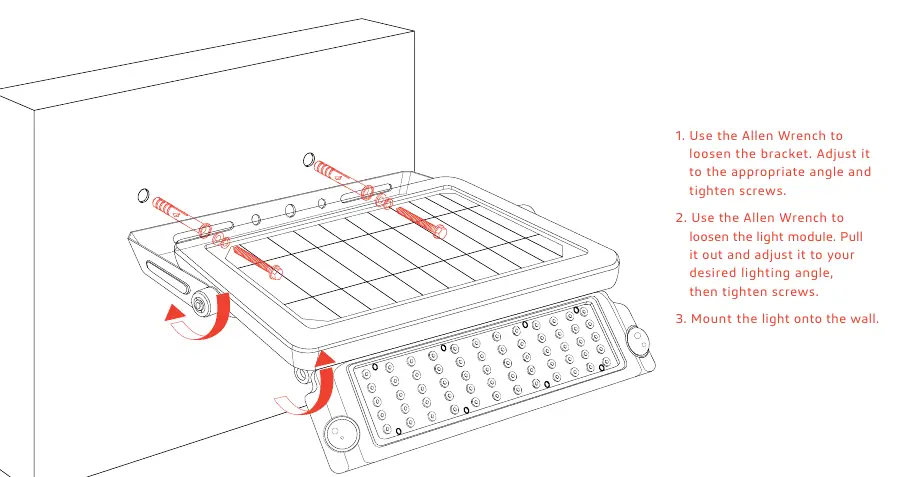
Wall Mount
- Use the Allen wrench to loosen the bracket and adjust it to the appropriate angle, then tighten the screws.
- Use the Allen wrench to loosen the light module, pull it out, adjust it to the desired lighting angle, and tighten the screws.
- Mount the light onto the wall.
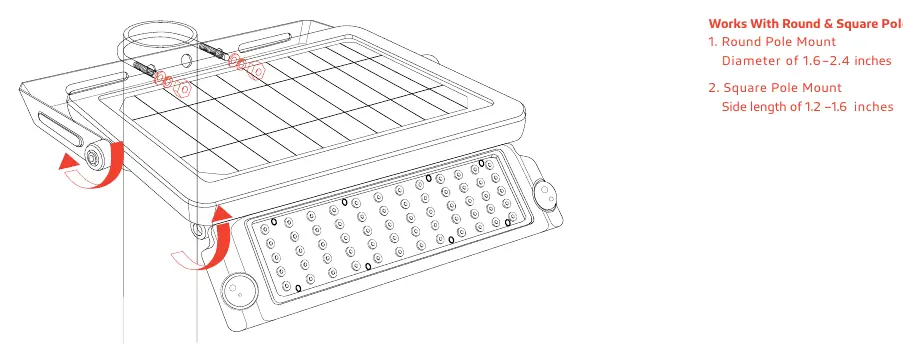
Lamp-Post Mount
The fixture is compatible with round and square poles:
- Round Pole Mount: Supports diameters of 1.6 to 2.4 inches.
- Square Pole Mount: Supports side lengths of 1.2 to 1.6 inches.
Remote Control
The remote control allows you to select from 4 operating modes:
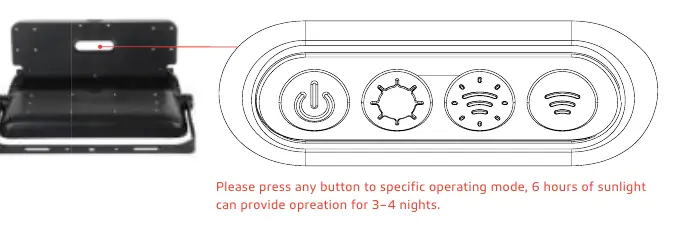
- On / Off: Manual power control.
- Constant Lighting Mode: Automatically turns on at dusk and remains at 20% brightness.
- Full Bright & Dim: Automatically turns on to full brightness (1000 lm) when motion is detected within ≤26 ft, then reduces to 3% brightness after 20 seconds of no motion.
- Full Bright & Off: Automatically turns on to full brightness (1000 lm) when motion is detected within ≤26 ft, then turns off after 30 seconds of no motion.
Panel Angle
To maximize solar energy collection, angle your solar panels based on your area's latitude. You can increase the tilt by 15° in the winter or decrease it by 15° in the summer to optimize sunlight intake. While south-facing panels are ideal, east, west, and north-facing installations will still function, though charging may take longer.

Specifications
- LED Nominal Power: 10W
- Lumen Output: 1000 lm
- Solar Panel: Mono-Crystalline 5.5V 6W
- Battery: 27WH 3.7V 7.2AH
- CCT: 4000K & 5000K
- IP Rating: IP65 (Water, dirt, and dust protection)
- PIR Sensor: 180° detection angle, 16–26 ft range
- Operating Temperature: -5 °F to 113 °F
Warranty
The SOLPAD 10W is covered by a 3-year limited warranty against defects in materials and workmanship. Contact your local distributor or sales representative for warranty service.
Practical help
Common problems
Reduced run time
Occurs during continuous rainy or cloudy days as the battery will not be fully charged.
Lamp not activating after battery replacement
Allow the solar panel to receive maximum sunshine to activate the lamp.
Battery not charging
Ensure the solar panel is pointed directly at solar radiation (standard value 1000W/m2).
Before use
- Charge the solar panel in full sunlight for 8 to 9 hours before initial use.
- Verify the mounting surface is suitable for wall or pole mount.
- Check that the solar panel angle is optimized for your latitude.
- Ensure the battery is properly installed if it was removed.
Specs in practice
- Charging Time
- 7 hours under standard solar radiation (1000W/m2).
Images and diagrams
- Wall Mount: Illustrates using an Allen wrench to adjust the bracket and light module angles.
- Lamp-Post Mount: Shows compatibility with round (1.6–2.4 inch) and square (1.2–1.6 inch) poles.
- Remote Control: Displays the four operating mode buttons.
- Panel Angle: Shows the recommended tilt angles based on latitude.
Model compatibility
- Round Pole Mount: Diameter of 1.6–2.4 inches.
- Square Pole Mount: Side length of 1.2–1.6 inches.

Manual page author
David Miller
Documentation analyst
Organizes user manual content into clear summaries, with attention to model details, product context, and everyday usability.